Introduction
Chocolate chip cookies are a cherished classic, beloved by many for their delightful combination of chewy texture and rich flavors. The mere mention of these cookies evokes a sense of nostalgia, often transporting us back to warm afternoons spent in the kitchen, the sweet aroma wafting through the air, and the joyful anticipation of indulging in a freshly baked treat. Whether enjoyed as an after-school snack or a comforting late-night dessert, homemade chocolate chip cookies have a unique way of bringing people together.
The secret to achieving the perfect chocolate chip cookie lies in the quality of the ingredients used. While the recipe may seem simple, the nuances of each component can significantly impact the final result. From the buttery richness to the gooey chocolate chunks, every detail matters in crafting a cookie that is truly irresistible.
In this comprehensive guide, we will explore everything you need to know about making homemade chocolate chip cookies, including a detailed list of ingredients, step-by-step instructions, variations to try, and tips for storing your cookies to maintain their freshness. Whether you’re a seasoned baker or a novice in the kitchen, this guide is designed to help you create cookies that will impress your family and friends.
Understanding the Ingredients
To bake the ultimate chocolate chip cookies, it’s essential to understand the role each ingredient plays in the recipe. Here, we’ll break down the key components that contribute to the cookies’ flavor, texture, and overall success.
All-Purpose Flour
At the heart of any cookie recipe is flour, which provides the structure. All-purpose flour is the most common choice for chocolate chip cookies due to its balanced protein content, which allows for a chewy yet tender texture. When measuring flour, it’s crucial to avoid packing it into the measuring cup, as too much flour can lead to dense cookies. Instead, spoon the flour into the cup and level it off for the most accurate measurement.
Baking Soda and Baking Powder
These two leavening agents are often used in cookie recipes to help the cookies rise and achieve that perfect spread. Baking soda is a base that reacts with acidic ingredients (like brown sugar) to create carbon dioxide, resulting in a light and airy texture. Baking powder contains both an acid and a base, and is used when a recipe doesn’t include other acidic ingredients. In most chocolate chip cookie recipes, baking soda is preferred for its ability to enhance browning and contribute to the cookies’ chewy texture.
Unsalted Butter vs. Salted Butter
Butter is the star of the show in chocolate chip cookies, imparting a rich flavor and moistness. The choice between unsalted and salted butter can affect the overall taste of the cookies. Unsalted butter allows for greater control over the amount of salt in the recipe, enabling bakers to adjust according to personal preference. Salted butter, on the other hand, adds a savory element that can enhance the sweetness of the cookies. For the best results, using unsalted butter is often recommended, allowing you to add salt precisely as needed.
Granulated Sugar and Brown Sugar Differences
The combination of granulated sugar and brown sugar is what gives chocolate chip cookies their signature flavor and texture. Granulated sugar contributes to the crispness of the edges, while brown sugar, which contains molasses, adds moisture and a deeper flavor. This combination yields cookies that are chewy in the center with a slightly crisp exterior. Some recipes may even suggest using a small amount of coarse sugar for sprinkling on top before baking, which adds a delightful crunch.
Eggs and Their Role in Texture
Eggs serve multiple functions in cookie recipes: they provide moisture, act as a binding agent, and add richness. The number of eggs used can influence the texture of the cookies, with more eggs resulting in a cakier cookie, while fewer eggs create a denser and chewier cookie. Most chocolate chip cookie recipes call for one or two large eggs, which should be at room temperature to ensure even mixing.
Chocolate Chips: Types and Quality Considerations
The choice of chocolate chips can make or break your cookies. Semi-sweet chocolate chips are the traditional option, offering a perfect balance of sweetness and richness. However, you can also experiment with milk chocolate chips for a sweeter cookie or dark chocolate chips for a more intense chocolate flavor. High-quality chocolate chips will melt beautifully, creating gooey pockets of chocolate in your cookies. For an added twist, consider using chopped chocolate bars, which can provide a variety of textures and flavors.
Optional Ingredients and Their Impact
While the classic chocolate chip cookie recipe is simply delightful on its own, you can elevate your cookies with various optional ingredients. For instance, adding chopped nuts like walnuts or pecans can introduce a satisfying crunch and nuttiness. Incorporating oats can create a chewy texture and a wholesome element, while dried fruits such as cranberries or cherries can add a touch of tartness. These optional ingredients allow you to customize your cookies to suit your taste preferences and create unique flavor profiles.
Preparing Your Kitchen
Before diving into the baking process, it’s essential to prepare your kitchen for success. Having the right tools and equipment at your disposal can streamline the process and ensure that everything goes smoothly.
Essential Tools and Equipment
1. Mixing Bowls and Measuring Cups: Invest in a set of mixing bowls in various sizes for easy ingredient preparation. Accurate measuring cups (both dry and liquid) are crucial for achieving the correct proportions in your cookie dough.
2. Baking Sheets and Parchment Paper: A solid, rimmed baking sheet is ideal for spreading cookies evenly. Lining your baking sheet with parchment paper ensures easy removal of the cookies and minimizes cleanup.
3. Electric Mixer vs. Hand Mixer: While a hand mixer can suffice for mixing the dough, an electric stand mixer can save time and effort, especially when creaming butter and sugars together. If you opt for a hand mixer, ensure it is powerful enough to handle the thick cookie dough.
4. Setting Up Your Workspace for Efficiency: Organize your workspace by gathering all ingredients and tools before you start baking. This ensures that you won’t have to run around searching for items mid-recipe. Consider pre-measuring your ingredients for a more efficient baking experience.
Step-by-Step Instructions for the Perfect Cookie Dough
Now that you have a grasp of the essential ingredients and tools, it’s time to dive into the step-by-step instructions for creating the perfect chocolate chip cookie dough. Follow these steps carefully to ensure your cookies turn out just right.
Creaming the Butter and Sugars: Achieving the Right Texture
Start by placing your softened unsalted butter in a large mixing bowl. Using an electric mixer, cream the butter until it is light and fluffy. This process usually takes about 2-3 minutes on medium speed. Next, gradually add in the granulated and brown sugars, continuing to mix until the mixture is well combined and creamy. This step is crucial, as it incorporates air into the dough, contributing to a lighter texture in the finished cookies.
Gradually Incorporating the Eggs
Once the butter and sugars are creamed together, it’s time to add the eggs. Crack the eggs into a separate bowl to avoid any shell fragments, then add them one at a time to the creamed mixture. Beat well after each addition, ensuring that the eggs are fully incorporated before adding the next. This gradual incorporation helps achieve a smooth and homogenous dough.
Mixing in Dry Ingredients: Flour, Baking Soda, and Salt
In a separate bowl, whisk together the all-purpose flour, baking soda, and salt. This step helps to evenly distribute the leavening agents and salt throughout the flour. Gradually add the dry ingredients to the wet mixture, mixing on low speed until just combined. Be careful not to overmix the dough, as this can lead to tough cookies. The dough should be soft and slightly sticky.
Folding in the Chocolate Chips
Finally, it’s time to add the star of the show: the chocolate chips. Using a spatula or wooden spoon, gently fold in the chocolate chips until they are evenly distributed throughout the dough. If you’re adding any optional ingredients, such as nuts or oats, this is the time to incorporate them as well.
Common Mistakes to Avoid During the Mixing Process
While making cookie dough may seem straightforward, there are a few common mistakes to be aware of:
1. Overmixing the Dough: Mixing the dough too much can lead to tough cookies. Mix until just combined for the best texture.
2. Incorrect Measurements: Baking is a science, and accurate measurements are crucial. Always double-check that you’re using the correct measuring cups for dry and wet ingredients.
3. Not Softening Butter Properly: If your butter is too cold, it will not cream properly with the sugars. Aim for room temperature butter that’s soft but not melted.
By following these steps and avoiding common pitfalls, you’ll be well on your way to creating delicious homemade chocolate chip cookies that are sure to please everyone!
Stay tuned for the next part of this guide, where we will explore the importance of chilling the dough and how to bake your cookies to perfection.
Enhanced Flavor Development
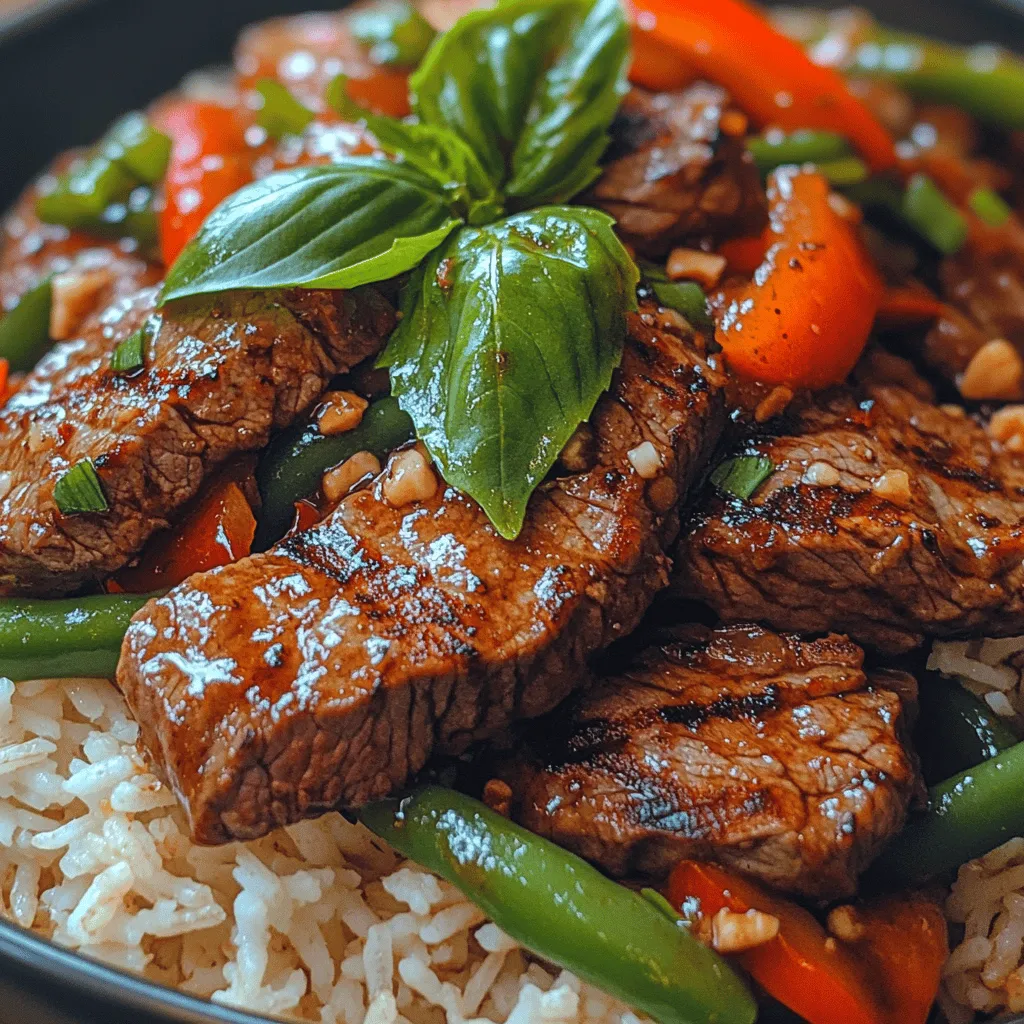
To elevate the flavor of your Aromatic Thai Basil Beef Stir Fry, start by marinating your beef. A simple marinade of soy sauce, oyster sauce, and a hint of sugar will not only tenderize the meat but also infuse it with a savory depth. Allow the beef to sit in the marinade for at least 30 minutes, or even overnight if time permits. This soaking process allows the flavors to penetrate the meat thoroughly, enhancing the overall taste of your stir fry.
Additionally, consider the timing of adding your aromatics. Garlic and ginger should be sautéed first to release their essential oils before adding the beef. This timing ensures that the aromatics’ flavors are well integrated into the dish, creating a rich, fragrant base. Finally, finish the dish with a splash of fish sauce and a sprinkle of fresh lime juice just before serving. This will brighten the dish, adding a layer of complexity that perfectly complements the deep flavors of the beef.
Improved Texture: Chewy vs. Crispy
Texture plays a crucial role in the overall enjoyment of your stir fry. For a chewy beef texture, choose cuts like sirloin or flank steak, which are tender yet firm when cooked. Cut the beef against the grain into thin slices; this technique breaks down the muscle fibers, resulting in a tender bite. If you prefer a crispy texture, consider stir-frying the beef in batches. This method ensures that the meat gets a good sear on all sides, creating a delightful contrast to the tender vegetables.
When it comes to the vegetables, use a mix of crisp and tender varieties. Bell peppers, broccoli, and snap peas retain their crunch and add a vibrant color to your dish. Stir-frying them briefly ensures they maintain their texture while absorbing the flavors of the sauce. Remember, the secret to achieving the perfect stir fry lies in the high heat and quick cooking method, so have all your ingredients prepped and ready to go before you start cooking.
Recommended Chilling Times and Tips for Effective Chilling
While chilling may not be a common step in preparing stir fry, preparing your ingredients in advance can greatly enhance the cooking experience. After your beef is marinated, allow it to chill in the refrigerator for an optimal flavor boost. A chilling time of at least 30 minutes is recommended, but if you have the luxury of time, letting it marinate overnight will yield the best results.
For vegetables, a brief chill can help them retain their crispness. Place sliced bell peppers and other vegetables in ice water for about 10 minutes before cooking. This not only keeps them crisp but also refreshes their color. When you’re ready to cook, make sure to drain them well to avoid excess moisture in your stir fry, which can lead to steaming rather than stir-frying.
Baking the Cookies
Preheating the Oven: Optimal Temperatures for Baking
When transitioning to baking the cookies, preheating your oven to the correct temperature is essential for ensuring even baking. For chocolate chip cookies, set your oven to 350°F (175°C). This temperature allows the cookies to bake evenly, achieving a golden brown exterior while remaining soft and chewy inside. Preheating is crucial because placing dough in a cold oven can lead to uneven baking and undesirable textures.
Portioning the Dough: Achieving Uniform Cookie Sizes
Uniform cookie sizes ensure that all cookies bake evenly. Use a cookie scoop or a tablespoon to portion out your dough. Aim for balls of dough that are about 1.5 inches in diameter for standard-sized cookies. This size will yield cookies that are perfectly soft in the center yet slightly crisp on the edges. For a more gourmet touch, you can weigh the dough portions; typically, 30 grams per cookie works well.
Baking Times: How to Know When Cookies Are Done
Baking times can vary depending on your oven’s specifics and the size of your cookies. Generally, chocolate chip cookies take about 10-12 minutes at 350°F. To determine if they are done, look for cookies that are lightly golden around the edges but still soft in the center. They will continue to cook slightly as they cool on the baking sheet, achieving that perfect chewy texture. If you prefer a firmer cookie, add an extra minute or two to the baking time.
Tricks for Even Baking and Preventing Spreading
To prevent your cookies from spreading too much while baking, ensure that your butter is not too warm. Room temperature butter (soft but not melted) is ideal for achieving the right texture. Additionally, chilling your cookie dough for at least 30 minutes before baking can help control spreading. You can also line your baking sheet with parchment paper to promote even heat distribution and easy removal of cookies post-baking.
Cooling and Serving Suggestions
Best Practices for Cooling Cookies on Racks
Once your cookies are baked to perfection, remove them from the oven and let them cool on the baking sheet for about 5 minutes. This allows them to set before transferring them to a wire rack. Place the cookies on a wire rack to cool completely. This method prevents them from becoming soggy on the bottom, ensuring they maintain their delightful texture.
Creative Serving Ideas: Pairing with Milk, Ice Cream Sandwiches, or Gourmet Toppings
When serving your cookies, consider classic pairings that enhance their flavor. A glass of cold milk is a timeless companion for chocolate chip cookies, but you can elevate your serving game by creating ice cream sandwiches. Simply place a scoop of your favorite ice cream between two cookies for a delicious treat. For a gourmet touch, try drizzling your cookies with melted chocolate or caramel sauce, or sprinkling them with sea salt for a hint of savory contrast.
Presentation Tips for Special Occasions
If you’re hosting a gathering, consider presenting your cookies in a decorative manner. Stack them on a beautiful platter, or arrange them in a mason jar tied with a ribbon for a charming gift idea. For a festive touch, dust the cookies with powdered sugar or place them in colorful cupcake liners.
Variations on the Classic Chocolate Chip Cookie
Different Types of Chocolate Chips: Dark, Milk, and White Chocolate
One of the easiest ways to put a twist on classic chocolate chip cookies is by experimenting with different types of chocolate chips. Dark chocolate chips offer a rich, bittersweet flavor that pairs well with the sweetness of the cookie. Milk chocolate chips provide a more traditional sweet flavor, while white chocolate chips add a creamy touch. You can also blend different types of chips for a unique flavor experience.
Flavor Enhancements: Vanilla Extract, Espresso Powder, or Sea Salt
To elevate the flavor profile of your cookies further, consider adding a teaspoon of espresso powder to the dough. This enhances the chocolate flavor without making the cookies taste like coffee. A splash of vanilla extract is essential for a classic taste, while a sprinkle of flaky sea salt on top before baking can create an irresistible sweet-salty combination.
Alternative Flours for Gluten-Free Options
For those looking for gluten-free alternatives, consider using almond flour or a gluten-free all-purpose flour blend. These options can yield delicious cookies while accommodating various dietary restrictions. Be sure to check that your baking powder and chocolate chips are also gluten-free to maintain the integrity of the recipe.
Vegan Adaptations: Egg Substitutes and Plant-Based Butter
Creating vegan chocolate chip cookies is easier than one might think. Replace the eggs with flaxseed meal or chia seeds mixed with water to create a binding effect. You can also substitute traditional butter with plant-based butter or coconut oil, ensuring your cookies remain rich and delightful without animal products.
Creative Uses for Leftover Cookie Dough
Freezing Cookie Dough for Future Baking
If you have leftover cookie dough, freezing it is a fantastic option. Portion the dough into balls, place them on a baking sheet, and freeze until solid. Once frozen, transfer the dough balls to a zip-top bag and store them in the freezer for up to three months. This method allows you to enjoy freshly baked cookies at a moment’s notice; simply bake straight from frozen, adding a couple of extra minutes to the baking time.
Recipes Using Leftover Dough: Cookie Crusts or Bars
Leftover cookie dough can also be repurposed for other delicious treats. Press the dough into the bottom of a greased baking pan to create a cookie crust for pies or cheesecakes. Alternatively, you can bake the dough in a larger pan to create cookie bars, adjusting the baking time to accommodate the thicker layer of dough.
Innovative Desserts That Incorporate Cookies
Consider using your cookies in creative desserts. Crumble cookies over ice cream for a delightful sundae topping or incorporate them into a delicious milkshake. You can also layer crumbled cookies with whipped cream and pudding for a quick and easy dessert parfait.
Storing Your Chocolate Chip Cookies
Best Practices for Storing Fresh Cookies
To keep your freshly baked cookies at their best, store them in an airtight container at room temperature. This will lock in moisture and keep them soft. If you prefer a firmer cookie, place parchment paper between layers to allow air circulation, preventing them from becoming too chewy.
How to Keep Cookies Soft and Chewy
To maintain the soft and chewy texture of your cookies, include a slice of bread in the container with them. The bread will absorb excess moisture, keeping the cookies from drying out. Replace the bread slice every few days to maintain freshness.
Long-Term Storage Options: Freezing Cookies and Dough
For long-term storage, consider freezing your baked cookies. Place them in a single layer on a baking sheet until frozen solid, then transfer them to a freezer-safe bag. This will allow you to enjoy delicious cookies even weeks after baking. For cookie dough, follow the freezing instructions mentioned earlier to ensure you have dough ready for spontaneous baking sessions.
Conclusion
Homemade Aromatic Thai Basil Beef Stir Fry is not just a dish; it’s an experience that brings together bold flavors and delightful textures. The joy of creating this dish, paired with the satisfaction of sharing it with loved ones, is truly rewarding. Don’t hesitate to experiment with variations of the recipe to suit your taste preferences or dietary needs. From different cuts of beef to a medley of vegetables, the possibilities are endless.
As you explore this recipe and its variations, remember that cooking is as much about creativity as it is about following instructions. Embrace the process, enjoy the aromas filling your kitchen, and savor the moments spent with family and friends over a delicious meal. Your journey with Aromatic Thai Basil Beef Stir Fry may just become a staple in your culinary repertoire, bringing joy and flavor to your dining table for years to come.