Introduction
If you’re on the hunt for a dish that combines delightful sweetness with an irresistible crunch, look no further than Sweet & Crunchy Honey Chicken. This delectable recipe has won over the hearts of many, thanks to its perfect blend of flavors and textures. Imagine succulent pieces of chicken, coated in a crispy shell, and drizzled with a rich honey sauce that brings everything together beautifully. Whether you’re planning a family dinner or looking to impress guests at your next gathering, this dish is a crowd-pleaser that will leave everyone asking for seconds.
The appeal of Sweet & Crunchy Honey Chicken lies not just in its flavor but also in its versatility. It can be served over rice, nestled into a wrap, or enjoyed on its own, making it an ideal dish for various occasions. The balance of sweet and savory flavors, combined with the satisfying crunch, makes it a comfort food favorite for many.
The Allure of Sweet & Crunchy Honey Chicken
Sweet & Crunchy Honey Chicken is a dish that transcends cultural boundaries, with variations found in Chinese-American cuisine and beyond. Its popularity can be attributed to the unique way it showcases the delectable pairing of honey and chicken, making it a go-to choice for those seeking a delightful meal. The dish is not only flavorful but also visually appealing, making it an excellent option for both casual family meals and more formal gatherings.
One of the key elements that elevate this dish is the interplay of textures and flavors. The juicy chicken contrasts beautifully with the crispy coating, while the honey sauce adds a layer of sweetness that ties everything together. Comfort food often revolves around these satisfying combinations, providing a sense of warmth and nostalgia with each bite.
Making Sweet & Crunchy Honey Chicken at home offers several benefits compared to ordering takeout. For one, you can control the ingredients and customize the flavors to suit your preferences. Additionally, preparing this dish in your own kitchen allows you to enjoy the aroma of freshly cooked chicken, enhancing the overall dining experience. The knowledge that you’ve created this delicious meal from scratch adds an extra layer of satisfaction to your culinary endeavor.
Ingredients Breakdown
Chicken
The foundation of any great Sweet & Crunchy Honey Chicken recipe is, of course, the chicken itself. For the best results, boneless, skinless chicken thighs are highly recommended. This cut of meat is known for its juiciness and tenderness, making it a perfect choice for frying. Unlike chicken breasts, which can dry out easily, thighs retain moisture during cooking, ensuring a succulent bite every time.
Coating
The coating is what truly makes this dish stand out. To achieve that desired crunch, a mixture of flour and cornstarch is used. This combination allows for a light yet crispy exterior that perfectly complements the tender chicken inside. The cornstarch contributes to a satisfying crunch, while the flour provides structure.
In addition to the flour and cornstarch, several seasonings enhance the overall flavor profile. Baking powder is included to help achieve that extra crispiness during frying, while garlic powder, onion powder, salt, and pepper add depth and complexity to the coating. Each of these ingredients plays a crucial role in elevating the dish beyond the ordinary.
Honey Sauce Ingredients
The sweet and sticky honey sauce is the star of the show. Made with simple ingredients, the sauce is a blend of honey, soy sauce, ginger, and garlic. Honey, as a natural sweetener, not only adds flavor but also provides various health benefits, including antioxidants and antibacterial properties.
Soy sauce contributes a savory depth, balancing the sweetness of the honey. Fresh ginger and garlic add warmth and depth, creating a well-rounded sauce that elevates the chicken to new heights. For those who enjoy a bit of heat, red pepper flakes can be added to the sauce, providing an exciting contrast to the sweetness.
Step-by-Step Preparation of Sweet & Crunchy Honey Chicken
Preparation of the Chicken
To begin your culinary journey, start by preparing the chicken. Cut the boneless, skinless chicken thighs into bite-sized pieces, ensuring they are uniform in size for even cooking. This step is crucial as it allows the chicken to cook thoroughly and ensures that each piece absorbs the honey sauce beautifully.
Once the chicken is cut, it’s essential to season it well. A simple sprinkle of salt and pepper will enhance its natural flavor, setting the stage for the coating to shine. Allow the seasoned chicken to rest for a few minutes while you prepare the coating mixture.
The Coating Process
For the coating, combine flour, cornstarch, baking powder, garlic powder, onion powder, salt, and pepper in a mixing bowl. Whisk these dry ingredients together until they are well incorporated. The key to achieving that perfect crunch lies in the coating process.
Take each piece of chicken and dredge it in the flour and cornstarch mixture, ensuring that every surface is evenly covered. An effective technique is to place the chicken pieces in a resealable plastic bag with the dry mixture. Seal the bag and shake gently to coat the chicken evenly. This method not only ensures coverage but also reduces mess, making clean-up a breeze.
Frying the Chicken
Now that the chicken is coated, it’s time to fry it to crispy perfection. Heat a generous amount of oil in a deep skillet or frying pan over medium-high heat. The optimal oil temperature for frying should be around 350°F (175°C). To test if the oil is ready, drop a small piece of the coating mixture into the oil; if it sizzles and bubbles, then you’re good to go.
Carefully add the coated chicken pieces to the hot oil in batches, ensuring you do not overcrowd the pan. Fry the chicken until it is golden brown and crispy, which typically takes about 4-6 minutes per batch. Use a slotted spoon to remove the chicken from the oil, allowing excess oil to drain off before transferring the pieces to a paper towel-lined plate. This step is crucial for maintaining that delightful crunch that everyone loves.
With the chicken fried to perfection, you’re just a few steps away from enjoying a plate of Sweet & Crunchy Honey Chicken. The next phase involves making the honey sauce that will elevate this dish to new heights. Stay tuned for the final touches that will transform your crispy chicken into a sweet and savory delight!

Tips for Cooking in Batches
When making Sweet & Crunchy Honey Chicken, one of the key factors to achieving that perfectly crispy texture is managing the oil temperature effectively. If you’re frying multiple batches of chicken, it’s crucial to maintain a consistent oil temperature. Here’s how to do it:
1. Use a Thermometer: Keep an eye on the oil temperature using a deep-fry thermometer. The ideal frying temperature for chicken is around 350°F (175°C).
2. Do Not Overcrowd the Pan: Fry the chicken in small batches. Overcrowding can lower the oil temperature drastically, resulting in soggy chicken.
3. Allow the Oil to Reheat: After frying each batch, give the oil a moment to regain its temperature before adding the next batch. This ensures that each piece gets the crispy finish you desire.
Importance of Draining Excess Oil
Once your chicken has reached a beautiful golden brown, it’s essential to drain the excess oil for a less greasy finish. Here’s how to do it effectively:
1. Use a Wire Rack: After frying, transfer the chicken pieces to a wire rack placed over a baking sheet. This allows any excess oil to drip off while keeping the chicken crispy.
2. Paper Towels for Absorption: If you don’t have a wire rack, place the fried chicken on a plate lined with paper towels. This will help absorb the oil, ensuring your chicken remains crunchy and not greasy.
Crafting the Honey Sauce
The honey sauce is what elevates this dish, bringing a sweet and savory dimension to the crispy chicken. Here’s how to craft it perfectly:
1. Ingredients for the Sauce: You will need honey, soy sauce, garlic, ginger, and a splash of rice vinegar for acidity.
2. Simmering Techniques: In a small saucepan, combine the honey, soy sauce, minced garlic, grated ginger, and rice vinegar. Bring the mixture to a gentle simmer over medium heat.
3. Desired Consistency: Allow the sauce to simmer for about 5-7 minutes, stirring occasionally. It should thicken slightly but remain pourable. If you prefer a thicker sauce, let it simmer longer or add a cornstarch slurry (1 tablespoon cornstarch mixed with 2 tablespoons water) for extra thickness.
Balancing Flavors in the Sauce
Achieving the perfect balance of flavors in your honey sauce is crucial. Here are some tips:
1. Taste as You Go: Start with the base ingredients and adjust according to your preference. If it’s too sweet, add a bit more soy sauce or vinegar for saltiness and acidity.
2. Add Heat: For those who enjoy a spicy kick, consider adding red pepper flakes or a dash of sriracha to the sauce. This contrast will enhance the overall flavor profile.
Combining Chicken and Sauce
Once your sauce is ready, it’s time to combine it with the crispy chicken. Follow these steps:
1. Tossing Technique: Place the fried chicken in a large bowl and pour the honey sauce over it. Using a spatula or wooden spoon, gently toss the chicken until each piece is evenly coated. Be careful not to break the coating as you mix.
2. Let It Rest: Allow the chicken to sit for a few minutes after tossing. This will help the sauce adhere better to the chicken.
Serving Suggestions
Sweet & Crunchy Honey Chicken pairs wonderfully with various accompaniments. Here are some ideas:
1. Steamed Rice: Serve your honey chicken over a bed of fluffy steamed rice. The rice will soak up the delicious sauce, making each bite even better.
2. Vegetable Stir-Fry: A colorful vegetable stir-fry complements the chicken perfectly. Use bell peppers, broccoli, and snap peas for a vibrant plate.
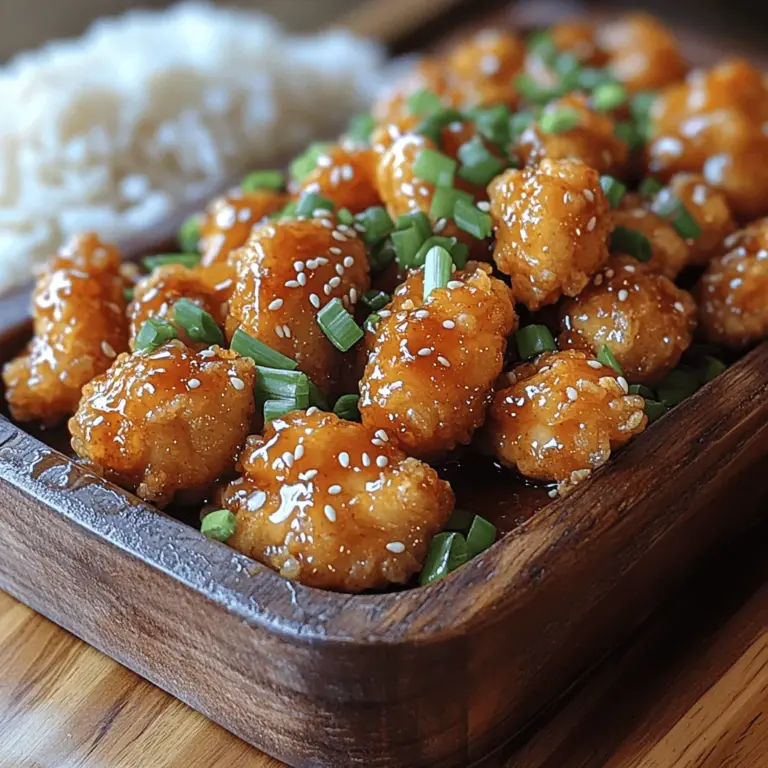
3. Garnishing: Enhance the dish’s presentation by garnishing with sliced green onions and sesame seeds. This not only adds visual appeal but also a fresh flavor and crunch.
Presentation Tips
1. Plate Like a Pro: Use a large, shallow plate to give your dish room to breathe. Lay down a base of rice, then artfully arrange the honey chicken on top.
2. Add Color: Incorporate bright vegetables around the chicken for a pop of color. This makes the dish more inviting and appetizing.
Nutritional Information
Understanding the nutritional aspects of your Sweet & Crunchy Honey Chicken can help you enjoy it more mindfully. Here’s a brief overview:
1. Caloric Breakdown: A typical serving of this dish contains approximately 400-500 calories, depending on portion sizes and accompaniments.
2. Health Considerations: While this dish is indulgent, it can be made healthier by using skinless chicken breast and reducing the amount of honey in the sauce.
3. Making It Healthier: Consider using whole grain rice or quinoa as a base and adding more vegetables to increase fiber and nutrients without sacrificing flavor.
Tips for Perfecting Your Honey Chicken
To ensure your Sweet & Crunchy Honey Chicken turns out perfectly every time, keep these tips in mind:
1. Common Pitfalls: Avoid using too much oil, which can lead to a greasy finish. Also, ensure the chicken is fully coated in the batter before frying to prevent clumping.
2. Flavor Variations: Experiment with different flavor profiles by adding citrus zest for freshness or adjusting the sweetness with more honey or less soy sauce.
3. Storage and Reheating: Store any leftovers in an airtight container in the refrigerator for up to three days. To reheat, place the chicken in an oven at 350°F (175°C) for about 10-15 minutes to regain its crispiness.
Conclusion
Sweet & Crunchy Honey Chicken is a delightful dish that is sure to impress at any meal. With its perfect combination of sweet and savory flavors, it’s a must-try recipe that appeals to both adults and children alike. Don’t hesitate to explore various serving ideas and flavor adjustments to make this dish your own. Enjoy it with family and friends, creating memorable dining experiences filled with laughter and good food. Whether served as a weeknight dinner or a special occasion meal, this honey chicken recipe promises to be a crowd-pleaser.
