In recent years, the world of desserts has seen a remarkable shift towards healthier options that do not compromise on taste. The growing popularity of high-protein recipes reflects a broader trend among health-conscious individuals seeking indulgent treats that fit within their nutritional goals. Among these delightful concoctions, Protein Peanut Butter Cheesecake Cups stand out as a scrumptious and nutritious choice for dessert lovers. These little cups not only satisfy your sweet tooth but also pack a powerful punch of protein, making them perfect for anyone looking to maintain a balanced diet without sacrificing flavor.
The Allure of Protein Peanut Butter Cheesecake Cups
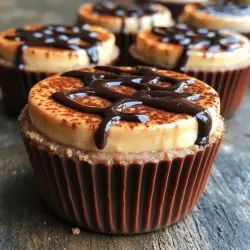
Protein Peanut Butter Cheesecake Cups are a delightful fusion of creamy cheesecake and rich peanut butter, all while being guilt-free. This recipe is a fantastic way to indulge in dessert without the usual calorie overload, thanks to the carefully chosen ingredients that offer both health benefits and taste. With each bite, you’ll experience the satisfying combination of textures and flavors, making these cups a perfect post-workout treat or a sweet snack during the day.
The main ingredients of this recipe are not just tasty; they also bring numerous health benefits to the table. Low-fat cream cheese and Greek yogurt create a creamy texture while keeping the calorie count down. Peanut butter serves as a high-quality protein source, providing essential nutrients that help fuel your body. Natural sweeteners like honey or maple syrup offer a healthier alternative to refined sugars, ensuring that you enjoy your dessert without the sugar crash that often follows traditional sweets. Additionally, protein powder enhances the overall protein content, making these cheesecake cups a fantastic option for anyone looking to increase their protein intake.
Understanding the Ingredients
To create the perfect Protein Peanut Butter Cheesecake Cups, it’s essential to understand the key ingredients and their health benefits. Here’s a closer look at each component of this delicious recipe:
Low-Fat Cream Cheese and Greek Yogurt
Low-fat cream cheese is an excellent choice for this recipe as it provides the signature creaminess of traditional cheesecake while reducing the fat content. It retains the rich flavor that cheesecake lovers crave, making it a perfect base for our dessert. Greek yogurt adds another layer of creaminess, along with a boost of protein and probiotics. Probiotics are beneficial for gut health, making this dessert not only a treat for your taste buds but also a support for your digestive system.
Peanut Butter: A Protein Powerhouse
Peanut butter is a star ingredient in this recipe, and for good reason. It is rich in protein, healthy fats, and essential vitamins and minerals, including vitamin E, magnesium, and potassium. The protein content helps to keep you feeling full, making these cheesecake cups a satisfying snack that can curb your cravings. Additionally, the healthy fats in peanut butter contribute to heart health, making it a nutritious choice when consumed in moderation.
Natural Sweeteners
When it comes to sweetening our cheesecake cups, opting for natural sweeteners like honey or maple syrup is a game-changer. These alternatives not only provide sweetness but also offer additional nutrients compared to refined sugars. Honey is known for its antioxidant properties and can help boost your immune system. Maple syrup, on the other hand, is packed with minerals like manganese and zinc, making it a healthier option for sweetening your desserts.
Protein Powder
Adding protein powder to the mix elevates the nutritional profile of these cheesecake cups even further. Protein powder can help with muscle recovery after workouts, making these cups an ideal post-exercise treat. It also contributes to the overall texture of the filling, helping to create a denser, creamier cheesecake that is rich in flavor. There’s a variety of protein powders available on the market—whey, casein, and plant-based options—allowing you to choose the one that best fits your dietary preferences.
Optional Ingredients: Cocoa Powder and Dark Chocolate Chips
For those who want an extra touch of flavor, cocoa powder and dark chocolate chips can be added to the recipe. Cocoa powder not only enhances the chocolatey flavor of the cups but also provides antioxidants, which are beneficial for overall health. Dark chocolate chips, when used in moderation, can add a delightful richness and a bit of indulgence to your dessert. They are also known for their heart-healthy properties, making them a perfect addition to these cheesecake cups.
Step-by-Step Breakdown of the Recipe
Now that we have a solid understanding of the ingredients and their benefits, let’s dive into the step-by-step process of making Protein Peanut Butter Cheesecake Cups. This detailed breakdown will guide you through each stage of the recipe, ensuring that you achieve the perfect result.
Preparing the Base
The first step in creating your Protein Peanut Butter Cheesecake Cups is preparing the crust. This crust serves as the foundation for your cheesecake and adds a delightful crunch to each bite. Here’s how to make it:
1. Gather Ingredients: You will need crushed graham crackers, melted coconut oil (or butter), and a natural sweetener of your choice if desired.
2. Crushing the Graham Crackers: If you haven’t purchased pre-crushed graham crackers, place whole graham crackers in a resealable plastic bag and crush them using a rolling pin or your hands until you achieve fine crumbs.
3. Mixing the Crust: In a mixing bowl, combine the crushed graham crackers with melted coconut oil. If you prefer a sweeter crust, mix in a tablespoon of honey or maple syrup. Stir until the mixture resembles wet sand.
4. Assembling the Crust: Line a muffin tin with cupcake liners for easy removal. Evenly distribute the crust mixture into the bottom of each liner, pressing down firmly to create a solid base.
5. Chilling the Crust: Place the muffin tin in the refrigerator for about 15-20 minutes to allow the crust to set while you prepare the filling.
Tips for Adjusting the Crust
If you have specific dietary preferences or restrictions, there are several ways to adjust the crust. For those looking for a gluten-free option, consider using gluten-free graham cracker alternatives or almond flour mixed with coconut oil. You can also experiment with oats or crushed nuts to create a unique base that suits your taste and dietary needs.
Making the Cheesecake Filling
Once the crust is set, it’s time to prepare the creamy cheesecake filling. This step is crucial for achieving the smooth, velvety texture that makes these cheesecake cups irresistible.
1. Soften the Cream Cheese: Begin by allowing your low-fat cream cheese to soften at room temperature for about 30 minutes. This will make it easier to mix and ensure a smooth filling.
2. Combining the Ingredients: In a large mixing bowl, combine the softened cream cheese, Greek yogurt, and peanut butter. Using an electric mixer, beat the mixture on medium speed until well combined and creamy.
3. Incorporating Protein Powder: Gradually add your chosen protein powder to the mixture, continuing to beat until fully incorporated. This will help to achieve the desired consistency and add that protein boost.
4. Balancing Flavors: To enhance the flavor of your filling, mix in honey or maple syrup, along with a splash of vanilla extract. Taste the mixture and adjust the sweetness as needed. You want the filling to be sweet enough to satisfy, but balanced so that the rich flavors of the peanut butter shine through.
5. Achieving the Perfect Texture: For a smooth filling, you may want to use a food processor instead of a mixer, especially if you’re adding cocoa powder or dark chocolate chips. This ensures that all ingredients are well blended and creates a creamy, lump-free texture.
Adding Flavor and Sweetness
With your cheesecake filling ready, it’s time to add the finishing touches that will elevate these cups to the next level.
1. Incorporating Cocoa Powder: If you choose to add cocoa powder for a chocolate version, sifting it into the filling will help prevent lumps. Start with a tablespoon and taste the mixture to determine if you’d like to add more for a richer chocolate flavor.
2. Dark Chocolate Chips: If you’re using dark chocolate chips, fold them gently into the cheesecake filling once everything is well combined. This will create delightful pockets of chocolate throughout the cups.
3. Filling the Cups: Carefully spoon the cheesecake filling into the prepared crusts, filling each liner to the top. Smooth the tops with a spatula for an even finish.
By following these steps, you’ll be well on your way to creating delicious Protein Peanut Butter Cheesecake Cups that are perfect for any occasion. In the next section, we will cover the chilling process and some additional tips to ensure your dessert turns out perfectly every time. Stay tuned for more delicious details!
{{image_1}}
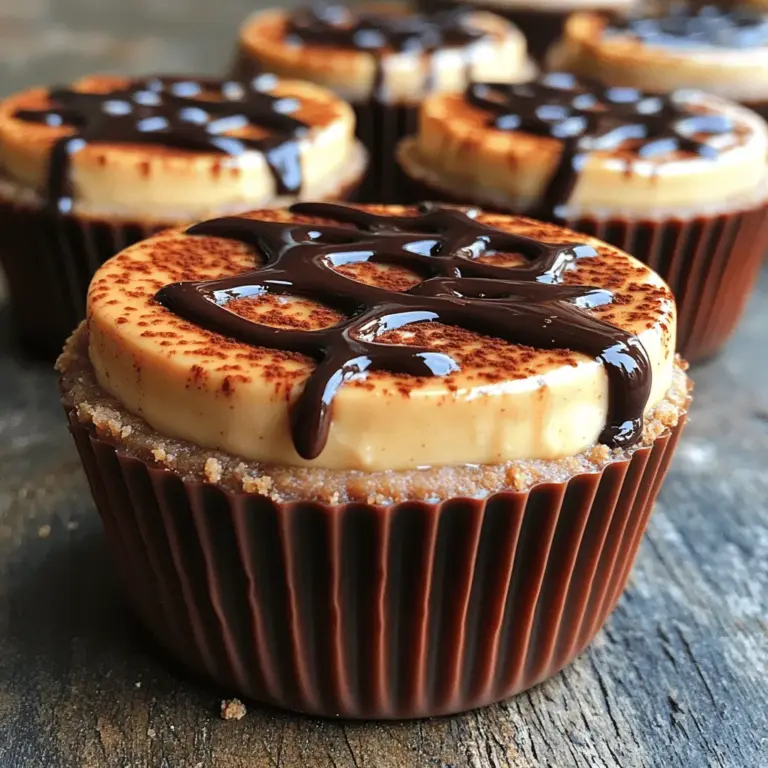
The Role of Protein Powder in Protein Peanut Butter Cheesecake Cups
Protein powder is an essential ingredient in our Protein Peanut Butter Cheesecake Cups, primarily for its ability to boost the protein content while maintaining a creamy texture. This ingredient not only supports muscle recovery and growth but also helps keep you full longer, making it an ideal choice for a healthy dessert option. When selecting a protein powder, consider the flavors available to customize your cheesecake cups.
You might choose a classic whey protein powder, which is known for its smooth texture, or a plant-based option like pea or brown rice protein for a dairy-free version. Flavors such as vanilla, chocolate, or peanut butter can add an extra dimension to your cups. Brands like Optimum Nutrition, MyProtein, or Garden of Life offer excellent options worth considering. By customizing your protein powder, you can create a unique flavor profile that complements the peanut butter base of the cheesecake.
Filling the Cups
Filling the cups with the cheesecake mixture is one of the most satisfying steps in the process. To ensure a neat and even filling, use a piping bag or a spoon to carefully transfer the cheesecake mixture into each cup. If you’re using a piping bag, cut a small tip to allow for precise control over the filling. When filling the cups, leave about a quarter of an inch from the top to allow for any expansion during chilling.
Tips for Portioning the Filling and Avoiding Overfilling
To achieve consistent portions, consider using a measuring spoon or an ice cream scoop. This will help you maintain uniformity across all the cups, resulting in a more visually appealing presentation. Overfilling can lead to messy results and may affect the texture once chilled. If you accidentally overfill a cup, simply smooth the top with a spatula or the back of a spoon.
Suggestions for Alternative Serving Methods
While individual cups are charming, you can also use mini pans or mason jars for a different presentation. Mini pans allow you to serve larger portions for sharing, while jars can create a delightful layered effect, showcasing the creamy filling and any garnishes you choose to add. Just be sure to adjust the chilling time based on the serving method; larger portions may require additional time to set properly.
Chilling Process
Chilling is crucial for achieving the perfect texture in your Protein Peanut Butter Cheesecake Cups. The mixture needs time to firm up, allowing the flavors to meld and the cheesecake to stabilize. Ideally, allow the cups to chill for at least 2-4 hours, or overnight if time permits. The longer they chill, the better the texture and flavor will be.
Recommendations for Storage and Preparation in Advance
These cheesecake cups can be made in advance, making them a convenient dessert option for busy weeks. Store them covered in the refrigerator for up to a week. If you want to prepare them even further in advance, consider freezing them. Just be sure to thaw them in the refrigerator overnight before serving. This not only preserves their flavor and texture but also allows for flexibility in your meal planning.
Serving Suggestions
Presentation can elevate your Protein Peanut Butter Cheesecake Cups from simple to spectacular. Consider garnishing with a dollop of whipped cream, a sprinkle of crushed peanuts, or a drizzle of melted dark chocolate for an indulgent touch. Fresh fruit like strawberries, raspberries, or banana slices can add a refreshing contrast and enhance the visual appeal.
Pairing these cheesecake cups with a sauce, such as a homemade berry compote or a rich chocolate sauce, can also enhance both flavor and presentation. The tartness of the berries will complement the creamy sweetness of the cheesecake, while chocolate sauce can intensify the dessert’s richness.
Nutritional Information
One of the significant benefits of these Protein Peanut Butter Cheesecake Cups is their nutritional content. Each serving typically contains around 150 calories, depending on the specific ingredients used. With an impressive protein content of approximately 10-15 grams per serving and minimal sugar (around 5 grams), these cups are a healthier alternative to traditional cheesecakes, which can contain over 300 calories and 20-30 grams of sugar per slice.
This recipe can fit seamlessly into various dietary plans, including low-carb and high-protein diets. The use of peanut butter adds healthy fats, while the protein powder ensures you’re getting a satisfying dessert without compromising your nutritional goals.
Variations and Customization
The beauty of this recipe lies in its versatility. For those looking for a flavor twist, consider experimenting with chocolate peanut butter by substituting some of the peanut butter with cocoa powder or using chocolate-flavored protein powder. You can also create berry-infused cheesecake cups by folding in crushed berries into the mixture or layering them in between the cheesecake layers for a burst of flavor.
For dietary modifications, vegans can substitute dairy products with plant-based alternatives and use a vegan protein powder. If you have nut allergies, you can replace peanut butter with sunflower seed butter or tahini, ensuring everyone can enjoy this delightful dessert.
Incorporating seasonal ingredients can also provide a fresh twist. For instance, adding pumpkin puree in the fall or using fresh lemon juice for a citrusy summer treat can keep this recipe exciting throughout the year.
Conclusion
Protein Peanut Butter Cheesecake Cups are not only a delectable treat but also a smart choice for those looking to indulge in dessert while maintaining a healthy lifestyle. With their rich flavor profile, creamy texture, and high protein content, these cups satisfy sweet cravings without the guilt often associated with traditional desserts.
We encourage you to try making this recipe and experience the joy of creating a dessert that aligns with your health goals. With endless variations and customization options, you can truly make these cheesecake cups your own, ensuring they fit perfectly into your culinary repertoire. Enjoy the process of making and sharing these delightful treats, knowing they support your journey toward a healthier lifestyle.