When it comes to indulgent desserts that are both satisfying and incredibly easy to prepare, few recipes can compete with the Peanut Butter Bliss Dump Cake. This delightful treat combines the rich, creamy flavor of peanut butter with the decadent sweetness of chocolate, creating a dessert that’s sure to please any crowd. Whether you’re hosting a party, celebrating a special occasion, or simply craving something sweet, this dump cake is the perfect solution.
The appeal of dump cakes lies in their simplicity. As the name suggests, you “dump” all the ingredients into a baking dish, mix, and let the oven do the work. There’s minimal preparation involved, making it an ideal choice for busy bakers or anyone who prefers to spend less time in the kitchen and more time enjoying delicious food. Plus, the cleanup is a breeze since you’ll only dirty a few bowls and utensils. What’s not to love?
Understanding the Ingredients
Before diving into the preparation of the Peanut Butter Bliss Dump Cake, it’s essential to understand the key ingredients that contribute to its unique flavor and texture. Each component plays a vital role in creating that perfect balance of richness and sweetness.
Creamy Peanut Butter
At the heart of this recipe is creamy peanut butter. Not only does it provide a rich, nutty flavor, but its smooth texture also contributes to the cake’s moistness. Peanut butter is a source of healthy fats, making it a more nutritious choice than many other dessert options. When mixed into the batter, it creates a luscious, velvety texture that melts in your mouth.
Sugars
A combination of granulated and brown sugar is used in this recipe to enhance the flavor profile. Granulated sugar provides sweetness while allowing the other flavors to shine through, while brown sugar adds a hint of caramel depth and moisture. This combination ensures that every bite of your dump cake is perfectly sweet without being overpowering, making it a delightful treat for all palates.
Eggs
Eggs are another crucial ingredient in this cake. They serve as a binding agent, helping to hold all the components together. Additionally, eggs contribute richness and moisture, resulting in a tender crumb that contrasts beautifully with the creamy peanut butter and chocolate flavors.
Flour and Cocoa Powder
All-purpose flour is a staple in baking, providing structure to the cake. In this recipe, it’s combined with cocoa powder, which not only enhances the chocolate flavor but also adds depth and complexity to the cake. The combination of these two ingredients ensures that your dump cake has the right texture and isn’t too dense.
Baking Powder and Salt
The chemistry of baking is essential to achieving the right rise and texture in your cake. Baking powder acts as a leavening agent, helping the cake to rise as it bakes. A pinch of salt may seem minor, but it plays a significant role in balancing flavors, enhancing the sweetness of the sugars and the richness of the peanut butter.
Milk
Milk is another vital ingredient that enhances moisture and tenderness in the cake. It interacts with the other ingredients during mixing and baking, resulting in a soft, fluffy texture that pairs perfectly with the rich flavors of peanut butter and chocolate.
Chocolate Chips and Crushed Peanuts
To elevate the Peanut Butter Bliss Dump Cake even further, you might consider adding chocolate chips and crushed peanuts. These optional ingredients add delightful bursts of flavor and texture, creating a more complex dessert experience. The chocolate chips melt into gooey pockets of chocolate goodness, while the crushed peanuts provide a satisfying crunch that perfectly complements the creamy cake.
Step-by-Step Guide to Making Peanut Butter Bliss Dump Cake
Now that you understand the ingredients and their roles, it’s time to get started on making your Peanut Butter Bliss Dump Cake. Follow this step-by-step guide to ensure your cake turns out perfectly every time.
Preheating the Oven
The first step in any baking recipe is to preheat your oven. For this dump cake, set the temperature to 350°F (175°C). Preheating the oven is crucial because it ensures that your cake bakes evenly and rises properly. If you put the cake batter into a cold oven, the baking process will be uneven, leading to a dense and unappetizing result.
Preparing the Peanut Butter Mixture
While the oven preheats, you can begin preparing the peanut butter mixture. Using a mixing bowl, add the creamy peanut butter, granulated sugar, and brown sugar. To achieve a smooth consistency, it’s helpful to warm the peanut butter slightly in the microwave for about 15-20 seconds. This step makes it easier to mix with the sugars, ensuring that you create a creamy, homogeneous mixture that will blend seamlessly into the rest of the ingredients.
The Addition of Eggs and Vanilla
Once the peanut butter and sugars are well combined, it’s time to add the eggs and vanilla extract. Crack the eggs into the bowl and add about one teaspoon of vanilla extract. The vanilla not only enhances the overall flavor but also adds a lovely aromatic quality to the cake. Use a whisk or electric mixer to blend these ingredients thoroughly, ensuring that the eggs are fully incorporated and the mixture is smooth.
Combining Dry Ingredients
In a separate bowl, combine the all-purpose flour, cocoa powder, baking powder, and salt. Whisk these dry ingredients together to ensure they are evenly distributed. This step is essential for avoiding clumps of cocoa powder or flour in your batter, which can lead to an uneven texture in the finished cake.
Mixing Techniques
Now that you have your wet and dry ingredients prepared, it’s time to combine them. Begin by gradually adding the dry mixture into the wet peanut butter mixture. It’s crucial to do this gently to avoid overmixing, which can lead to a dense cake. Use a spatula or wooden spoon to fold the ingredients together until just combined. The batter should be thick and slightly lumpy, which is perfect for a dump cake.
By following these initial steps, you’re well on your way to creating a delicious Peanut Butter Bliss Dump Cake that’s sure to impress your family and friends. Stay tuned for the next section, where we’ll dive into the final steps of assembling and baking this fantastic dessert.
{{image_1}}
Folding in Chocolate Chips and Peanuts
After preparing the peanut butter batter, it’s time to enhance its flavor and texture by folding in the chocolate chips and chopped peanuts. To do this effectively, use a spatula or a wooden spoon to gently incorporate the chocolate chips and peanuts into the batter. Begin by adding about half of the chocolate chips and peanuts, folding them in with a gentle motion from the bottom of the bowl to the top. This technique helps maintain the light, airy texture of the batter, preventing it from becoming dense.
Be cautious not to overmix—just enough to ensure that the chocolate chips and peanuts are evenly distributed throughout the batter. Overmixing can lead to a tougher cake texture, which is not what we want for our Peanut Butter Bliss Dump Cake. Aim for a homogenous mixture with visible specks of chocolate and peanut throughout.
Pouring and Spreading
Once the chocolate chips and peanuts are folded in, it’s time to transfer the batter into the prepared baking dish. Start by pouring the mixture directly into the center of the dish. Use a spatula to help guide the batter into the corners and edges. To ensure an even distribution, gently spread it out with the spatula, taking care not to disturb the texture you’ve carefully created.
An even layer is crucial as it ensures that the cake bakes uniformly, avoiding any undercooked or overcooked spots. The batter should fill the dish to about three-quarters full, allowing room for the cake to rise during baking.
Baking Process
Now that your cake is in the oven, set the timer for about 30 to 35 minutes. The baking time can vary slightly depending on your oven, so it’s important to keep an eye on it. You’ll know the Peanut Butter Bliss Dump Cake is done when the edges turn a lovely golden brown and a toothpick inserted into the center comes out clean or with a few moist crumbs clinging to it. If the toothpick comes out with wet batter, continue baking for an additional 5 minutes, then check again.
Another sign of doneness is a slight spring back when you gently press the center of the cake. If it feels firm and springs back, it’s ready to come out of the oven. Remember to rotate the baking dish halfway through if your oven has hot spots, ensuring even cooking.
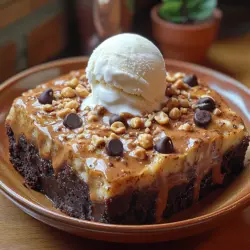
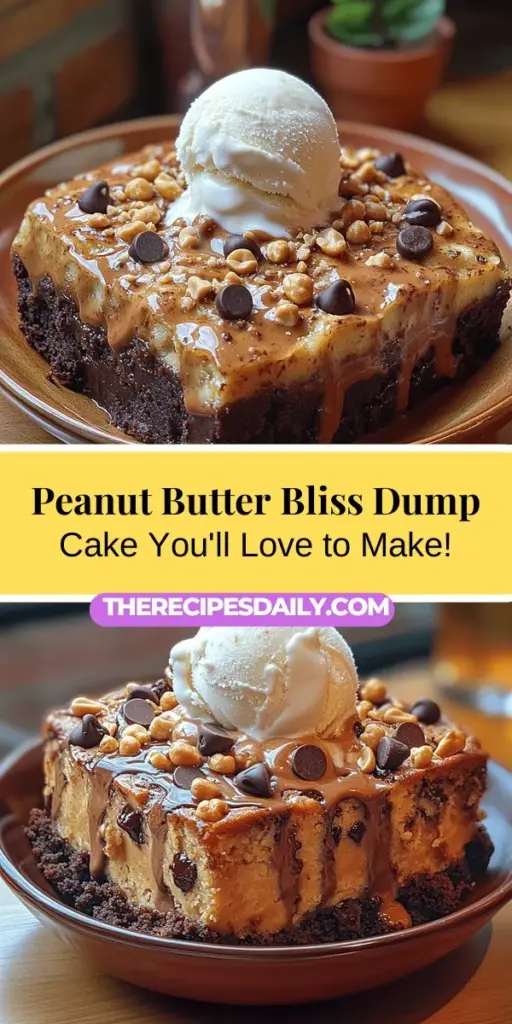
Cooling and Serving
Once out of the oven, let your Peanut Butter Bliss Dump Cake cool in the baking dish for about 10 to 15 minutes. This cooling period allows the cake to set and makes it easier to cut into squares. For serving, you can enjoy the cake warm, which enhances the gooeyness of the chocolate and peanut butter flavors.
Consider adding toppings such as a scoop of vanilla ice cream or a dollop of whipped cream to contrast the warm cake’s richness. Drizzling with chocolate sauce or a sprinkle of crushed peanuts can elevate the presentation and flavor, making it an indulgent experience.
Baking Tips for Success
Importance of Accurate Measurements
Precision in measuring your ingredients is crucial for the perfect Peanut Butter Bliss Dump Cake. Baking is a science, and even slight variations in ingredient quantities can lead to unexpected results. For example, too much flour can yield a dry cake, while too little can make it dense. Always use measuring cups and spoons, leveling off dry ingredients for accuracy.
Avoiding Overmixing
As mentioned earlier, overmixing can lead to a tough cake. The gluten in flour develops when mixed, so it’s vital to mix just until the ingredients are combined. The light and airy texture of your cake depends on this careful handling, allowing the cake to rise beautifully without losing its desirable softness.
Substitutions and Variations
One of the best aspects of this recipe is its versatility. You can easily swap out ingredients to suit different dietary preferences or available pantry items. For instance, if you’re allergic to peanuts, try almond butter or sunflower seed butter. For a dairy-free option, use coconut milk or almond milk instead of regular milk. You can even experiment with dark chocolate chips for a richer flavor or use mini chocolate chips for an even distribution throughout the batter.
Adjusting for Altitude
Baking at higher altitudes can affect the outcome of your cake due to lower air pressure. If you live at an elevation above 3,000 feet, consider reducing the baking powder slightly (about 1/8 teaspoon for every teaspoon) and increasing the flour by a couple of tablespoons to maintain the cake’s structure. Additionally, you may need to increase the baking time slightly, so keep an eye on it as it bakes.
Pairing Suggestions
Ideal Accompaniments
When serving your Peanut Butter Bliss Dump Cake, consider pairing it with complementary flavors. Vanilla ice cream is a classic choice, providing a creamy contrast to the warm, rich cake. Whipped cream also adds a lightness that balances the dessert’s density. For added texture, sprinkle some crushed peanuts or chocolate shavings on top for a delightful crunch.
Beverage Pairings
To enhance your dessert experience, consider serving your cake with a beverage that complements its flavors. A glass of cold milk is always a classic option, perfect for balancing the richness of the cake. Alternatively, a cup of coffee or espresso can offer a delightful contrast, enhancing the chocolate notes in the cake. For a festive touch, consider a dessert wine or a sweet port, which pairs beautifully with the nutty flavors of the peanut butter.
Nutritional Insights
A slice of Peanut Butter Bliss Dump Cake is not just a treat but also provides a balance of indulgence and nutrition. The peanut butter contributes protein and healthy fats, while the chocolate chips add a touch of antioxidants. On average, a serving of this cake contains around 350-400 calories, depending on the specific ingredients used.
For those concerned about dietary restrictions, this cake can be easily modified. Using gluten-free flour allows those with gluten sensitivities to enjoy this dessert without worry. Additionally, by substituting sugar with a sweetener like stevia or maple syrup, you can create a lower-sugar version without sacrificing flavor.
Conclusion
The Peanut Butter Bliss Dump Cake is an indulgent yet simple dessert that brings joy to any occasion. With its rich peanut butter flavor, complemented by chocolate and nuts, this cake is perfect for sharing with friends and family. Baking is not just about the end product; it’s about the memories made in the kitchen, the laughter shared, and the smiles brought forth with each slice.
We encourage you to try making this cake as a fun activity, whether for a special celebration or just as a delightful weekend treat. The process is straightforward, and the reward is a delicious dessert that everyone will love. Dive into the joy of baking and savor the bliss that this Peanut Butter Bliss Dump Cake brings to your table.