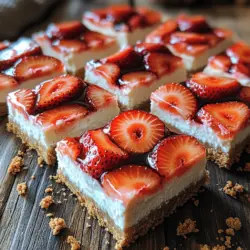
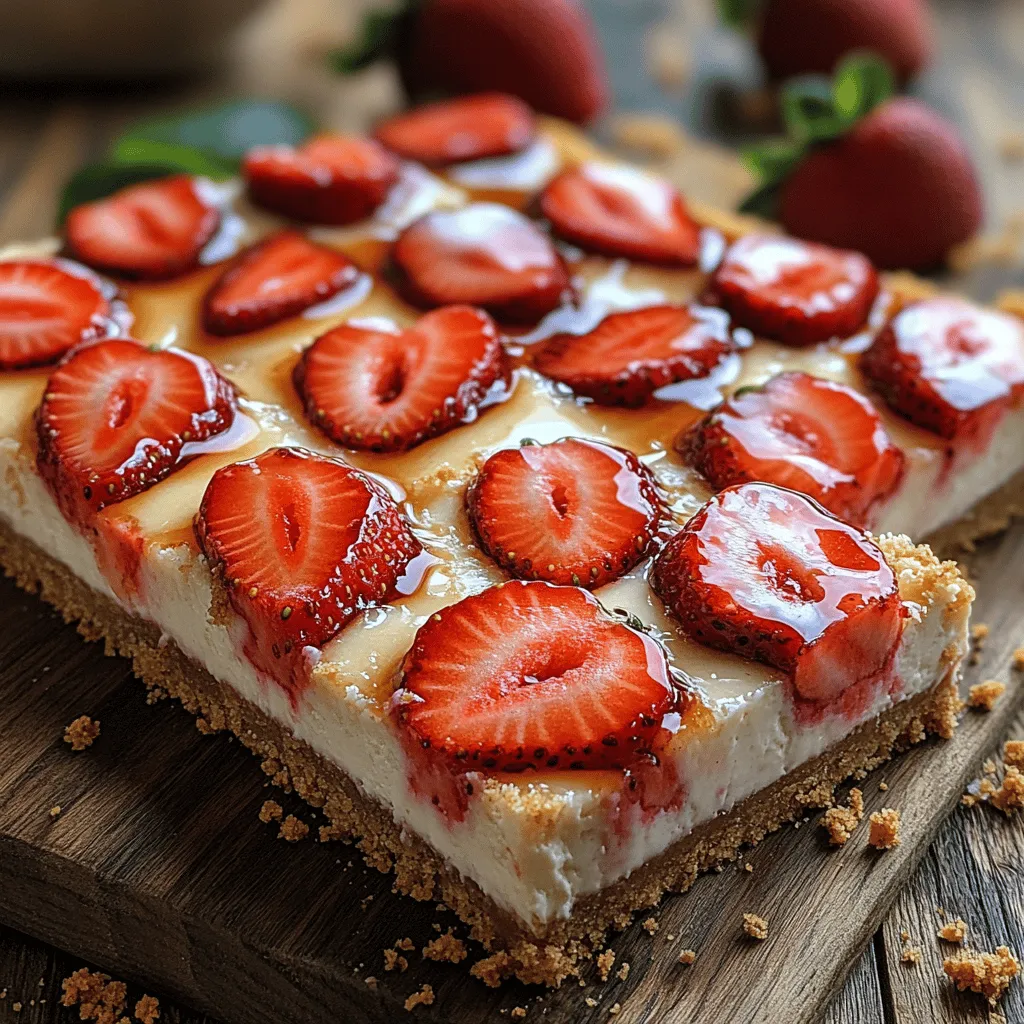
No-Bake Strawberry Cheesecake Bars: A Refreshing Delight for Any Occasion
As the temperature rises and the sun shines brighter, the allure of no-bake desserts becomes increasingly irresistible. These treats offer a perfect solution for warm weather cravings, allowing dessert lovers to indulge without the added heat of an oven. One such delightful creation is the No-Bake Strawberry Cheesecake Bars—a recipe that combines the creamy richness of cheesecake with the bright, refreshing taste of fresh strawberries. Whether for a summer gathering, a picnic in the park, or simply to satisfy a sweet tooth, these bars deliver both flavor and convenience.
The appeal of no-bake desserts lies in their simplicity and versatility. Unlike traditional baked goods, no-bake recipes often require minimal preparation and cooking time. This means you can whip up a delicious dessert in a fraction of the time, freeing you to enjoy the summer sun or spend quality moments with friends and family. Plus, without the need for an oven, you can keep your kitchen cool, making it a practical choice when temperatures soar.
What makes No-Bake Strawberry Cheesecake Bars particularly enticing is the harmonious blend of textures and flavors. The creamy cheesecake filling melts in your mouth, while the fresh strawberries add a burst of sweetness and a hint of tartness, making every bite a delightful experience. It’s no wonder these bars have become a favorite among dessert enthusiasts of all ages.
The Allure of No-Bake Desserts
No-bake desserts come with a plethora of benefits that make them stand out, especially during the warmer months. Here are a few reasons why they are so appealing:
– Convenience and Time-Saving: No-bake recipes typically involve fewer steps and less equipment than their baked counterparts. You can often prepare them in under an hour, making them perfect for last-minute gatherings or when you crave something sweet without the fuss.
– No Need for an Oven: The beauty of no-bake desserts is that they require no baking, which means you can skip the heat of the oven altogether. This is especially advantageous during hot weather when the last thing you want is to heat up your kitchen.
– Versatility in Flavors and Presentations: No-bake desserts can be customized in countless ways. From fruity variations to rich chocolate indulgences, the possibilities are endless. You can also experiment with different presentations, whether in bar form, individual cups, or even layered parfaits.
Ingredients Breakdown
To create the perfect No-Bake Strawberry Cheesecake Bars, you’ll need a few key ingredients that work together to create a deliciously harmonious dessert. Below is a breakdown of what you’ll need:
For the Crust
The crust forms the foundation of your cheesecake bars, providing a flavorful and textured base. Here are the primary components:
– Graham Cracker Crumbs: These are the backbone of your crust, offering a sweet, slightly nutty flavor and a satisfying crunch. The crumbs bind together well, creating a sturdy base that holds up the creamy filling.
– Granulated Sugar: A little granulated sugar is added to the graham cracker crumbs to enhance their sweetness, balancing the flavors of the crust with the creamy filling.
– Melted Butter: This ingredient acts as the glue that holds the crust together. When mixed with the graham cracker crumbs and sugar, melted butter creates a moist and cohesive mixture that can be easily pressed into the pan.
For the Cheesecake Filling
The creamy filling is the star of the show, offering a rich and decadent contrast to the crispy crust. The ingredients for the filling include:
– Cream Cheese: The primary ingredient in cheesecake, cream cheese provides the rich, creamy texture that we all love. It’s essential to use softened cream cheese for easy blending.
– Powdered Sugar: This ingredient sweetens the filling without adding graininess, creating a smooth and velvety texture. It balances the tanginess of the cream cheese perfectly.
– Vanilla Extract: A splash of vanilla extract elevates the flavor profile of the cheesecake filling, adding a warm and aromatic quality that complements the other ingredients.
– Heavy Whipped Cream: Whipped cream is folded into the mixture to give the filling its lightness and airy texture. This is what makes the cheesecake bars feel indulgent yet not overly heavy.
For the Strawberry Topping
The fresh strawberry topping is what makes these bars stand out, adding a burst of color and flavor. Here’s what you’ll need:
– Fresh Strawberries: The star ingredient, fresh strawberries bring a sweet and slightly tart flavor that perfectly complements the creamy cheesecake. They also provide a vibrant pop of color that makes the bars visually appealing.
– Sugar: A touch of sugar enhances the natural sweetness of the strawberries, allowing their flavor to shine through.
– Lemon Juice: A squeeze of lemon juice brightens the strawberry topping, adding a hint of acidity that balances the sweetness.
– Optional Cornstarch: If you prefer a thicker topping, you can use cornstarch, which helps to create a syrup-like consistency when cooked with the strawberries and sugar.
Step-by-Step Instructions for Perfect Cheesecake Bars
With the ingredients ready, it’s time to dive into the preparation of your No-Bake Strawberry Cheesecake Bars. Follow these detailed steps to ensure a successful outcome:
Preparing the Crust
1. Combine Ingredients: In a mixing bowl, combine the graham cracker crumbs and granulated sugar. Mix well to ensure that the sugar is evenly distributed throughout the crumbs.
2. Add Melted Butter: Pour the melted butter over the graham cracker mixture. Using a spatula or your hands, combine the ingredients until the crumbs are fully coated and the mixture resembles wet sand.
3. Press into Pan: Line an 8×8 inch (or 9×9 inch) square baking pan with parchment paper for easy removal. Transfer the crust mixture into the pan and press it firmly and evenly into the bottom using the back of a measuring cup or your fingers. Ensure it’s compact to create a sturdy base for the cheesecake filling.
4. Chill the Crust: Place the pan in the refrigerator for about 10-15 minutes to allow the crust to set while you prepare the cheesecake filling.
This initial step is crucial for establishing a strong foundation for your No-Bake Strawberry Cheesecake Bars, ensuring they hold their shape when cut and served.
As you continue with the preparation of the cheesecake filling and strawberry topping, you’ll be well on your way to creating a dessert that will impress and satisfy. Stay tuned for the next part of this recipe, where we’ll delve into the creamy filling and the vibrant strawberry topping that makes these bars a must-try treat.
Mixing and Pressing the Crust Mixture
To create a delicious base for your No-Bake Strawberry Cheesecake Bars, start by thoroughly mixing your graham cracker crumbs with melted butter and a touch of sugar. The key to a perfect crust is achieving the right texture—moist but not soggy. You can test this by pressing a small amount of the mixture in your hand. It should hold together firmly without crumbling apart.
Tips for the Perfect Crust
– Use the Right Ratio: A good rule of thumb is to use 1 cup of graham cracker crumbs to 1/2 cup of melted butter. Adjust the sugar based on your preference for sweetness.
– Press Firmly: When transferring the mixture to your lined baking pan, use the back of a measuring cup or your fingers to press down firmly and evenly. This ensures the crust holds its shape when cut.
– Chill for Best Results: After pressing the crust into the pan, refrigerate it for at least 15-20 minutes. This setting time allows the butter to firm up, providing a sturdier base for the cheesecake filling.
Making the Cheesecake Filling
The cheesecake filling is the heart of this recipe, and getting it just right is essential. Begin by letting the cream cheese soften at room temperature for about 30 minutes. This step is crucial, as softened cream cheese blends more easily, resulting in a smoother filling.
Mixing Tips
1. Beat the Cream Cheese: In a mixing bowl, use an electric mixer to beat the cream cheese until smooth and creamy. Scrape the sides of the bowl as needed to ensure there are no lumps.
2. Add Sugar and Vanilla: Gradually add powdered sugar and vanilla extract, mixing until combined. Adjust the sweetness according to your taste preference.
3. Incorporate Whipped Cream: In a separate bowl, whip the heavy cream until stiff peaks form. Gently fold the whipped cream into the cream cheese mixture using a spatula. This folding technique incorporates air into the filling, giving it a light and fluffy consistency.
Assembling the Cheesecake Bars
Once your crust and filling are ready, it’s time to assemble the cheesecake bars. Pour the cheesecake filling over the chilled crust, spreading it out evenly with a spatula. The filling should be smooth and level, ensuring each bite is delightful.
Importance of Refrigeration
For optimal texture and flavor, refrigerate the cheesecake layer for at least 4 hours, or preferably overnight. This resting time allows the flavors to meld and the cheesecake to firm up, making it easier to cut into bars without losing shape.
Preparing the Strawberry Topping
The strawberry topping brings a refreshing burst of flavor to your cheesecake bars. Start by washing and hulling fresh strawberries. You can slice them in half or quarters, depending on your preference.
Cooking Process
1. Create a Strawberry Mixture: In a saucepan, combine the sliced strawberries, sugar, and a splash of lemon juice. Heat over medium-low heat until the strawberries soften and release their juices.
2. Thickening with Cornstarch: If you desire a thicker topping, mix a tablespoon of cornstarch with a tablespoon of water to create a slurry. Stir this into the strawberry mixture and cook for an additional minute until it thickens. This method not only enhances the texture but also helps the topping adhere to the cheesecake.
Final Assembly and Serving
Once the strawberry topping has cooled, pour it over the chilled cheesecake layer. Spread it evenly across the surface, making sure to cover all areas for a beautiful presentation.
Setting Time
Allow the entire assembled dish to chill in the refrigerator for another 2 hours. This final setting time is essential; it ensures the layers adhere properly and the bars hold together when cut.
When ready to serve, lift the cheesecake bars out of the pan using the parchment paper, and cut them into squares. A sharp knife dipped in hot water will help create clean cuts.
Flavor Variations and Personalization
One of the best aspects of No-Bake Strawberry Cheesecake Bars is their versatility. Here are some ideas to make this recipe your own:
– Seasonal Variations: Swap out strawberries for other berries like blueberries, raspberries, or blackberries. Each fruit brings its own unique flavor and can add a colorful twist.
– Chocolate Infusion: For chocolate lovers, consider adding melted chocolate or cocoa powder to the cheesecake filling. This addition creates a decadent chocolate-strawberry combination.
– Different Crust Options: Experiment with different types of cookies for the crust. Oreo, digestive, or almond cookie crusts can add a unique flavor profile. For added crunch, incorporate chopped nuts like pecans or almonds into the crust mixture.
Nutritional Information
When crafted thoughtfully, No-Bake Strawberry Cheesecake Bars can be a relatively balanced treat. Here’s a general overview of the nutritional benefits:
– Fresh Strawberries: Rich in vitamin C and antioxidants, strawberries are not only delicious but also beneficial for your health.
– Portion Control: Each bar can be enjoyed in moderation, allowing you to indulge without overindulging. A typical serving size is one bar, which can satisfy your sweet tooth while keeping calorie intake reasonable.
Conclusion
No-Bake Strawberry Cheesecake Bars are a delightful dessert that combines the rich, creamy texture of cheesecake with the fresh, sweet flavor of strawberries. This easy-to-make recipe is perfect for any occasion and will impress your family and friends with its beautiful presentation and delicious taste.
Don’t hesitate to experiment with the recipe and personalize it to your liking. Whether you choose to incorporate different fruits, flavors, or crusts, the possibilities are endless. Embrace the joy of creating this no-bake treat, and indulge in the delightful flavors that come together in every bite. Enjoy your culinary adventure!