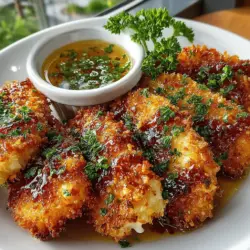
Crispy Oven-Baked Chicken Tenders with Honey Mustard Dipping Sauce: A Family Favorite Reimagined
Chicken tenders are a beloved staple in many households, cherished for their tender meat, crispy exterior, and versatility. Whether served as a quick weeknight dinner or a crowd-pleasing appetizer at gatherings, these delightful strips of chicken appeal to both children and adults alike. However, traditional fried chicken tenders, while delicious, can often be heavy and laden with excess oil. This is where our recipe for Crispy Oven-Baked Chicken Tenders with Honey Mustard Dipping Sauce comes into play, offering a healthier alternative that doesn’t compromise on taste.
In recent years, there has been a growing trend toward making healthier versions of classic comfort foods. As families become more health-conscious, the desire for recipes that maintain flavor while cutting down on calories and unhealthy fats has surged. This oven-baked version of chicken tenders not only satisfies cravings but also promotes a balanced diet without sacrificing enjoyment. By utilizing baking techniques and wholesome ingredients, you can enjoy crispy, flavorful chicken tenders that everyone will love.
Introduction to the Recipe: Crispy Oven-Baked Chicken Tenders with Honey Mustard
This recipe for Crispy Oven-Baked Chicken Tenders features tender chicken tenderloins coated in a flavorful blend of spices and baked to golden perfection. The accompanying honey mustard dipping sauce provides a sweet and tangy contrast, elevating the dish while keeping it light. With just a handful of ingredients and straightforward preparation steps, this dish is perfect for busy families looking for a nutritious meal option.
Understanding the Ingredients
To create the perfect crispy chicken tenders, it’s essential to start with quality ingredients. Here’s a closer look at the key components of this recipe:
Chicken Tenderloins
Chicken tenderloins are the star of this dish. These small strips of meat are located just beneath the breast and are known for their tenderness and flavor. Using tenderloins not only ensures a juicy bite but also reduces cooking time, making this recipe a quick and convenient option for any meal.
Buttermilk
One of the secrets to achieving moist and flavorful chicken is marinating it in buttermilk. Buttermilk acts as a natural tenderizer due to its acidity, which helps break down proteins in the chicken, leading to a more tender texture. Additionally, the buttermilk imparts a subtle tang that enhances the overall flavor of the chicken.
Spices and Seasoning
To elevate the taste of the chicken tenders, a blend of spices is essential. Garlic powder, onion powder, paprika, salt, and black pepper combine to create a savory seasoning mix that seeps into the chicken during marination. Each spice contributes its unique flavor, ensuring that every bite is packed with deliciousness.
Breadcrumbs and Parmesan Cheese
The coating of the chicken tenders is what truly makes them crispy. For the best texture, a mixture of Panko breadcrumbs and grated Parmesan cheese is used. Panko breadcrumbs are larger and airier than traditional breadcrumbs, allowing for a lighter, crunchier finish when baked. The addition of Parmesan cheese not only enhances the flavor but also adds a rich, savory element to the crust.
Overview of the Honey Mustard Dipping Sauce
No chicken tender dish is complete without a dipping sauce, and our honey mustard sauce strikes the perfect balance between sweet and tangy. Made from a combination of Dijon mustard, honey, and apple cider vinegar, this sauce complements the crispy chicken tenders beautifully. The mustard provides a sharp bite, the honey adds sweetness, and the apple cider vinegar introduces a hint of acidity, creating a well-rounded dip that everyone will adore.
Step-by-Step Preparation Guide
Now that we’ve covered the ingredients, let’s dive into the preparation process. Making Crispy Oven-Baked Chicken Tenders is straightforward, but some key steps will enhance your results.
Marinating the Chicken: Importance of Flavor Absorption
Begin by marinating the chicken tenderloins in buttermilk. This step is crucial for ensuring that the chicken remains moist and flavorful throughout the cooking process. For optimal results, allow the chicken to marinate for at least 30 minutes, though longer (up to two hours) is even better. This extra time allows the buttermilk to penetrate the meat, yielding a tender and juicy final product.
*Tips for Marinating:*
– Place the chicken and buttermilk in a resealable plastic bag or a bowl, ensuring the chicken is fully submerged.
– For added flavor, consider mixing in some of the spices you’ll be using for the breading into the buttermilk.
Preparing the Breading Station: Setting Up a Dredging Process
While the chicken is marinating, it’s time to set up your breading station. This will streamline the process of coating the chicken tenders and ensure even coverage.
1. Prepare Three Shallow Dishes:
– In one dish, combine flour with a pinch of salt and pepper.
– In the second dish, beat a couple of eggs until smooth.
– In the third dish, mix Panko breadcrumbs with grated Parmesan cheese and the remaining spices (garlic powder, onion powder, paprika, salt, and black pepper).
2. Dredging Process:
– Start by removing each tenderloin from the buttermilk, allowing excess liquid to drip off.
– Dredge the chicken in the flour mixture first, ensuring it’s well-coated. This step helps the egg adhere better.
– Next, dip the floured chicken into the beaten eggs, allowing any excess to drip off.
– Finally, coat the chicken in the Panko-Parmesan mixture, pressing gently to ensure an even layer sticks to the surface.
*Importance of Panko Breadcrumbs*:
Panko breadcrumbs are the secret weapon for achieving that coveted crunch. Their larger size and airy structure allow them to crisp up beautifully in the oven, providing a texture that rivals fried chicken without the added calories.
Coating the Chicken Tenders: Techniques for Even Coverage
As you coat the chicken tenders, it’s important to ensure an even layer of breadcrumbs for the best results. Here are some techniques to keep in mind:
– Avoid Clumping: After coating each tender, gently shake off any excess breadcrumbs before placing them on the baking sheet. This ensures that the tenders will bake evenly without clumps of breadcrumbs, which can lead to soggy spots.
– Spacing is Key: Arrange the coated chicken tenders on a baking sheet lined with parchment paper or a silicone mat, making sure to leave space between each piece. This allows hot air to circulate around the chicken as it bakes, promoting even cooking and crispiness.
With the chicken marinated, breaded, and ready to go, you’re well on your way to serving up a delicious and healthier version of a family favorite. Stay tuned for the next steps, where we’ll dive into the baking process and how to prepare the irresistible honey mustard dipping sauce!

Visual Cues for Knowing When the Chicken is Properly Coated
When preparing your crispy oven-baked chicken tenders, achieving the right coating is crucial for that perfect crunch. The visual cues you should look out for include:
– Even Coverage: The chicken tenders should be evenly coated in the breadcrumb mixture. This means that no bare spots should be visible, and the chicken should appear fully enveloped in the crispy coating.
– Dull Appearance: A properly coated tender will have a slightly dull appearance due to the flour and egg mixture. If the tenders are shiny, they may not be coated enough, indicating the need for more breadcrumbs.
– Thickness of Coating: Aim for a coating that is not too thick or too thin. A good test is to lift a tender and gently shake it. If the breadcrumbs fall off easily, you may need to re-dip in the egg and breadcrumbs for better adhesion.
Baking Instructions
Importance of Preheating the Oven
Preheating the oven is a crucial step in ensuring your chicken tenders cook evenly and achieve that desirable crispiness. When you place the chicken in a preheated oven, it begins cooking immediately, allowing the outside to sear and form a crunchy crust while keeping the inside juicy. For best results, preheat your oven to 425°F (220°C) for a golden finish.
Tips for Achieving Even Browning: Flipping Halfway Through
To ensure even browning on your chicken tenders, it’s recommended to flip them halfway through the baking process. This not only promotes uniform cooking but also allows both sides to crisp up nicely. Here’s how to do it:
1. Bake the chicken tenders for 10 minutes on one side.
2. Carefully flip each tender using tongs or a spatula.
3. Bake for an additional 10–12 minutes, or until golden brown and cooked through.
How to Check for Doneness: Using a Meat Thermometer
To guarantee that your chicken tenders are fully cooked, use a meat thermometer to check the internal temperature. Insert the thermometer into the thickest part of the tender; it should read 165°F (75°C) to ensure that the chicken is safe to eat. This method is the most reliable way to prevent undercooking or overcooking your chicken.
Creating the Honey Mustard Dipping Sauce
Step-by-Step Process for Making the Dipping Sauce
The honey mustard dipping sauce is an essential component of your crispy chicken tenders, adding a sweet and tangy flavor that complements the dish perfectly. Here’s how to make it:
Ingredients:
– ½ cup of Dijon mustard
– ½ cup of honey
– 1 tablespoon of apple cider vinegar (optional for added tang)
– Salt and pepper to taste
Instructions:
1. In a small mixing bowl, combine the Dijon mustard and honey. Stir well until fully incorporated.
2. If you prefer a tangier sauce, add the apple cider vinegar and mix thoroughly.
3. Taste the sauce, then adjust the sweetness or tanginess by adding more honey or vinegar as desired.
4. Cover and refrigerate the sauce for at least 30 minutes before serving. This allows the flavors to meld beautifully.
Discussion on Adjusting Flavors to Personal Preference
The beauty of making your own honey mustard sauce is the ability to customize it to your liking. If you prefer a sweeter sauce, increase the honey. For a more pungent taste, add extra Dijon mustard. Experimenting with additional ingredients like garlic powder or cayenne pepper can also give your dipping sauce a unique twist.
Importance of Serving the Sauce Fresh for Optimal Flavor
For the best flavor experience, serve the honey mustard sauce fresh. As it sits, the flavors can change, so preparing it shortly before serving will ensure that you enjoy the bright, vibrant tastes that enhance your chicken tenders.
Serving Suggestions
Ideas for Side Dishes that Complement Chicken Tenders
Chicken tenders are versatile and can be paired with a variety of side dishes. Here are some ideas to consider:
– French Fries or Sweet Potato Fries: Classic options that add a crunchy texture and complement the tenders perfectly.
– Coleslaw: A refreshing, creamy side that balances the richness of the fried chicken.
– Vegetable Sticks: Carrot and cucumber sticks with ranch dressing provide a crunchy, healthy option.
– Rice Pilaf or Quinoa: These can add a wholesome grain element to your meal.
Creative Ways to Serve Chicken Tenders
Get creative with how you serve your chicken tenders:
– Wraps: Place the chicken tenders in a tortilla with lettuce, tomatoes, and your choice of sauce for a delicious wrap.
– Salads: Slice the tenders and add them to a bed of mixed greens, cherry tomatoes, avocado, and a drizzle of honey mustard dressing for a satisfying salad.
– Party Appetizer: Serve chicken tenders on a platter with various dipping sauces for a fun appetizer at gatherings.
Pairing Suggestions for Beverages
To complement your crispy oven-baked chicken tenders, consider these beverage pairings:
– Lemonade or Iced Tea: Refreshing drinks that balance the savory flavors of the chicken.
– Light Beer or Hard Cider: These beverages can enhance the crispy texture and flavors.
– Sparkling Water: A non-alcoholic option that cleanses the palate.
Nutritional Information
Overview of the Dish’s Nutritional Benefits
Crispy oven-baked chicken tenders are not only delicious but can also be a healthier alternative to fried tenders. Here’s a brief overview of their nutritional benefits:
– High Protein: Chicken is a great source of lean protein, which is essential for muscle growth and repair.
– Lower in Fat: Baking the chicken instead of frying reduces the overall fat content significantly.
– Customizable Ingredients: By making your own tenders and sauce, you control the ingredients, allowing for healthier choices.
Discussion on Portion Control and Balancing with Healthy Sides
Practicing portion control is essential when enjoying chicken tenders. A serving size of about 3-4 tenders can be satisfying, especially when paired with healthy sides like a salad or steamed vegetables. Balancing your plate with nutritious options will ensure a well-rounded meal.
Comparison of Nutritional Values: Homemade vs. Store-Bought Chicken Tenders
Homemade chicken tenders typically have fewer preservatives and additives compared to store-bought options. For example, a serving of homemade chicken tenders can be lower in calories and fat, especially when baked instead of fried. Additionally, you can adjust the seasoning and breading to suit your dietary needs, making homemade tenders a superior choice for health-conscious eaters.
Conclusion
In summary, crispy oven-baked chicken tenders with honey mustard offer a delightful combination of textures and flavors that are simple to prepare and sure to impress. By following the clear instructions and serving them with delicious sides and a fresh dipping sauce, you can create a meal that is both satisfying and wholesome.
We encourage you to try making these chicken tenders at home. Not only will you enjoy the process of cooking, but you’ll also appreciate the satisfaction of serving a homemade dish to your family and friends. Embrace the joy of cooking and savor the wonderful moments that come with enjoying delicious, homemade meals.