Introduction
Chick-Fil-A nuggets have captured the hearts (and taste buds) of fast food enthusiasts across the United States. Known for their tender, juicy chicken coated in a subtly seasoned breading, these bite-sized morsels are often a go-to choice for families and friends craving a satisfying meal or snack. However, while their popularity is undeniable, many individuals look for healthier alternatives that don’t compromise on flavor. Enter the air fryer: a culinary marvel that has transformed the way we think about cooking, allowing us to achieve that coveted crispy texture with significantly less oil.
Air fryers have surged in popularity, and for good reason. They offer a healthier way to enjoy traditionally fried foods by using hot air circulation to create a crispy outer layer while retaining moisture inside. This cooking method is not only lower in calories but also significantly reduces the fat content of your meals. By making Chick-Fil-A nuggets at home using an air fryer, you can indulge in the deliciousness you know and love while taking charge of what goes into your food—ensuring that you use fresh, wholesome ingredients without any hidden additives.
This crispy air fryer Chick-Fil-A nugget recipe is perfect for family meals, gatherings, or as a delightful snack during movie night. With just a few simple ingredients and straightforward steps, you can recreate this fast-food favorite right in your kitchen. Let’s dive into the details of what makes these nuggets so special and how to prepare them.
Understanding the Ingredients
To achieve the perfect Chick-Fil-A nugget replica, understanding the ingredients is essential. Each component plays a crucial role in delivering the right flavor, texture, and juiciness.
Chicken Breast
The star of this recipe is, of course, the chicken breast. As a lean source of protein, chicken breast is not only nutritious but also versatile. It absorbs flavors well and remains juicy when cooked correctly. For the best results, opt for fresh, high-quality chicken breast. You can cut the chicken into bite-sized pieces to ensure even cooking and to mimic the classic nugget shape.
Dill Pickle Juice
One of the unique aspects of this recipe is the use of dill pickle juice in the marinating process. This might raise some eyebrows, but trust us—it’s a game-changer. The acidity in dill pickle juice helps to tenderize the chicken, breaking down the proteins for a more succulent bite. Additionally, it infuses the chicken with a subtle tang that enhances the overall flavor. This step is crucial for achieving that iconic Chick-Fil-A taste.
Buttermilk
Buttermilk is another key ingredient in this recipe, serving as a tenderizing agent that adds moisture and richness to the chicken. Soaking the chicken in buttermilk allows it to absorb flavor while also creating a creamy base for the breading to adhere to. The lactic acid in buttermilk further helps to break down the protein structure, ensuring that your nuggets are as tender as they are flavorful.
Seasonings
A well-balanced blend of seasonings is the secret to elevating the flavor profile of your nuggets. For this recipe, we’ll be using garlic powder, onion powder, smoked paprika, salt, black pepper, and a hint of cayenne pepper for a touch of heat. Each of these spices contributes to the overall taste, creating a deliciously seasoned crust that complements the chicken perfectly. The smoked paprika, in particular, adds a subtle smokiness that mimics the flavor of traditional frying.
The Marination Process
Marinating is a critical step in this recipe that can’t be overlooked. It not only enhances the flavor of the chicken but also significantly affects its texture. For the best results, you’ll want to marinate your chicken in dill pickle juice for at least 30 minutes, but if you have the time, letting it sit overnight will yield even juicier and more flavorful nuggets.
How Marination Affects Texture and Flavor
When chicken is marinated, the acid in the marinade begins to break down the proteins in the meat. This process helps to tenderize the chicken, resulting in a more succulent and flavorful bite. The dill pickle juice not only imparts its unique tangy flavor but also helps to keep the chicken moist during cooking. As a result, you’ll end up with nuggets that are crispy on the outside and juicy on the inside.
Marination Time Options
– 30 Minutes: If you’re short on time, a quick 30-minute soak in the dill pickle juice will still provide a noticeable flavor enhancement and tenderness to the chicken.
– Overnight: For those who plan ahead, marinating overnight is ideal. This allows the chicken to fully absorb the flavors, making each nugget a burst of deliciousness with every bite.
Rinsing and Preparing the Chicken
After marination, it’s essential to rinse the chicken pieces under cold water to remove excess pickle juice. This step is crucial to prevent the nuggets from becoming overly salty. Once rinsed, pat the chicken dry with paper towels to remove any excess moisture. This will help the buttermilk coating adhere better during the next step.
Creating the Buttermilk Coating
Now that your chicken is marinated and prepped, it’s time to create the buttermilk coating that will give your nuggets that signature Chick-Fil-A texture.
Step-by-Step Guide to Preparing the Buttermilk Coating
1. Combine Buttermilk and Seasonings: In a mixing bowl, combine the buttermilk with a pinch of salt and some of the seasoning blend you’ll be using for the breading. This will ensure that the chicken is flavorful all the way through.
2. Soak the Chicken: Place the rinsed and dried chicken pieces into the buttermilk mixture, ensuring each piece is thoroughly coated. Let them soak for at least 10-15 minutes. This additional soaking time not only adds flavor but also creates a moisture-rich environment that will help the breading stick during cooking.
3. Prepare for Breading: While the chicken is soaking, you can prepare the dry breading mixture. This is where the balance of flavors and textures comes into play.
The Science Behind Soaking and Coating Techniques
Soaking the chicken in buttermilk serves a dual purpose: it adds flavor and helps to achieve that crispy coating. The moisture from the buttermilk will cause the breading to adhere better during cooking, resulting in a crunchy exterior. When frying or air frying, the moisture evaporates, allowing the breading to crisp up beautifully.
By following these initial steps, you’re setting yourself up for success in creating crispy, flavorful air fryer Chick-Fil-A nuggets that are sure to impress. The next phase will involve mixing the dry ingredients for the breading, which is just as critical to achieving the perfect nugget experience. Stay tuned as we delve into that process!
Benefits of Using All-Purpose Flour and Panko Breadcrumbs for Crunch
When it comes to achieving the perfect crispy texture for your Chick-Fil-A style nuggets, the choice of coating ingredients plays a crucial role. All-purpose flour provides a solid base that adheres well to the chicken, allowing for a deliciously crispy exterior. It helps create a cohesive coating that locks in moisture while providing a slight chewiness.
Panko breadcrumbs, on the other hand, elevate the crunch factor significantly. Unlike traditional breadcrumbs, panko is lighter and flakier, resulting in a texture that is both airy and crispy when cooked. Combining these two elements—flour for adhesion and panko for crunch—ensures that each nugget is coated evenly and fries up beautifully in the air fryer.
Coating the Chicken Nuggets
Detailed Instructions on the Coating Process
To start, prepare your chicken by cutting it into bite-sized pieces. The chicken should be uniform in size to ensure even cooking. In three separate bowls, set up your dredging station: one with all-purpose flour seasoned with salt, pepper, and any other desired spices, the second with beaten eggs, and the third with panko breadcrumbs mixed with additional seasonings.
1. Dredging: Begin by taking a piece of chicken and dipping it into the flour mixture. Ensure it is fully coated, shaking off any excess flour.
2. Egg Bath: Next, immerse the floured chicken piece in the egg mixture, allowing any excess to drip off.
3. Panko Coating: Finally, roll the chicken in the panko breadcrumbs, pressing lightly to ensure an even coating.
The Double-Dipping Method and Its Benefits for Extra Crunch
For an extra layer of crunch, consider using the double-dipping method. After the initial coating in flour, egg, and panko, repeat the process once more. This means dipping the chicken back into the egg and then again into the panko. This technique results in a thicker crust that crisps up beautifully in the air fryer, adding to the overall texture and flavor.
Tips on Ensuring Even Coating for Consistent Cooking Results
To ensure even coating and consistent cooking, keep these tips in mind:
– Work in Batches: Avoid overcrowding your dredging station. Work in small batches to ensure every piece of chicken gets the attention it deserves.
– Tap Off Excess: Shake off any excess flour, egg, or breadcrumbs to avoid clumping and ensure a light coating that crisps well.
– Refrigerate Before Cooking: Allow the coated nuggets to sit in the refrigerator for about 15-20 minutes before air frying. This helps the coating adhere better during cooking.
Preheating the Air Fryer
Importance of Preheating the Air Fryer for Optimal Cooking
Preheating your air fryer is a crucial step that should not be overlooked. Just like an oven, an air fryer needs to reach the desired cooking temperature to ensure that the food cooks evenly and thoroughly. Preheating helps to create a crispy exterior while sealing in the moisture of the chicken.
Recommended Temperature Settings and Time for Preheating
For air frying the Chick-Fil-A style nuggets, preheat your air fryer to 400°F (200°C). This temperature is ideal for achieving that golden-brown crust. Allow the air fryer to preheat for about 5 minutes. This simple step will enhance the texture of your nuggets significantly.
Air Frying the Nuggets
Step-by-Step Guide on Arranging and Cooking the Nuggets in the Air Fryer
Now that your nuggets are coated and the air fryer is preheated, it’s time to cook! Arrange the coated chicken nuggets in a single layer in the air fryer basket. Ensure that there is enough space between each nugget, as this allows hot air to circulate effectively, resulting in even cooking.
1. Cook in Batches: If you have a large quantity of nuggets, it’s best to cook them in batches to avoid overcrowding. Overcrowding can lead to uneven cooking and a less crispy texture.
2. Cooking Time: Air fry the nuggets for about 10-12 minutes, flipping them halfway through to ensure they cook evenly on both sides.
Discuss the Technique of Flipping Nuggets for Even Cooking
Flipping the nuggets halfway through the cooking process is vital for achieving that perfect golden-brown finish. Use tongs or a spatula to gently turn each nugget, ensuring they cook evenly. This method not only promotes uniform browning but also helps create that sought-after crunch on all sides.
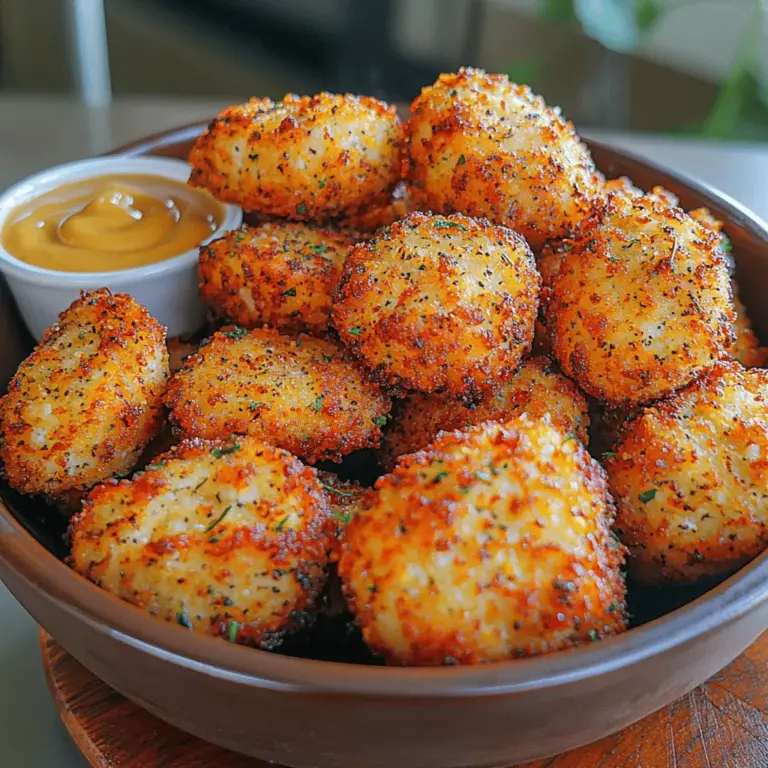
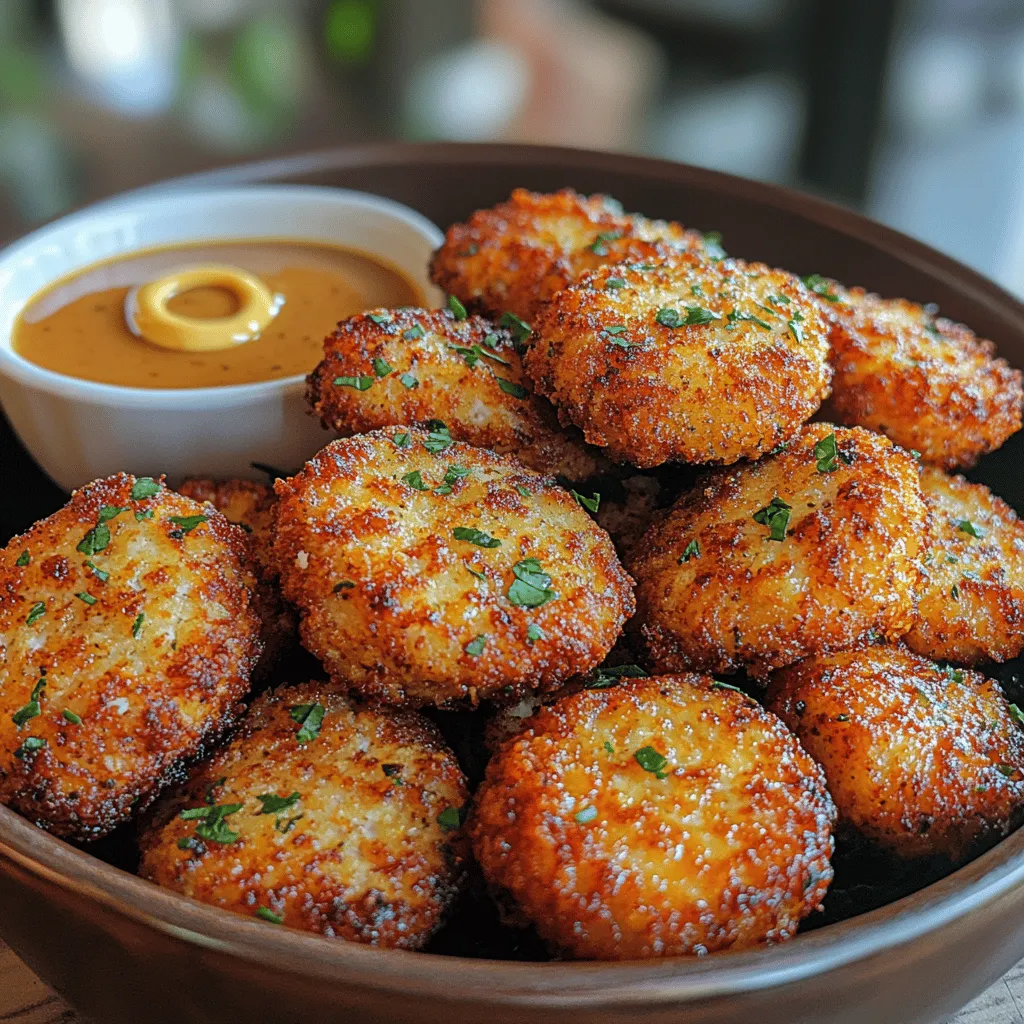
Importance of Using Olive Oil Spray for Achieving a Crispy Texture
For that extra crispiness, lightly spray the nuggets with olive oil before air frying. This step is essential as it helps to achieve a golden color and a delightful crunch without the need for additional fat. A light coat of oil also promotes even browning, making your nuggets look as good as they taste.
Serving Suggestions
Ideas for Dipping Sauces That Complement the Nuggets
Once your Chick-Fil-A style nuggets are cooked to perfection, it’s time to think about dipping sauces. Here are some delicious options:
– Honey Mustard: A classic choice that combines sweetness with tanginess, enhancing the flavor of the chicken.
– BBQ Sauce: For a smoky flavor, BBQ sauce is an excellent accompaniment that pairs well with the crispy texture of the nuggets.
– Ranch Dressing: Creamy ranch adds a cool touch that balances the spices in the coating.
Suggestions for Sides That Pair Well with Chick-Fil-A Style Nuggets
To create a complete meal, consider serving your nuggets with these tasty sides:
– French Fries: Crispy fries are a natural pairing. You could opt for regular fries or sweet potato fries for a healthier twist.
– Coleslaw: A fresh coleslaw adds a crunchy and refreshing element to balance the richness of the nuggets.
– Salad: A light green salad can complement the meal, providing a fresh contrast to the crispy nuggets.
Discuss the Versatility of the Nuggets for Various Occasions
These Chick-Fil-A style nuggets are incredibly versatile, making them perfect for various occasions. Serve them at family gatherings, birthday parties, or game day celebrations. They are also great for meal prep, allowing you to enjoy a quick and satisfying meal throughout the week. Pair them with different sauces and sides to keep things exciting and cater to different tastes.
Nutritional Analysis
Overview of the Nutritional Benefits of the Recipe
One of the most significant advantages of making these air fryer nuggets at home is the control you have over the ingredients. You can select high-quality chicken and seasonings, ensuring a healthier product that meets your dietary preferences.
Comparison of Homemade Nuggets Versus Traditional Fried Options
Homemade air fryer nuggets are a healthier alternative compared to traditional deep-fried nuggets. By using the air fryer, you significantly reduce the amount of oil needed, leading to lower calorie and fat content without sacrificing flavor. A typical serving of air-fried nuggets contains around 200-250 calories, depending on the portion size and ingredients used, compared to upwards of 400 calories for fried counterparts.
Highlight the Lower Calorie and Fat Content Achieved Through Air Frying
The air frying method allows you to enjoy the crispy texture of fried foods without the excess calories and fats associated with deep frying. This makes it easier to indulge in your favorite flavors while maintaining a balanced diet.
Conclusion
In summary, making Chick-Fil-A style nuggets at home is an enjoyable and rewarding culinary experience. With the right techniques and ingredients, you can replicate the crispy, flavorful nuggets you love while ensuring a healthier version. The combination of all-purpose flour and panko breadcrumbs creates the perfect crunch, while the air fryer allows for a lower-calorie and lower-fat outcome.
Don’t hesitate to experiment with different flavors, seasonings, and dipping sauces to make this recipe your own. Enjoy the satisfaction of indulging in a homemade version of a fast-food favorite, knowing you’re treating yourself to something delicious and nutritious. Whether it’s a family dinner or a fun party snack, these air-fried nuggets are sure to impress!
