Introduction
In a world where busy schedules often dictate our eating habits, finding quick, nutritious snacks can feel like a daunting task. Enter the Choco-Peanut Bliss Bars—an irresistible no-bake treat that not only satisfies your sweet tooth but also nourishes your body. These bars bring together the rich, creamy flavors of chocolate and peanut butter, creating a delightful indulgence that you can feel good about eating. With their simple preparation and wholesome ingredients, they are ideal for health-conscious individuals seeking a delicious snack or a satisfying dessert.
The appeal of Choco-Peanut Bliss Bars goes beyond their taste. They are a fantastic option for anyone looking to maintain a balanced diet without sacrificing flavor. Made primarily with wholesome ingredients, they cater to a variety of dietary preferences, including gluten-free and vegetarian. In an era where homemade snacks are gaining popularity, these bliss bars stand out as an easy solution for nutritious, on-the-go munching.
The Allure of Choco-Peanut Bliss Bars
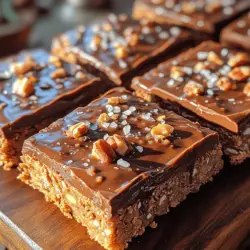
Imagine biting into a Choco-Peanut Bliss Bar—it’s rich, creamy, and indulgent, yet surprisingly nutritious. The combination of chocolate and peanut butter results in a mouthwatering flavor profile that is both satisfying and comforting. These bars are perfect for any occasion, whether you need a quick snack to power you through your day, a sweet treat to share with friends, or a nutritious option after a workout.
One of the key reasons these bliss bars have captured the hearts of many is their versatility. Not only can you enjoy them as a snack or dessert, but they also serve as a post-workout boost, providing the energy you need to refuel. The nutritious ingredients not only enhance the flavor but also offer an array of health benefits.
Peanut butter, the star ingredient, is packed with protein and healthy fats, making it an excellent choice for sustaining energy levels. Rolled oats add fiber, supporting your digestive health and keeping you fuller for longer. Dark chocolate, a beloved treat in its own right, is rich in antioxidants and can improve heart health when consumed in moderation. Together, these ingredients create a delicious balance that makes Choco-Peanut Bliss Bars an excellent choice for anyone looking to enjoy a guilt-free indulgence.
Ingredients Breakdown
To create the perfect Choco-Peanut Bliss Bars, you will need a few key ingredients that not only contribute to the flavor but also enhance the nutritional value of the bars. Here’s a closer look at what you’ll need:
– Creamy Peanut Butter: This ingredient is the heart of the recipe. Creamy peanut butter adds a rich, velvety texture and a nutty flavor that complements the chocolate perfectly. Beyond taste, peanut butter is also a nutritional powerhouse, offering a good source of protein, healthy fats, and essential vitamins and minerals.
– Honey or Maple Syrup: Natural sweeteners like honey or maple syrup are used to sweeten the bars without resorting to refined sugars. Both options provide a touch of sweetness while also bringing their own unique flavors. Honey is known for its antibacterial properties, while maple syrup contains antioxidants and has a lower glycemic index than traditional sugar.
– Rolled Oats: These are essential for giving the bars their chewy texture. Rolled oats are a great source of dietary fiber, which helps support digestive health and keeps you feeling full. They also provide sustained energy, making them a perfect ingredient for a snack or meal replacement.
– Coconut Flour: A gluten-free alternative to traditional flour, coconut flour adds a subtle sweetness and a unique flavor. It is also high in fiber and protein, making it a great addition to these bars. The absorbent nature of coconut flour helps to bind the ingredients together, creating a firm texture.
– Dark Chocolate Chips: The rich flavor of dark chocolate chips elevates these bars to the next level. Dark chocolate is not only delicious but also packed with antioxidants, which can help reduce inflammation and improve heart health. Choosing dark chocolate with a higher cocoa content (70% or more) ensures you get the most health benefits while indulging in a sweet treat.
– Optional Toppings: To enhance the flavors of your Choco-Peanut Bliss Bars, consider adding toppings such as chopped nuts, shredded coconut, or a sprinkle of sea salt. These optional ingredients can add extra crunch and flavor, making your bars even more delightful.
Step-by-Step Instructions to Create Choco-Peanut Bliss Bars
Now that you have a clear understanding of the ingredients and their benefits, let’s dive into the step-by-step instructions for creating your own Choco-Peanut Bliss Bars. This recipe is straightforward and does not require any baking, making it perfect for those who may not have a lot of time or experience in the kitchen.
Preparing the Base
1. Combine Peanut Butter and Sweetener: Start by placing the creamy peanut butter and your chosen sweetener—honey or maple syrup—in a mixing bowl. Use a spatula or spoon to mix them together until you achieve a smooth and creamy consistency. This step is crucial as it creates the base flavor of your bars. If your peanut butter is stiff, you may want to microwave it for a few seconds to make it easier to blend.
2. Mix in Vanilla Extract: For an extra layer of flavor, you can add a teaspoon of vanilla extract to the peanut butter mixture. This ingredient enhances the overall taste of the bars and brings a warm, aromatic quality that complements the chocolate.
Incorporating Dry Ingredients
3. Add the Rolled Oats and Coconut Flour: Once your peanut butter and sweetener mixture is well combined, it’s time to incorporate the dry ingredients. Gradually add the rolled oats and coconut flour to the mixing bowl. Use a spoon or spatula to carefully fold in the dry ingredients, ensuring they are evenly distributed throughout the mixture. The rolled oats will provide texture, while the coconut flour will help bind everything together.
4. Stir in Dark Chocolate Chips: After the dry ingredients are fully incorporated, fold in the dark chocolate chips. This step not only adds bursts of chocolate flavor but also creates a beautiful contrast against the creamy peanut butter base. Be gentle when mixing to prevent breaking the chocolate chips.
Pressing the Mixture
5. Prepare Your Pan: Line a square 8×8-inch baking pan with parchment paper, allowing some overhang on the sides for easy removal later. This will prevent the bars from sticking and make cleanup a breeze.
6. Transfer and Press the Mixture: Pour the combined mixture into the prepared baking pan. Using a spatula or your hands, press the mixture down firmly and evenly. Make sure to compact it well, as this will help your bars hold their shape once they are chilled. The surface should be smooth and level.
7. Chill to Set: Once the mixture is pressed into the pan, place it in the refrigerator for at least 1-2 hours to allow it to set. This chilling step is essential—it helps the bars firm up, making them easier to cut into squares.
As you patiently wait for your Choco-Peanut Bliss Bars to chill, take a moment to appreciate the delightful combination of flavors and textures that will soon come together in this delicious, nutritious treat. These bars are not just a snack; they are a celebration of simple, wholesome ingredients that cater to both your taste buds and dietary needs. Enjoy the anticipation of indulging in a homemade creation that perfectly balances flavor, nutrition, and convenience.

Techniques on How to Achieve an Even, Compact Base in the Baking Dish
Achieving a compact and even base for your Choco-Peanut Bliss Bars is crucial for ensuring they hold their shape and texture. Start by lining your baking dish with parchment paper, allowing some overhang for easy removal later. This step not only prevents sticking but also helps in achieving uniform bars.
To create an even base, use the back of a measuring cup or a flat spatula to press the mixture firmly into the bottom of the dish. Begin from the center and work your way towards the edges, applying consistent pressure. This technique ensures that the base is not only compact but also spreads evenly across the dish. Keep an eye on the corners, as they tend to be the trickiest spots; press firmly to eliminate any gaps or air pockets.
Once your base is evenly pressed down, consider using a fork to poke small holes across the surface. This allows for better cooking and helps the mixture settle, creating a denser texture. By following these techniques, you’ll ensure a solid foundation for your Choco-Peanut Bliss Bars, setting the stage for a delicious treat.
Chilling the Bars
After preparing the base, it’s time to chill it. Chilling is essential for the right consistency before cutting. Place the baking dish in the refrigerator for at least 30 minutes. This step allows the ingredients to meld together and firm up, making it easier to cut the bars into neat squares or rectangles later on.
The chilling process not only helps in achieving the right texture but also enhances the flavors. As the mixture cools, the natural oils from the peanut butter and the sweetness from the honey will integrate beautifully, resulting in a rich flavor profile.
If you’re short on time, you can speed up the chilling process by placing the dish in the freezer for about 15-20 minutes. However, be careful not to forget about it, as leaving it too long can lead to overly hard bars that are difficult to cut.
Melting the Chocolate
Melting chocolate is a crucial step in this recipe, and doing it correctly can make a significant difference in the final product. To achieve perfectly melted chocolate without burning, opt for a double boiler method or the microwave.
If using a double boiler, fill a saucepan with a few inches of water and bring it to a simmer. Place a heatproof bowl on top of the saucepan, ensuring the bottom of the bowl doesn’t touch the water. Add your chocolate chips or chopped chocolate into the bowl. Stir gently as the chocolate begins to melt, ensuring it heats evenly. This method allows for slow, controlled melting, reducing the risk of burning.
If you prefer the microwave, place the chocolate in a microwave-safe bowl and heat it in 30-second intervals, stirring in between. This method is quicker but requires vigilance, as chocolate can go from perfectly melted to burnt in seconds. Aim to stop microwaving when the chocolate is almost fully melted, then stir until smooth.
Dipping the Bars
Now that your chocolate is melted, it’s time to dip the chilled bars for a delicious coating. For a neat chocolate dip and even coverage, use a fork or a dipping tool. First, remove the bars from the baking dish using the parchment overhang, and place them on a cooling rack set over a baking sheet to catch any drips.
Carefully lower each bar into the melted chocolate, ensuring it is fully submerged. Use the fork to lift it out, allowing excess chocolate to drip back into the bowl. For a smooth finish, gently tap the fork against the edge of the bowl to remove any additional chocolate.
If you want a thicker coating, you can repeat the dipping process after the first layer has set slightly. Just make sure to allow the first layer to cool for a few minutes before dipping again to achieve that professional look.
Setting the Topping
To personalize your Choco-Peanut Bliss Bars, consider adding creative toppings before the chocolate sets. While the chocolate is still soft, sprinkle crushed nuts, sea salt, or even a drizzle of caramel over the top. This not only enhances the flavor but also adds visual appeal.
For a gourmet touch, consider using decorative toppings like edible gold leaf or colorful sprinkles for special occasions. If you’re feeling adventurous, try a mix of toppings, such as crushed pretzels for a salty crunch or shredded coconut for a tropical twist. The key is to be creative and make the bars truly your own.
Final Chill
After dipping and decorating, it’s crucial to let the chocolate set properly. Place the bars back in the refrigerator for another 30 minutes, or until the chocolate is firm. This final chill is essential for achieving the best texture, ensuring that the chocolate coating is crisp and the bars hold together well when cut.
Avoid the temptation to skip this step, as cutting the bars before the chocolate has fully set can result in a messy and unattractive presentation. Once the chocolate is firm, you can remove the bars from the fridge and prepare to slice them into perfect portions.
Nutritional Profile of Choco-Peanut Bliss Bars
Understanding the nutritional profile of your homemade Choco-Peanut Bliss Bars can help you make informed decisions about including them in your diet. Each bar typically contains around 150-200 calories, depending on the size and specific ingredients used.
In terms of macronutrients, you can expect approximately:
– Carbohydrates: 20-25 grams
– Protein: 4-6 grams
– Fats: 8-10 grams
These bars are not only satisfying but also provide a good source of healthy fats from the peanut butter, along with a modest amount of protein from the nuts and seeds. Additionally, the natural sweeteners used can offer a more balanced approach to sugar compared to traditional snacks.
Comparatively, homemade Choco-Peanut Bliss Bars are often healthier than store-bought snacks loaded with preservatives and artificial ingredients. By controlling what goes into your bars, you can avoid unnecessary additives and tailor the recipe to suit your dietary needs.
Serving Suggestions and Pairings
Choco-Peanut Bliss Bars are incredibly versatile and can be enjoyed in various ways. They make an excellent snack to power you through the afternoon slump, a post-workout energy boost, or a satisfying dessert after dinner.
For a delightful pairing, consider serving your bars with a glass of cold milk or a warm cup of coffee. The creamy texture of the milk complements the rich chocolate and peanut flavors beautifully. If you’re looking for a refreshing option, a smoothie—especially one featuring bananas or berries—can create a lovely contrast with the sweetness of the bars.
You can also crumble the bars over yogurt for a delicious breakfast or dessert alternative. The combination of creamy yogurt with the crunch of the bars creates a delightful texture and taste experience.
Storage and Shelf Life
To maintain the freshness of your Choco-Peanut Bliss Bars, it’s essential to store them properly. Keep them in an airtight container at room temperature for up to a week. If you live in a hot climate, you may want to refrigerate them to prevent melting.
For extended shelf life, consider freezing the bars. Wrap each bar individually in plastic wrap and place them in a freezer-safe container. They can last for up to three months in the freezer. When you’re ready to enjoy them, simply take out a bar and let it thaw at room temperature for about 30 minutes or microwave it for a few seconds.
Conclusion
Choco-Peanut Bliss Bars are a simple yet delicious homemade treat that caters to various tastes and dietary preferences. The joy of making these bars lies in the ability to customize them to your liking, ensuring they meet your personal health goals while satisfying your sweet tooth.
With their rich flavors and delightful texture, these bars are perfect for snacking, sharing, or enjoying after a meal. So why not gather your ingredients and try your hand at making these delightful treats? You’ll not only reap the benefits of a wholesome snack but also enjoy the satisfaction of crafting something delicious in your kitchen. Embrace the joy of homemade snacks and indulge in the delightful goodness of Choco-Peanut Bliss Bars.