The allure of freshly baked cinnamon rolls is undeniable, infusing our kitchens with warm, spiced aromas that awaken our senses and evoke feelings of comfort and nostalgia. However, as much as we cherish the traditional method of rolling and baking these delectable pastries, there are times when we crave the same delightful flavors but in a simpler, more convenient form. Enter Cinnamon Roll Bliss Bars! These delightful treats combine the classic flavors of cinnamon rolls with the ease of bar-style baking, making them the perfect indulgence for breakfast, dessert, or any time you find yourself yearning for a sweet, comforting bite.
In this article, we’ll explore the Cinnamon Roll Bliss Bars recipe in detail. From understanding the essential ingredients that create these bars to a step-by-step guide on how to prepare them, you’ll be equipped with all the knowledge you need to create a batch of these irresistible treats at home. Plus, we will highlight the creamy, dreamy frosting that ties everything together, ensuring each bite is a heavenly experience.
Understanding the Ingredients
Every great recipe begins with quality ingredients. Let’s delve into the key components of Cinnamon Roll Bliss Bars, examining their roles and importance for achieving the perfect balance of flavor and texture.
All-Purpose Flour: The Foundation of the Bars
At the heart of any baked good lies flour, and for our Cinnamon Roll Bliss Bars, all-purpose flour serves as the cornerstone of the recipe. It provides structure and stability, allowing the bars to hold their shape while remaining tender and soft.
Importance of Flour in Baking
Flour is essential in baking as it contains gluten, a protein that gives baked goods their structure. When mixed with liquids, gluten helps create a network that traps air bubbles during baking, leading to a light and airy texture. In our bliss bars, this means a delightful chewiness that complements the gooey cinnamon filling.
Alternatives to All-Purpose Flour
For those with dietary restrictions or preferences, alternatives to all-purpose flour can be utilized. Options like whole wheat flour offer increased fiber and a nutty flavor, while gluten-free blends can cater to those avoiding gluten. Just be mindful that substitutions may alter the texture slightly, so adjustments may be needed in liquid ratios.
Baking Powder and Salt: The Rising Agents
Next up are the leavening agents that help our bars rise and achieve that perfect texture. Baking powder and salt play complementary roles in this recipe.
Role of Baking Powder in Achieving the Right Texture
Baking powder is a chemical leavening agent that generates carbon dioxide when mixed with wet ingredients. This reaction causes the batter to rise, resulting in fluffy, light bars. The amount of baking powder used is crucial; too little will yield dense bars, while too much may lead to a bitter taste.
Importance of Salt in Enhancing Flavor
While salt is often viewed as an antagonist to sweetness, in baking, it serves to enhance flavors and balance the sweetness of the sugars. A small amount of salt in our recipe will elevate the cinnamon and sugar profiles, making the overall flavor of the Cinnamon Roll Bliss Bars richer and more complex.
Ground Cinnamon: The Star Spice
No cinnamon roll recipe would be complete without cinnamon, the star spice that defines the flavor profile of these bliss bars.
Health Benefits of Cinnamon
Not only does cinnamon provide a warm, comforting flavor, but it also comes with health benefits. It is known for its anti-inflammatory properties and can aid in digestion. Incorporating cinnamon into your diet may also help regulate blood sugar levels and provide antioxidants, making these treats a bit more guilt-free.
Variations and Substitutes for Ground Cinnamon
While ground cinnamon is traditional, exploring other varieties can add an interesting twist. Consider using Ceylon cinnamon for a sweeter, more delicate flavor, or experimenting with spices like nutmeg or cardamom for a unique spin on the classic cinnamon taste.
Unsalted Butter: For Richness and Flavor
Butter plays a crucial role in adding richness and moisture to our bars, making unsalted butter the preferred choice in baking.
Why Unsalted Butter is Preferred in Baking
Unsalted butter allows for better control over the salt content in our recipe, ensuring that we can precisely balance flavors. Additionally, using butter adds a rich flavor and tender crumb to the bars, making each bite melt in your mouth.
Tips for Using Butter in Recipes
For optimal results, it’s best to use butter at room temperature so it can cream well with sugars, leading to a light and airy batter. If you forget to take the butter out ahead of time, you can soften it by cutting it into small pieces or microwaving it on a low setting, but be cautious not to melt it.
Sugar Variations: Granulated and Brown Sugar
Sugar is more than just a sweetener; it contributes to the texture and moisture of baked goods. In our Cinnamon Roll Bliss Bars, both granulated sugar and brown sugar are used to achieve the perfect balance.
The Roles of Granulated Sugar and Brown Sugar in the Recipe
Granulated sugar provides sweetness and helps the bars rise, while brown sugar adds moisture and a rich, caramel-like flavor. The combination of these sugars creates bars that are not only sweet but also soft and chewy.
How Sugar Affects Texture and Moisture
Granulated sugar tends to create a drier texture, while brown sugar, with its higher moisture content, contributes to a more tender crumb. This interplay is essential in achieving the blissful texture we desire in our bars.
Eggs and Milk: Binding and Moisture
Eggs and milk are integral to the structure and moisture of our Cinnamon Roll Bliss Bars.
The Role of Eggs in Structure and Richness
Eggs act as a binding agent, holding the ingredients together while providing richness and flavor. They also contribute to the leavening process, helping the bars rise and maintain their shape.
Alternatives for Eggs and Dairy for a Vegan Option
For those looking for vegan alternatives, flax eggs (made by mixing ground flaxseed with water) can be used as a binding agent. As for dairy, plant-based milk options like almond milk, oat milk, or coconut milk can be substituted without compromising the integrity of the recipe.
Preparing the Cinnamon Roll Bliss Bars
Before diving into the baking process, it’s essential to prep your workspace. A clean, organized kitchen not only makes the process smoother but also helps prevent accidents and ensures you have all your ingredients on hand.
Prepping Your Workspace
Importance of a Clean, Organized Kitchen
A tidy workspace sets the tone for successful baking. Before you begin, gather all your ingredients and tools, including mixing bowls, measuring cups, a whisk, and a spatula. Cleaning your surfaces and clearing away any clutter will allow you to focus solely on creating your delicious Cinnamon Roll Bliss Bars without distractions.
With your ingredients and workspace ready, you are well on your way to creating a batch of these incredible Cinnamon Roll Bliss Bars. Stay tuned for the detailed step-by-step instructions that will guide you through the baking process, ensuring you achieve that perfect blend of flavors and textures that make these bars a standout treat!
Tools and Equipment Needed for Baking
Before diving into the delicious world of Cinnamon Roll Bliss Bars, it’s essential to gather the right tools and equipment to ensure a smooth baking process. Here’s what you will need:
1. Mixing Bowls: A set of mixing bowls in various sizes will help you combine your dry and wet ingredients effectively.
2. Whisk or Electric Mixer: For mixing your batter and frosting, a whisk or an electric mixer will save you time and effort.
3. Measuring Cups and Spoons: Accurate measurements are crucial in baking, so have both dry and liquid measuring tools on hand.
4. Spatula: A rubber spatula is ideal for scraping down the sides of the bowl and ensuring all ingredients are well combined.
5. Baking Dish: A 9×13-inch baking pan is perfect for these bars, allowing them to bake evenly.
6. Parchment Paper: Using parchment paper will help prevent the bars from sticking to the pan and make for easy removal.
7. Cooling Rack: After baking, a cooling rack will help your bars cool evenly and prevent sogginess.
8. Knife or Pizza Cutter: For cutting the bars into perfect squares, a sharp knife or a pizza cutter will do the trick.
Having these tools ready will make the process of baking your Cinnamon Roll Bliss Bars much easier and more enjoyable.
Step-by-Step Instructions
Now that you have your tools ready, let’s break down the steps to create these delightful bars:
1. Preheat Your Oven
Start by preheating your oven to 350°F (175°C). This ensures that your bars begin cooking at the right temperature for optimal rise and texture.
2. Prepare Your Baking Dish
Line your 9×13-inch baking dish with parchment paper, leaving some overhang on the sides. This will make it easier to lift the bars out once they are fully cooled.
3. Mix the Dry Ingredients
In a large mixing bowl, whisk together the flour, baking powder, salt, and cinnamon. This combination will form the base of your batter and ensure even distribution of flavors.
4. Combine the Wet Ingredients
In a separate bowl, beat together the sugar, eggs, and melted butter until smooth. Add in the vanilla extract and mix until fully combined.
5. Combine Wet and Dry Mixtures
Gradually add the dry ingredients to the wet mixture, stirring gently until just combined. Be careful not to overmix, as this can lead to dense bars.
6. Create the Cinnamon Swirl
In a small bowl, mix together the brown sugar and cinnamon for the swirl. Pour half of the batter into the prepared baking dish and spread it evenly. Sprinkle the cinnamon sugar mixture over the batter, then dollop the remaining batter on top. Use a knife or skewer to swirl the batter slightly, creating a marbled effect.
7. Bake the Bars
Place the baking dish in the preheated oven and bake for 25-30 minutes, or until a toothpick inserted into the center comes out clean. Keep an eye on the bars to prevent overbaking.
8. Cool Before Frosting
Once baked, remove the dish from the oven and allow the bars to cool in the pan for about 10 minutes. Then, use the parchment overhang to lift the bars out and transfer them to a cooling rack to cool completely.
Common Pitfalls to Avoid While Making the Bars
– Overmixing the Batter: Mixing too much can lead to tough bars. Combine just until the dry ingredients are incorporated.
– Incorrect Oven Temperature: Always preheat your oven. An oven thermometer can help if you suspect your oven temperature is off.
– Not Measuring Ingredients Accurately: Baking is a science, and precise measurements are key to achieving the right texture.
– Skipping the Cooling Step: Frosting warm bars can lead to a melted mess. Allow them to cool completely for the best results.
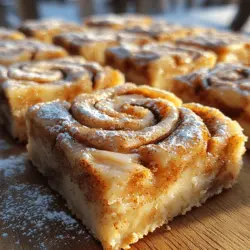
The Cinnamon Swirl: Creating Flavor Layers
The cinnamon swirl is the hallmark of these bars, bringing a delightful burst of flavor with each bite. It’s not just for aesthetics; it plays a crucial role in flavor distribution throughout the bars.
Crafting the Perfect Swirl
To achieve a beautiful marbled effect, follow these tips:
– Use a Knife or Toothpick: After dolloping the remaining batter on top, gently run a knife or toothpick through the layers in a zig-zag pattern. This will create a lovely swirl without fully mixing the layers.
– Don’t Overdo It: Swirling too much can blend the layers together. Aim for a few swirls to maintain distinct layers of flavor.
– Sprinkle Generously: Make sure to sprinkle enough of the cinnamon-sugar mixture over the first layer of batter. This ensures that every bite is packed with that signature cinnamon flavor.
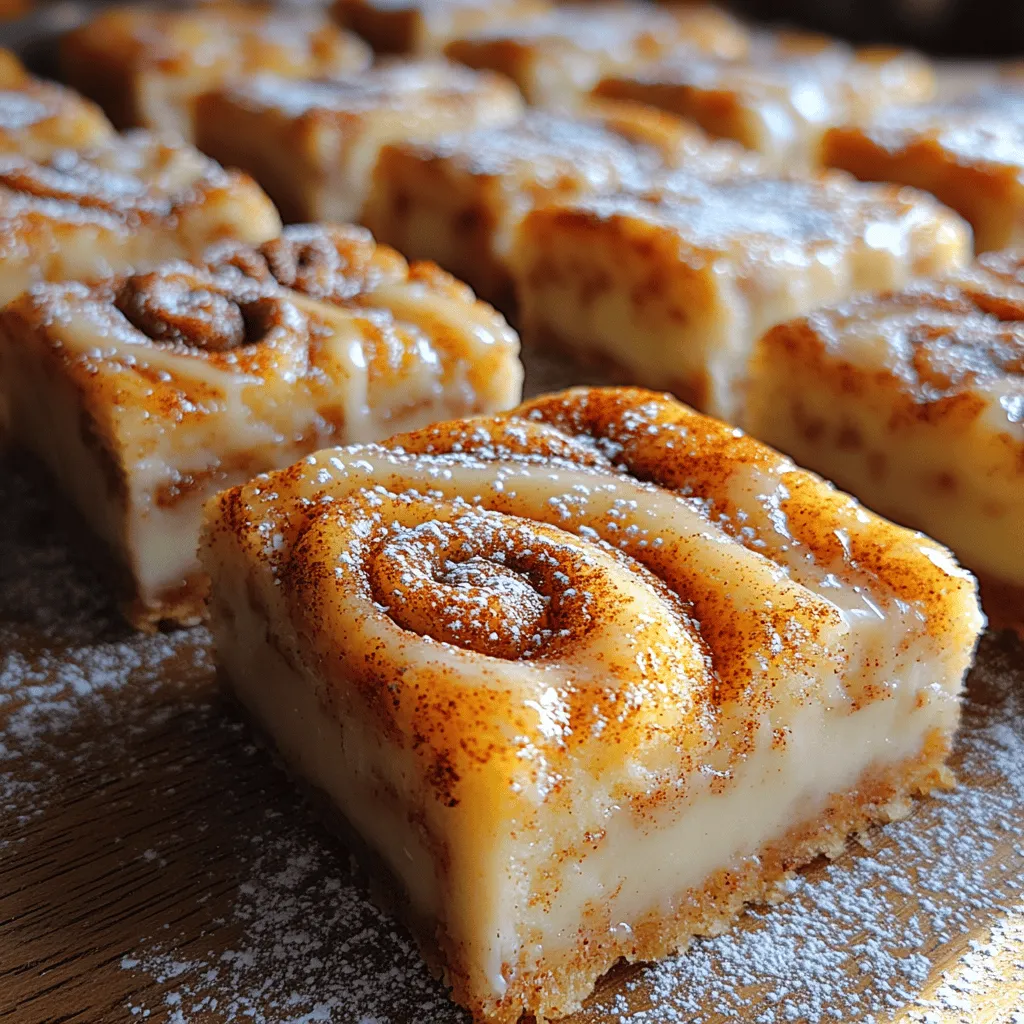
Frosting Perfection: Making Cream Cheese Frosting
A generous layer of cream cheese frosting is what takes these Cinnamon Roll Bliss Bars to the next level. Here’s how to make it perfectly.
Ingredients for the Frosting
To create a luscious cream cheese frosting, you will need:
– 8 oz cream cheese, softened
– 1/2 cup unsalted butter, softened
– 3-4 cups powdered sugar, sifted (adjust for sweetness)
– 1 teaspoon vanilla extract
– Milk or cream, as needed for consistency
For a dairy-free option, you can substitute the cream cheese with a dairy-free cream cheese alternative or a cashew-based frosting.
Step-by-Step Frosting Instructions
1. Beat the Cream Cheese and Butter: In a mixing bowl, beat the softened cream cheese and butter together until creamy and smooth.
2. Add Vanilla Extract: Mix in the vanilla extract, ensuring it’s fully incorporated into the frosting.
3. Gradually Add Powdered Sugar: Slowly add in the sifted powdered sugar, one cup at a time, mixing on low until combined. Increase speed to medium and beat until smooth. If the frosting is too thick, add a tablespoon of milk or cream until the desired consistency is reached.
4. Frost the Completely Cooled Bars: Once your bars are completely cool, spread a generous layer of frosting over the top, using a spatula for an even finish.
Serving Suggestions and Storage Tips
These Cinnamon Roll Bliss Bars are not only delicious but also versatile in how they can be served.
How to Serve Cinnamon Roll Bliss Bars
– Presentation Ideas: Cut the bars into squares and arrange them on a decorative platter. For an extra touch, dust with a light sprinkling of cinnamon or powdered sugar before serving.
– Pairing Suggestions: These bars pair wonderfully with a cup of coffee, chai tea, or even a glass of cold milk. The warm spices and creamy frosting complement the beverages beautifully.
Storage Guidelines
Proper storage will help keep your Cinnamon Roll Bliss Bars fresh and delicious.
– Best Practices: Store the bars in an airtight container at room temperature for up to 3 days. If you prefer them chilled, you can refrigerate them for up to a week.
– Shelf Life and Freezing Options: For longer storage, these bars freeze well. Wrap them tightly in plastic wrap and then in aluminum foil, and they can be stored in the freezer for up to 2-3 months. When ready to enjoy, simply thaw at room temperature or warm them slightly in the microwave.
Conclusion
Cinnamon Roll Bliss Bars are a delightful fusion of flavors and textures, bringing the beloved taste of cinnamon rolls into an easy-to-make bar form. With simple ingredients and straightforward instructions, you can whip up a batch that will impress family and friends alike. Whether enjoyed warm out of the oven or chilled from the fridge, these bars are sure to become a favorite in your dessert repertoire. Indulge in the comforting flavors of cinnamon and cream cheese frosting, and share the joy of baking with others. Enjoy this sweet journey into the world of Cinnamon Roll Bliss Bars!