
Introduction
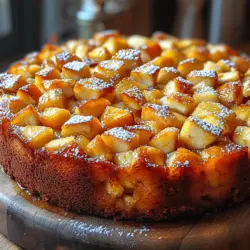
Apple-based desserts have a timeless appeal that captures the hearts and palates of many. From the classic apple pie to the comforting apple crisp, these treats evoke warmth and nostalgia, often reminding us of family gatherings and cozy afternoons spent in the kitchen. Among these delightful options, the Apple Bliss Cake stands out for its simplicity and irresistible flavor. This cake brings together the natural sweetness of fresh apples, the warmth of spices, and a soft, moist texture that makes it a perfect addition to any occasion—be it a festive celebration or a casual weeknight dessert.
What makes the Apple Bliss Cake particularly enchanting is its balance of sweetness and texture. The combination of tender apples and fluffy cake creates a harmonious experience that is both satisfying and indulgent. Whether you’re an experienced baker or just starting your culinary journey, this recipe is designed to be straightforward while delivering a delicious result that will impress your friends and family.
Understanding the Ingredients
To create a truly remarkable Apple Bliss Cake, understanding the key ingredients is essential. Each component plays a vital role in building the layers of flavor and texture that define this dessert.
Apples: The Star of the Show
Apples are undoubtedly the highlight of this cake. They add not only flavor but also moisture, creating a tender crumb that is essential for a memorable cake. Choosing the right type of apple is crucial; different varieties can significantly affect the final taste and texture.
Granny Smith apples, known for their tartness, provide a lovely contrast to the sweetness of the cake, enhancing the overall flavor profile. On the other hand, Honeycrisp apples offer a sweeter, juicier bite that can lead to a more mellow cake. A blend of both types can also work beautifully, balancing tart and sweet for a complex flavor experience. When selecting apples, look for firm, fresh specimens with a vibrant color, as these will yield the best results.
The Role of Sugar
Sugar is another important ingredient in the Apple Bliss Cake, playing a dual role in both flavor enhancement and moisture retention. The sugar not only sweetens the cake but also helps to balance the tartness of the apples. The right amount of sugar will amplify the apples’ natural flavors without overpowering them.
For those who prefer a less sweet cake, consider reducing the sugar slightly. However, keep in mind that adjusting sugar can also affect the cake’s texture, so it’s best to experiment cautiously.
The Importance of Self-Rising Flour
Self-rising flour is a key ingredient in this cake, contributing to its light and fluffy texture. This type of flour is pre-mixed with a leavening agent, typically baking powder, and salt, which means you won’t need to measure these components separately. This not only simplifies the baking process but also ensures that the cake rises evenly and achieves a perfect consistency.
If you don’t have self-rising flour on hand, you can easily make your own by combining all-purpose flour with baking powder and a pinch of salt. This substitution is straightforward and will yield results similar to using store-bought self-rising flour.
Preparation Steps for the Apple Bliss Cake
Now that we’ve covered the essential ingredients, let’s dive into the preparation process for the Apple Bliss Cake. A successful cake begins well before it enters the oven, and following these steps will set you up for success.
Preheating the Oven
The first step in preparing your Apple Bliss Cake is to preheat the oven to the specified temperature. Preheating is crucial in baking, as it ensures that the cake begins cooking at the right temperature from the moment it goes in. This helps create a beautiful rise, a desirable texture, and even baking throughout. Aim for a temperature of 350°F (175°C), which is standard for most cakes, including this one.
Greasing the Cake Pan
Next, prepare your cake pan by greasing it properly. This step is vital for ensuring that your cake releases easily once baked. You can use butter, cooking spray, or parchment paper to grease the pan. If using butter, apply a generous layer on the bottom and sides of the pan, then dust with flour to create a non-stick surface. Alternatively, lining the bottom with parchment paper can provide an extra layer of protection against sticking.
Preparing the Apples
With the oven preheating and the pan greased, it’s time to prepare the apples, which is a crucial step in achieving the best flavor and texture.
1. Peeling and Dicing vs. Grating: Depending on your preference for apple texture in the cake, you can choose to peel and dice the apples or grate them. Dicing will give you chunks of apple that provide bursts of flavor, while grating will incorporate the apples more evenly throughout the batter, adding moisture without noticeable pieces.
2. Maintaining Freshness and Flavor: If you choose to dice the apples, try to do this just before adding them to the batter, as pre-cut apples can oxidize and turn brown. To prevent this, you can toss them lightly with a bit of lemon juice, which not only preserves their color but also adds a subtle hint of acidity that enhances the overall flavor of the cake.
3. Measuring the Apples: Aim for about 2 to 3 cups of prepared apples, depending on how apple-forward you want the cake to be. Remember that the moisture from the apples will play a key role in the cake’s texture, so don’t skimp on this ingredient.
Mixing and Baking the Cake
With your ingredients prepared and your apples ready, it’s time to mix and bake the cake, where the magic truly happens.
Mixing the Ingredients
When it comes to mixing the ingredients, technique matters. Start by combining your sugar and melted butter in a mixing bowl. Creaming these ingredients together until light and fluffy helps incorporate air into the batter, contributing to a light texture. Once creamed, add eggs one at a time, mixing well after each addition to ensure they are fully incorporated.
Next, gradually incorporate the self-rising flour into the mixture, alternating with the prepared apples. This technique helps to maintain the best consistency, ensuring the batter forms a smooth mixture without overworking the flour, which can lead to a dense cake.
The Role of Apples’ Moisture
As you mix, you’ll notice that the moisture from the apples begins to bind the batter together. This is a key factor in achieving the desired texture. The apples not only provide flavor but also add necessary moisture, allowing the cake to remain tender and soft even after baking.
Pouring and Spreading in the Cake Pan
Once your batter is ready, it’s time to pour it into the prepared cake pan. Use a spatula to spread the batter evenly across the bottom of the pan. This ensures that the cake bakes uniformly, resulting in an even rise and a delightful crumb. Make sure to tap the pan gently on the counter to release any air bubbles trapped within the batter, which can create unwanted holes in the cake.
After you’ve shaped the batter, place the cake pan in the preheated oven and let it bake for the recommended time. Keep an eye on it, as baking times can vary based on your oven and the size of your pan. A toothpick inserted into the center should come out clean, indicating that your Apple Bliss Cake is ready to be enjoyed.
With these preparation and mixing steps, you’re well on your way to creating a delicious Apple Bliss Cake that will surely delight anyone lucky enough to enjoy a slice.
{{image_1}}
Baking Instructions
Once you have your ingredients prepped and ready, it’s time to dive into the baking of your Simple & Sweet Apple Bliss Cake. Follow these detailed steps for a perfect bake:
1. Preheat Your Oven: Start by preheating your oven to 350°F (175°C). This temperature is optimal for baking cakes, ensuring an even rise and a beautifully browned exterior.
2. Mixing the Batter: In a large mixing bowl, combine the flour, baking powder, baking soda, and salt. In a separate bowl, whisk together the sugar, eggs, and melted butter until well combined. Gradually add the dry ingredients to the wet ingredients, mixing until just combined. Be careful not to overmix; a few lumps are okay!
3. Incorporate the Apples: Fold in the diced apples, ensuring they are evenly distributed throughout the batter. This will provide the cake with moisture and natural sweetness.
4. Prepare the Baking Pan: Grease and flour a 9-inch round cake pan or line it with parchment paper to prevent sticking. Pour the batter into the prepared pan, smoothing the top with a spatula.
5. Bake the Cake: Place the cake pan in the preheated oven and bake for approximately 30-35 minutes. The ideal baking time can vary slightly based on individual oven performance, so keep an eye on it.
Ideal Baking Time and Visual Cues for Doneness
To determine if your Apple Bliss Cake is done, look for several visual cues:
– Golden Brown Top: The top of the cake should be a light golden brown color.
– Firmness: Gently press the top of the cake; it should spring back without leaving an indentation.
– Edges Pulling Away: The edges of the cake may start to pull away from the sides of the pan.
The Science Behind Toothpick Testing for Cake Readiness
For the most reliable test, use the toothpick method. Insert a toothpick or a skewer into the center of the cake. If it comes out clean or with a few moist crumbs, your cake is ready. If it comes out wet with batter, it needs more time in the oven. This method is effective because it allows you to check the cake’s doneness without cutting into it.
Cooling and Serving Suggestions
Once your cake is baked to perfection, it’s important to let it cool properly. This step significantly affects the cake’s flavor and texture.
Importance of Cooling the Cake Properly
Cooling is crucial for allowing the cake to set. When a cake cools, it stabilizes, leading to a better texture and preventing it from falling apart when sliced. A warm cake may also continue to cook slightly from residual heat, which could lead to a drier texture.
How Cooling Affects Flavor and Texture
As the cake cools, the flavors meld and mature, enhancing the overall taste. If you cut into the cake too early, it might crumble and lose its perfect moisture.
Steps for Transferring the Cake to a Wire Rack
1. Cool in the Pan: Allow the cake to cool in the pan for about 10-15 minutes after removing it from the oven. This helps it set, making it easier to transfer.
2. Flip the Cake: Run a knife around the edge of the pan to loosen the cake. Place a wire rack over the top of the pan, flip it upside down, and gently tap the pan to release the cake.
3. Cool Completely: Let the cake cool completely on the wire rack before serving.
Serving Ideas for the Apple Bliss Cake
The Simple & Sweet Apple Bliss Cake can be enjoyed in various ways:
– Beverage Pairings: This cake pairs beautifully with a warm cup of tea or freshly brewed coffee. The warm spices and sweetness of the cake complement the flavors of these beverages.
– Creative Serving Options: For an elegant touch, dust the cake with powdered sugar before serving. Alternatively, a dollop of whipped cream or a scoop of vanilla ice cream can elevate the dessert, adding creaminess that contrasts with the cake’s sponginess.
Nutritional Information
Understanding the nutritional content can help you enjoy this delightful cake while maintaining a balanced diet.
Breakdown of Nutritional Content per Serving
The following nutritional information is based on a standard recipe serving about 12 pieces:
– Calories: Approximately 220 calories per slice
– Carbohydrates: About 30 grams
– Sugar: Roughly 15 grams
– Fiber: Approximately 2 grams
Discussion on the Health Benefits of Apples
Apples are not only delicious but also packed with nutrients. They are an excellent source of dietary fiber and vitamin C, contributing to overall health. The fiber helps to support digestive health, while vitamin C boosts the immune system.
Nutrient Content and How They Contribute to a Balanced Diet
Incorporating apples into your diet can aid in weight management, lower the risk of chronic diseases, and promote heart health. Additionally, the cake’s use of whole ingredients replaces some refined sugars and flours, making it a more nutritious option for dessert.
Variations and Customizations
The Simple & Sweet Apple Bliss Cake can be easily tailored to suit individual tastes. Here are some ideas for modifications:
Ideas for Modifying the Apple Bliss Cake
– Adding Spices: Enhance the flavor profile by incorporating spices such as cinnamon or nutmeg. These warm spices complement the apples beautifully and provide a cozy flavor.
– Incorporating Nuts: Add texture by folding in chopped walnuts or pecans. Nuts not only add crunch but also provide healthy fats and protein.
– Suggestions for Glazes or Frostings: Consider drizzling a simple glaze made from powdered sugar and apple cider over the cooled cake for added sweetness. Alternatively, a cream cheese frosting can create a richer dessert experience.
Conclusion
In summary, the Simple & Sweet Apple Bliss Cake is a delightful dessert that brings together the comforting flavors of apples, warm spices, and a moist, tender crumb. This recipe offers not just a delicious treat but also an opportunity to enjoy the process of baking and sharing with loved ones.
Embrace the joy of baking by trying out this recipe and making it your own. Experiment with variations, such as different spices or add-ins, to suit your preferences. Whether enjoyed at a family gathering or a quiet afternoon at home, this cake is sure to bring smiles and satisfaction to all who taste it. So gather your ingredients and let the baking adventures begin!