
Introduction
Garlic bread rolls are a beloved staple in various cuisines around the globe, cherished for their aromatic flavors and comforting textures. Whether served as an accompaniment to pasta, a side for soups, or simply enjoyed on their own, these rolls have a universal appeal that transcends cultural boundaries. The allure of homemade garlic bread rolls lies in their freshness, allowing you to control every aspect of the recipe, from the ingredients used to the flavors incorporated.
Crafting garlic bread rolls at home is not only a rewarding culinary experience but also a fantastic way to impress family and friends during gatherings, dinners, or casual get-togethers. The process is surprisingly straightforward, and the results are nothing short of delightful. With a crispy exterior and a soft, fluffy interior, these rolls can be customized to suit individual tastes, making them a versatile option for any occasion.
In this article, we will explore the essential ingredients that contribute to the perfect garlic bread rolls, the science behind bread making, and provide a comprehensive step-by-step guide to help you create these delightful treats in your kitchen.
Understanding the Ingredients
All-Purpose Flour
At the heart of every great bread recipe lies all-purpose flour. This versatile ingredient is essential for providing structure to the rolls. All-purpose flour contains a moderate level of protein, which is crucial for gluten development. Gluten is a network of proteins that gives bread its chewy texture and helps it rise. For garlic bread rolls, using high-quality all-purpose flour ensures that the dough has the right balance of strength and extensibility, allowing it to hold its shape while providing a tender crumb.
Instant Yeast
Instant yeast is the key player in the fermentation process, responsible for making the dough rise. Unlike active dry yeast, instant yeast can be mixed directly with dry ingredients without the need for proofing. This convenience makes it an excellent choice for home bakers looking to save time. Instant yeast works quickly, producing carbon dioxide that creates air pockets in the dough, resulting in a light and airy texture. Additionally, its ability to withstand higher temperatures allows for more flexibility in baking.
Olive Oil
Incorporating olive oil into your garlic bread rolls not only enhances the flavor but also contributes to the overall texture. Fat plays a crucial role in bread making by tenderizing the dough, making it softer and more pliable. Olive oil adds a distinct richness that complements the garlic and herbs, elevating the flavor profile of the rolls. Furthermore, using olive oil can improve the shelf life of the bread, helping it stay fresh longer.
Garlic and Herbs
Garlic is the star ingredient in these rolls, providing a robust and aromatic flavor that pairs beautifully with the bread. Fresh minced garlic infuses the dough with its distinctive taste, while also offering numerous health benefits, including antioxidant properties and anti-inflammatory effects. To enhance the flavor further, you can incorporate a variety of herbs such as parsley, oregano, or thyme. These herbs not only add depth to the flavor profile but also bring a burst of color and freshness to the finished rolls.
Optional Ingredients
For those looking to elevate their garlic bread rolls even further, consider adding grated Parmesan cheese to the dough or as a topping. The salty, nutty flavor of Parmesan complements the garlic and herbs, creating a rich and savory experience. You can also experiment with different cheeses, such as mozzarella or cheddar, to create unique variations that cater to your taste preferences.
The Science Behind Bread Making
Understanding the science of bread making can significantly improve your baking results. The fermentation process begins when yeast is mixed with flour and water. The yeast feeds on the sugars in the flour, producing carbon dioxide gas and alcohol in the process. This gas gets trapped in the gluten network, causing the dough to rise.
Kneading the dough is a vital step in developing gluten, as it strengthens the protein structure and ensures a good rise. Kneading also helps distribute the ingredients evenly and creates a smooth, elastic texture. A well-kneaded dough should be soft and slightly tacky but not overly sticky.
To achieve the perfect dough consistency, pay attention to the hydration level. If the dough feels too dry, you can add small amounts of water; if it’s too wet, incorporate a bit more flour. The goal is to create a dough that is manageable and elastic, capable of holding its shape during the rising and baking processes.
Step-by-Step Guide to Making Garlic Bread Rolls
Preparing the Dough
1. Gather Your Ingredients: Start by collecting all your ingredients in one place. This includes all-purpose flour, instant yeast, olive oil, minced garlic, and any herbs or optional ingredients you plan to use.
2. Mix Dry Ingredients: In a large mixing bowl, combine the all-purpose flour, instant yeast, and salt. Whisk the dry ingredients together to ensure an even distribution of the yeast and salt.
3. Add Wet Ingredients: Create a well in the center of the dry mixture and pour in warm water and olive oil. The water should be warm to the touch but not hot, as excessive heat can kill the yeast. Add the minced garlic and any herbs you wish to incorporate.
4. Combine: Using a wooden spoon or a spatula, mix the ingredients until they begin to form a cohesive dough. The mixture will seem shaggy at first but will come together as you continue to stir.
Kneading the Dough
Once your dough has formed, it’s time to knead it to develop gluten and achieve a smooth texture.
1. Transfer to a Floured Surface: Lightly flour your work surface and turn the dough out onto it.
2. Begin Kneading: With floured hands, start kneading the dough by pushing it away from you with the heel of your hand, then folding it back over itself. Rotate the dough a quarter turn and repeat.
3. Knead Until Smooth: Continue kneading for about 8-10 minutes or until the dough is smooth and elastic. You should notice that it becomes less sticky and more manageable as you work with it. A sign that your dough is well-kneaded is when it springs back when gently pressed with a finger.
4. Rest the Dough: Once kneaded, shape the dough into a ball and place it in a lightly greased bowl. Cover the bowl with a clean kitchen towel or plastic wrap to prevent it from drying out. Allow the dough to rise in a warm, draft-free area for about 1-1.5 hours, or until it has doubled in size.
As you embark on this culinary journey, you’ll not only enjoy the delightful aroma of garlic wafting through your kitchen but also gain a deeper appreciation for the art and science of bread making. Stay tuned for the next part, where we’ll cover shaping the rolls, baking, and serving suggestions for your homemade garlic bread rolls.
{{image_1}}
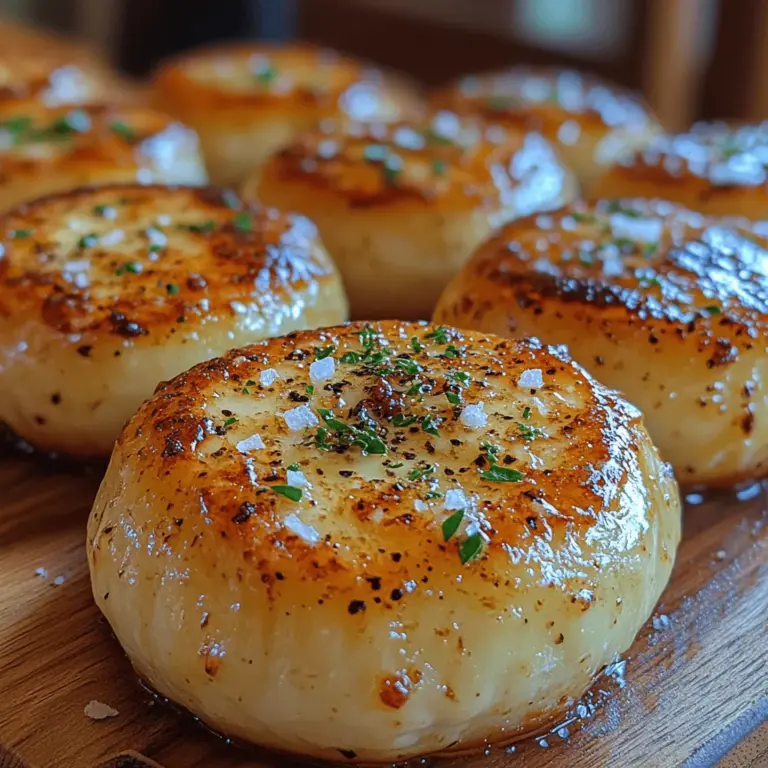
Preparing the Garlic Butter
To create the irresistible garlic bread rolls that everyone loves, the garlic butter is a crucial component. It’s essential to use high-quality ingredients to enhance the flavors and aromas of your rolls. Start with unsalted butter, as this allows you to control the saltiness of your dish. Let the butter come to room temperature for easy mixing.
For the garlic butter, finely mince 4-5 cloves of fresh garlic. The key here is to use fresh garlic rather than pre-minced or powdered varieties, as fresh garlic provides a more robust flavor and aroma. You might even consider using roasted garlic for a sweeter, milder flavor profile. Next, add a handful of freshly chopped parsley, which not only adds color but also a fresh herbaceous taste that complements the garlic beautifully. If you want a bit of a kick, consider adding a pinch of red pepper flakes or a dash of black pepper.
In a mixing bowl, combine the softened butter, minced garlic, chopped parsley, and any additional seasonings. Mix thoroughly until all ingredients are well incorporated. You want this mixture to be smooth and spreadable. Once mixed, set it aside to allow the flavors to meld and intensify.
Shaping the Rolls
Once your dough has risen to twice its size, it’s time to shape the garlic bread rolls. Begin by gently punching down the dough to release any air bubbles. On a lightly floured surface, turn out the dough and divide it into equal portions. The size of each piece depends on how large you want your rolls, but typically, a portion of about 2 ounces works well.
To shape the rolls uniformly, take a piece of dough and flatten it slightly with your hands. Fold the edges towards the center and pinch to seal, then roll it gently into a ball using your palms. This technique creates surface tension, which helps the rolls maintain their shape during the second rise and baking process.
Once shaped, place the rolls on a baking tray lined with parchment paper or a silicone baking mat, ensuring they have enough space between them to rise without touching. Cover the tray with a clean kitchen towel and allow the rolls to rest for about 30 minutes. This second rise is crucial as it allows the dough to puff up, ensuring a light and airy texture once baked.
Baking the Perfect Garlic Bread Rolls
Preheating the Oven
While the rolls are rising, preheat your oven to 375°F (190°C). Preheating is vital for achieving an even bake, as it ensures that the rolls begin cooking immediately once placed in the oven, promoting a perfect crust and fluffy interior.
Applying the Garlic Butter
After the second rise, it’s time to apply your flavorful garlic butter. Using a pastry brush, generously coat the tops of the rolls with the garlic butter mixture. Be sure to spread it evenly to ensure that every bite is infused with that delicious garlic flavor. For an extra touch, you can also brush the butter around the sides of the rolls.
Baking Time and Temperature
Place the baking tray in your preheated oven and bake for 20-25 minutes, or until the rolls are golden brown and have a lovely crust. Keep an eye on them towards the end of the baking time. A good indicator of doneness is a hollow sound when you tap the bottom of a roll.
Final Touches
Once the rolls are out of the oven, brush them with any remaining garlic butter to enhance the flavor and shine. This step not only adds additional flavor but also keeps the rolls moist. Let them cool on a wire rack for a few minutes before serving to allow the steam to escape.
Serving Suggestions for Garlic Bread Rolls
Garlic bread rolls are incredibly versatile and can be served in numerous ways:
– Pairing with Pasta Dishes: These rolls complement a wide variety of pasta dishes. Consider serving them alongside a classic spaghetti marinara or a creamy fettuccine Alfredo. The buttery garlic flavor adds richness to the meal, making it a comforting and satisfying experience.
– Serving as Appetizers: Garlic bread rolls can also shine as standalone appetizers. Serve them warm with a selection of dips or spreads. A marinara sauce for dipping, a creamy spinach-artichoke dip, or even a simple olive oil and balsamic vinegar mixture can elevate your garlic rolls to new heights.
– Storing and Reheating: If you have any leftover rolls (which is rare!), store them in an airtight container at room temperature for up to two days. To maintain their freshness, you can also freeze them. When ready to enjoy, reheat in a 350°F (175°C) oven for about 10 minutes to restore their warmth and texture.
Nutritional Information
Understanding the nutritional profile of your garlic bread rolls can help you make informed choices. Each roll contains approximately 150 calories, with varying nutritional values depending on the specific ingredients used.
Breakdown per Serving (1 Roll):
– Calories: 150
– Total Fat: 7g (Saturated Fat: 4g)
– Cholesterol: 20mg
– Sodium: 150mg
– Total Carbohydrates: 18g (Dietary Fiber: 1g, Sugars: 1g)
– Protein: 3g
The primary ingredients, such as garlic and parsley, offer health benefits as well. Garlic is known for its anti-inflammatory properties and potential immune-boosting effects, while parsley is rich in vitamins A, C, and K.
Low-Calorie or Gluten-Free Adaptations
If you’re looking to reduce calories, consider using light butter or a butter alternative. For a gluten-free version, substitute regular flour with a gluten-free flour blend, ensuring that the mixture is suitable for baking.
Conclusion
There’s something truly delightful about making garlic bread rolls from scratch in your own kitchen. The aroma of fresh bread baking, combined with the potent scent of garlic butter, creates an inviting atmosphere that brings family and friends together. These rolls are not just a side dish; they are a centerpiece that can elevate any meal.
Feel free to experiment with different herbs, spices, and additional flavors like cheese or sun-dried tomatoes to make the recipe your own. The joy of serving freshly baked rolls to your loved ones is unmatched, and the satisfaction of creating something delicious with your own hands is a reward in itself. Try these garlic bread rolls today, and share the warmth and comfort they bring to your table.
