Spooky Monster Rice Krispie Treats Recipe
As the leaves turn crisp and the air becomes tinged with the scent of pumpkin spice, the festive spirit of Halloween begins to envelop us. It’s the perfect time to channel your creativity into themed treats that not only tantalize the taste buds but also bring a dash of fun to any gathering. Among the myriad of Halloween goodies, Spooky Monster Rice Krispie Treats stand out as a delightful option for parties, family get-togethers, or an engaging activity for children. These treats are not only easy to make but also offer a canvas for artistic expression, allowing bakers of all skill levels to craft their own spooky creations.
The Allure of Rice Krispie Treats
Rice Krispie Treats have a rich history that dates back to the 1930s when they were first introduced by Kellogg’s. Originally featured in a promotional campaign, these sweet snacks quickly gained popularity and became a staple in American households. Their simple combination of crispy cereal, melted marshmallows, and butter creates a unique texture that is both crunchy and gooey—a delightful paradox that has won over hearts and palates for generations.
The versatility of Rice Krispie Treats makes them particularly beloved during festive times, especially Halloween. They serve as an excellent foundation for creativity, allowing bakers to incorporate various colors, shapes, and decorations that align with the playful spirit of the holiday. The fun part is letting your imagination run wild—whether it’s transforming them into spooky monsters, witches, or even ghostly figures, the possibilities are endless.
Ingredients Overview
To create your Spooky Monster Rice Krispie Treats, you’ll need a handful of simple ingredients, each playing a crucial role in crafting these festive delights:
– Rice Krispies Cereal: This iconic cereal serves as the base of the treat. Its light, crispy texture provides the perfect crunch that balances the gooeyness of the marshmallows.
– Mini Marshmallows: These little puffs are the key to achieving that sweet, sticky consistency essential for binding the Rice Krispies together. As they melt, they create a deliciously gooey mixture that forms the core of the treat.
– Unsalted Butter: Adding richness and depth to the flavor profile, butter not only enhances the taste but also helps in the melting process, ensuring a smooth mixture.
– Vanilla Extract: A subtle yet impactful addition, vanilla extract elevates the overall taste of the treats, imparting a warm and aromatic flavor that complements the sweetness of the marshmallows.
– Green Food Coloring: This ingredient is crucial for achieving the monster theme. A few drops will transform your mixture into a vibrant green, setting the stage for your creepy creations.
– White Chocolate Chips: Perfect for decorating, these chips add a sweet finish and can be melted down to create monster features or drizzled over the treats for an extra touch of sweetness.
– Chocolate Sprinkles: These add a festive touch and a bit of texture to your treats, making them visually appealing and fun to eat.
– Assorted Candy Eyes: Essential for bringing your monsters to life, these candy eyes can be placed on top of your treats to give them a playful and spooky appearance.
– Mini Pretzel Rods: These serve as unique edible horns, enhancing the monster theme and adding a salty crunch that contrasts beautifully with the sweetness of the treats.
– Edible Glitter (Optional): For those looking to add an enchanting, magical finish to their spooky monsters, a sprinkle of edible glitter can take the presentation to the next level.
Step-by-Step Instructions for Spooky Monster Rice Krispie Treats
Preparation of the Baking Dish
Before diving into the fun of melting and mixing, it’s essential to prepare your baking dish properly. Start by greasing a 9×13 inch baking pan to ensure that your treats come out easily once set. You can use unsalted butter or a cooking spray to coat the pan. Make sure to cover all the corners and edges to prevent sticking, which can make the removal process quite challenging later.
Melting Butter and Marshmallows
Once your baking dish is ready, it’s time to melt the butter and marshmallows. In a large saucepan over low heat, combine the unsalted butter with the mini marshmallows. Stir continuously until both ingredients are completely melted and smooth. This process usually takes about 5-7 minutes, and it’s important to keep the heat low to prevent the mixture from burning.
Once the butter and marshmallows have melted together, remove the saucepan from heat. At this point, you can add a splash of vanilla extract to enhance the flavor. For the spooky green color, add a few drops of green food coloring—mix well until you achieve your desired shade. The result should be a creamy, vibrant mixture that’s ready to bind the Rice Krispies.
Next, you’ll gradually add the Rice Krispies cereal to the melted marshmallow mixture. Stir carefully, ensuring that all the cereal is evenly coated. This step is crucial, as you want to maintain the crispness of the cereal while ensuring that every piece is enveloped in the gooey marshmallow mixture. Once fully combined, transfer the mixture into the prepared baking dish, pressing it down gently with a spatula to create an even layer.
Stay tuned for the next part of this article, where we will explore the fun process of decorating these Spooky Monster Rice Krispie Treats, transforming them into delightful Halloween-themed snacks that are sure to impress!
Creating Spooky Monster Rice Krispie Treats is not only a delightful way to celebrate Halloween but also an easy and fun activity that can get the whole family involved. In this section, we will dive deeper into the intricate steps of making these treats, including tips for achieving the perfect texture, incorporating flavor and color, decorating them, and serving suggestions that will wow your guests. Let’s get started!
Melting the Marshmallows
The first step in crafting your Spooky Monster Rice Krispie Treats is to melt the marshmallows. Start by using a large pot over low heat. This is crucial for preventing the marshmallows from burning, which can happen quickly if the heat is too high. Stir continuously as the marshmallows begin to melt, this helps achieve a smooth, creamy texture.
Tips for Achieving a Smooth Texture
– Use a Non-Stick Saucepan: A non-stick pot allows for easier cleanup and less chance of marshmallows sticking to the bottom.
– Low and Slow: Patience is key. Keeping the heat low allows the marshmallows to melt evenly without scorching.
– Incorporate Butter: Adding a tablespoon of butter to the pot while melting will help create a silkier consistency.
Incorporating Flavor and Color
Once the marshmallows are completely melted, it’s time to add flavor and color. This enhances your treats and makes them visually appealing.
Mixing in Vanilla Extract and Food Coloring
After removing the pot from heat, add a teaspoon of vanilla extract for a touch of flavor. Stir it in gently to combine. Now, it’s time to add the food coloring.
Achieving Different Shades of Green
– Starting Point: Begin with a few drops of green food coloring. Mix thoroughly.
– Customize It: To achieve different shades, you can mix in a drop of blue or yellow food coloring. Adjust according to your preference until you reach the desired hue.
Combining Cereal with Marshmallow Mixture
Now that your marshmallow mixture is flavorful and colorful, it’s time to fold in the Rice Krispies cereal.
Folding Without Crushing
To ensure your cereal maintains its crunch, use a spatula to gently fold the cereal into the marshmallow mixture. Here’s how:
– Add in Batches: Pour in about a third of the cereal at a time, folding it in carefully. This prevents crushing and ensures even coating.
– Use a Spatula: A silicone spatula works best for this. It allows for better control and helps prevent the mixture from sticking.
Ensuring Even Coating
Once all the cereal is incorporated, make sure that every piece is evenly coated with the marshmallow mixture. This will enhance the flavor and texture of your treats.
Transferring to the Baking Dish
With your mixture ready, it’s time to transfer it to a baking dish.
Flattening the Mixture
– Use a Parchment Lined Dish: Line your baking dish with parchment paper for easy removal later.
– Press Evenly: Using your hands (lightly greased with butter to prevent sticking) or a spatula, press the mixture down into the dish evenly. Aim for about an inch thick for the perfect treat size.
Cooling for Proper Setting
Allow the treats to cool at room temperature for at least 30 minutes. This setting time is crucial for ensuring they hold their shape when cut.
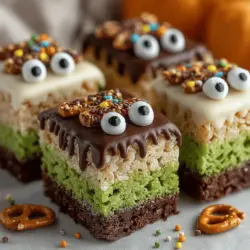
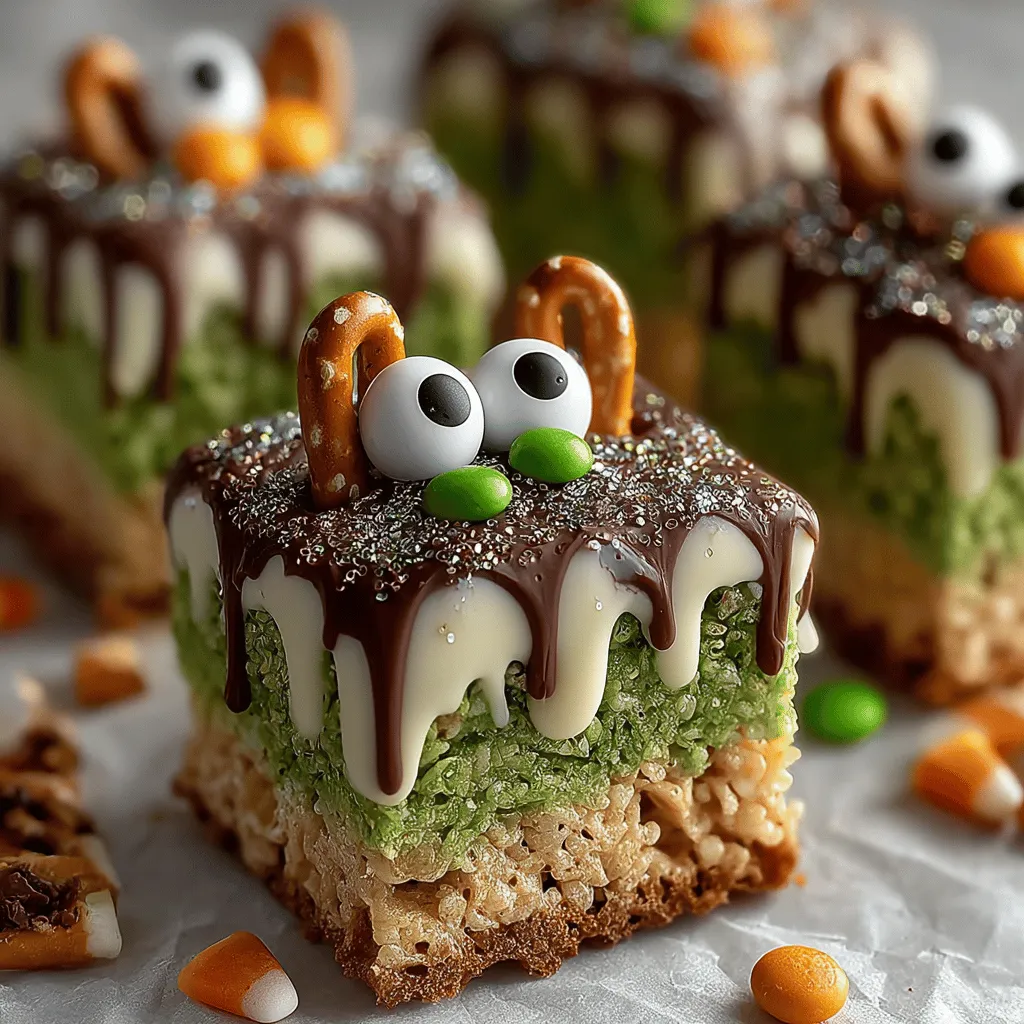
Decorating the Treats
Now comes the fun part—decorating your Spooky Monster Rice Krispie Treats!
Melting White Chocolate
To create a base for your decorations, melt white chocolate in a microwave-safe bowl. Heat in 30-second increments, stirring in between until smooth.
Creative Monster Face Designs
– Drizzle Technique: Use a piping bag or a plastic bag with a corner snipped off to drizzle melted chocolate over the cooled treats.
– Sprinkles and Candy Eyes: After drizzling, immediately add colorful sprinkles and candy eyes to create fun monster faces.
Adding Final Touches
For an extra spooky flair, you can add unique features to your monster creations.
Securing Pretzel Rods for Horns
– Pretzel Rods: Insert mini pretzel rods into the top of the treats for horns. Melt a bit of chocolate to secure them in place for added stability.
– Edible Glitter: A sprinkle of edible glitter can elevate the visual appeal, making your treats sparkle.
Presentation and Serving Suggestions
Once your Spooky Monster Rice Krispie Treats are decorated and ready, it’s time to think about presentation.
Serving at Halloween Parties
– Platter Display: Arrange the treats on a festive platter with Halloween decorations like mini pumpkins or spider webs for a themed look.
– Individual Wrapping: Wrap each treat in clear cellophane tied with a colorful ribbon for individual servings, making them perfect for party favors.
Packaging and Gifting
These treats make wonderful gifts for friends and family:
– Creative Packaging: Use Halloween-themed boxes or bags. You can even include a recipe card for a personal touch.
– Different Themes: Adjust colors and decorations to suit different seasonal themes, allowing for year-round enjoyment.
Conclusion
In summary, making Spooky Monster Rice Krispie Treats is a delightful and straightforward process. The combination of gooey marshmallows, crispy cereal, and creative decorating makes these treats a festive hit for any Halloween gathering. Not only do they provide a delicious sweet treat, but they also offer an opportunity to bond with family and friends in the kitchen.
Embrace your creativity as you mix flavors, colors, and decorations. This Halloween season, bring joy and fun to your celebrations with these whimsical treats. Each bite is not just a taste of sweetness but also a memory in the making, so gather your loved ones, turn on some spooky music, and create your very own Spooky Monster Rice Krispie Treats!