Spooky Halloween Treats for a Festive Celebration
As October rolls around, the air becomes crisp, the leaves turn vibrant shades of orange and red, and the excitement of Halloween begins to fill the atmosphere. This festive holiday is not only about spooky costumes and haunted houses; it’s also a time for indulging in creative and fun treats that delight both young and old. Halloween celebrations are often incomplete without an array of themed snacks that add a playful touch to parties, classrooms, and family gatherings.
In this article, we’ll explore three imaginative and easy-to-make Halloween-themed recipes that are sure to impress your guests: Spooky Spider Crackers, Ghostly Banana Pops, and Monster Fruit Cups. Each of these treats brings a unique flair to your Halloween festivities while incorporating simple ingredients that are easy to find. Let’s dive into our first recipe, the Spooky Spider Crackers, which perfectly balance a creepy aesthetic with a delicious taste.
Spooky Spider Crackers: A Creepy Yet Cute Snack
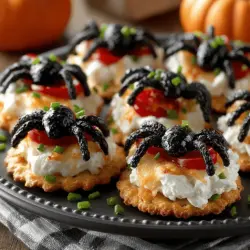
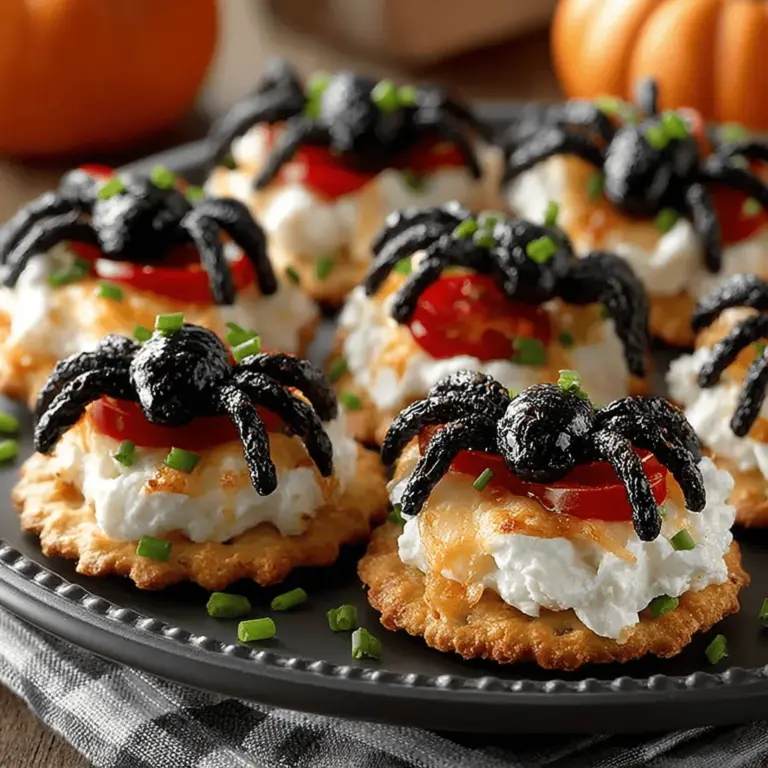
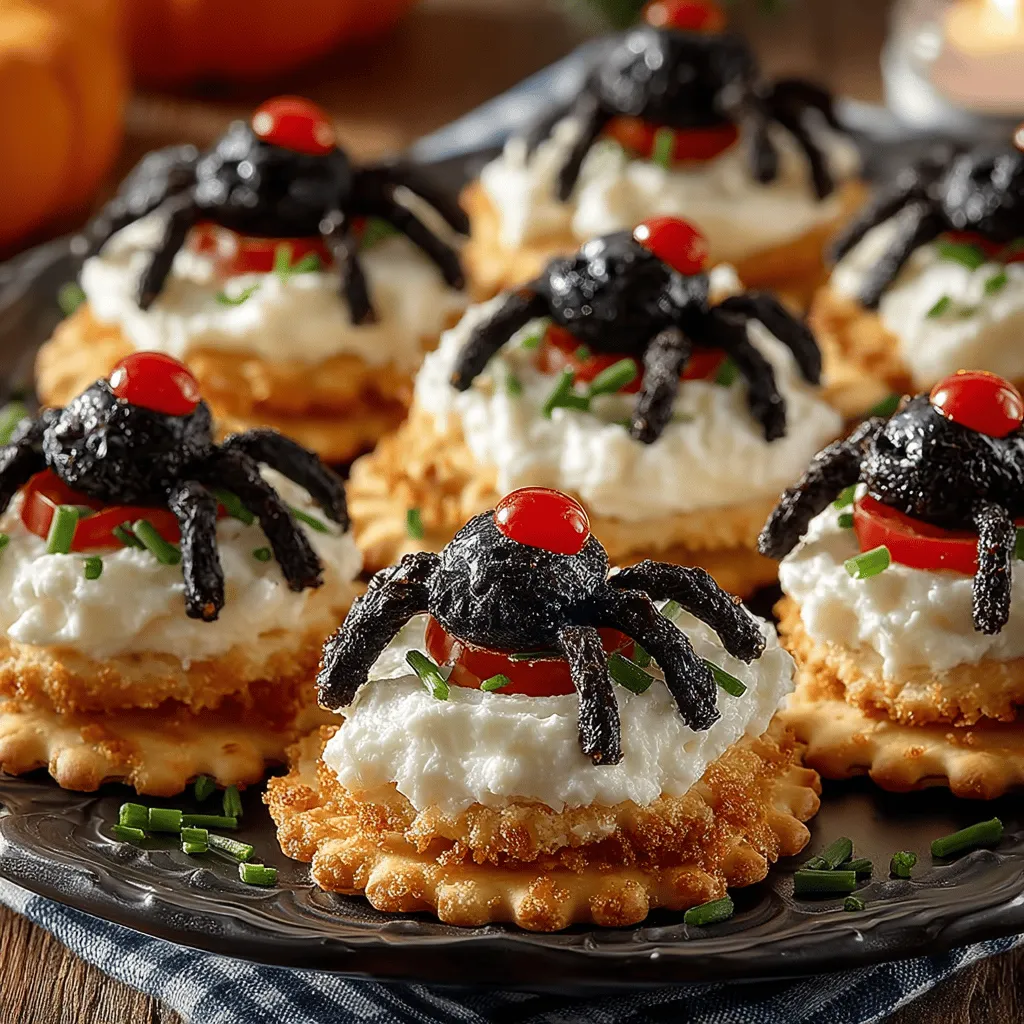
Imagine a platter of crackers adorned with playful, edible spiders that look both creepy and cute. The Spooky Spider Crackers are not only a visual delight, but they also pack a flavorful punch, making them an ideal addition to your Halloween spread. These snacks are perfect for kids who want a fun treat and adults who appreciate a little creativity in their appetizers.
The appeal of themed snacks during Halloween cannot be overstated. They not only capture the spirit of the holiday but also spark creativity, making the act of eating a memorable experience. Whether you’re hosting a Halloween party, organizing a classroom celebration, or simply enjoying a night in with family, these crackers will be a hit.
Ingredients Overview
To create your Spooky Spider Crackers, you will need the following ingredients:
– Crackers: Choose your favorite variety, such as whole grain or classic saltines, as the base for your spiders.
– Cream Cheese: This creamy spread serves as a base and helps to adhere the spider components to the crackers.
– Black Olives: These will be used to create the spider bodies and legs, adding a touch of spookiness to your presentation.
– Red Bell Pepper: This ingredient will provide the perfect pop of color for the spider’s eyes.
– Chives: Finely chopped chives can be used to garnish and enhance the appearance of the eyes.
– Paprika (optional): A dusting of paprika adds an extra layer of flavor and a hint of color to the finished product.
Each ingredient plays a crucial role in bringing the Spooky Spider Crackers to life. The cream cheese adds a rich texture that contrasts beautifully with the crunch of the crackers, while the olives contribute a fun factor that will have everyone talking. The bell pepper eyes add a shocking twist, ensuring that these snacks are as visually appealing as they are tasty.
Step-by-Step Instructions for Crafting Spooky Spider Crackers
Now that you have your ingredients ready, it’s time to get creative in the kitchen. Follow these step-by-step instructions to craft your Spooky Spider Crackers:
Preparing the Cream Cheese
Begin by softening the cream cheese. Let it sit at room temperature for about 15-30 minutes until it becomes easier to spread. For an added twist, consider incorporating herbs or spices into the cream cheese to enhance the flavor. A dash of garlic powder or a sprinkle of Italian seasoning can elevate the taste of your crackers while maintaining the festive theme.
Spreading the Base
Once your cream cheese is at the desired consistency, take a butter knife or spatula and spread a generous layer over each cracker. A uniform application will not only make the crackers look appealing but will also ensure that every bite is packed with flavor. Aim for a thickness of about 1/4 inch to create a smooth canvas for your spider creations.
Crafting the Spiders
Next, it’s time to get crafty. Take your black olives and slice them in half. Each half will serve as the body of a spider. For the legs, cut additional olives into thin strips; you will need four legs per spider. Arrange the olive halves on the cream cheese layer, and then place the strips around the body to form the legs. Encourage creativity – some spiders can be larger or smaller depending on how you cut the olives, allowing for a variety of spooky critters to adorn your platter.
Assembling the Snack
With the spiders crafted, it’s time to assemble your snack. Carefully place the olive halves on top of the cream cheese layer, ensuring they are centered and stable. Arrange the legs around the body, adjusting them as needed to create a natural look. The more whimsical the spider, the more fun it will be for your guests.
Adding Bell Pepper Eyes
To give your spiders a striking appearance, use the red bell pepper to create their eyes. Cut small triangles or circles from the bell pepper and place them above the olive body. For an added touch of detail, use finely chopped chives to create “pupils” in the eyes. This simple addition will bring your spooky spiders to life and add a vibrant color contrast to your crackers.
Dusting with Paprika
As a final step, consider adding a light dusting of paprika over the assembled crackers. This optional step not only enhances the visual appeal but also introduces a subtle flavor that can complement the cream cheese and olives beautifully.
Serving Suggestions
To elevate your serving presentation, arrange the Spooky Spider Crackers on a festive platter. You can add decorative elements such as fake cobwebs or plastic spiders around the edges for an extra Halloween touch. Consider pairing these snacks with other themed treats to create a cohesive Halloween spread that will impress your guests and encourage them to indulge in the festive spirit.
As you prepare your Spooky Spider Crackers, remember that the key to a successful Halloween treat is creativity and fun. These snacks are more than just food; they are an experience that evokes the playful spirit of the holiday. Whether served at a party or enjoyed at home, they are sure to become a beloved tradition in your Halloween celebrations.
Stay tuned for the next section of our Halloween treats series, where we will introduce the delightful Ghostly Banana Pops, a sweet treat that will enchant both kids and adults alike.
Importance of Cutting and Inserting Sticks for Easy Handling
When preparing your Spooky Spider Crackers, one essential step is cutting the bananas into manageable sizes and inserting sticks for easy handling. This process not only enhances the presentation but also makes it easier for guests, especially children, to enjoy the treats without any mess. By using sturdy lollipop sticks or wooden skewers, you can create delightful banana pops that resemble ghostly figures, making them fun and playful additions to your Halloween spread.
Melting the Chocolate
To create a delicious outer layer for your banana pops, melting chocolate is a vital step. For this recipe, you can choose either milk chocolate, dark chocolate, or white chocolate, depending on your preference. The key to achieving a smooth melt without burning the chocolate is to use a double boiler or microwave.
1. Double Boiler Method: Fill a saucepan with a couple of inches of water and place a heatproof bowl on top, ensuring it doesn’t touch the water. Heat the water over medium heat, add your chocolate to the bowl, and stir continuously until melted and smooth.
2. Microwave Method: Place the chocolate in a microwave-safe bowl and heat in 30-second intervals, stirring in between. This will help distribute the heat evenly and prevent scorching. Once melted, the chocolate should be glossy and fluid, ready for dipping.
Dipping the Bananas
Once your chocolate is melted, it’s time to dip the bananas. This step is crucial for achieving an even coating and creating a beautiful finish on your ghostly treats.
1. Coat the Bananas: Hold the banana pop by the stick and dip it into the melted chocolate, ensuring it is fully coated. To achieve an even coating, gently swirl the banana in the chocolate, allowing the excess to drip off back into the bowl.
2. Letting Excess Chocolate Drip Off: After dipping, give the banana pop a gentle shake to remove any excess chocolate. This not only prevents a thick layer of chocolate from forming but also ensures a more appealing appearance once it sets.
Creating Ghost Faces
To add character and charm to your spooky banana pops, you can create fun ghost faces using mini chocolate chips.
1. Designing Expressions: Use two mini chocolate chips for eyes and one for the mouth to craft different expressions on each banana. You can get creative here—some ghosts can be happy, while others can look surprised or silly. This personalization makes each pop unique and adds to the festive spirit.
Chilling and Setting
After decorating your banana pops with chocolate faces, it’s essential to chill them to set the chocolate.
1. Chilling Process: Place the dipped banana pops on a parchment-lined baking sheet and transfer them to the freezer for about 30 minutes. This will help the chocolate firm up quickly, ensuring that your ghostly treats maintain their shape when served.
Presentation Ideas
When it comes to serving your spooky banana pops, presentation is key. Here are some fun suggestions to display them at your Halloween party:
1. Spooky Stand: Place the banana pops in a decorative pumpkin or a jar filled with rice or beans to keep them upright. This adds a festive touch to your table and makes it easy for guests to grab a treat.
2. Ghostly Platter: Arrange the pops on a black or orange platter, surrounding them with Halloween-themed decorations such as plastic spiders or cobwebs for an eye-catching display.
Monster Fruit Cups: A Healthy Halloween Option
As you delight in the spooky treats, consider offering a healthier alternative that still fits the Halloween theme—Monster Fruit Cups. These colorful creations are not only festive but also nutritious, making them a great addition to your party menu.
Ingredients Overview
For Monster Fruit Cups, the ingredient list can be as versatile as your favorite seasonal fruits. Here’s what you’ll need:
– Fresh Seasonal Fruits: Choose a variety of fruits such as strawberries, blueberries, grapes, kiwi, and bananas for a colorful mix.
– Yogurt: Use plain Greek yogurt or flavored yogurt for added taste. You can also opt to enhance plain yogurt with honey or vanilla extract.
– Candy Eyes: These will be used to create fun monster faces.
– Banana Teeth: Cut bananas into small pieces to resemble teeth.
– Optional Toppings: Consider adding granola, nuts, or shredded coconut for added texture and flavor.
Step-by-Step Instructions for Assembling Monster Fruit Cups
Preparing the Fruit
Start by selecting in-season fruits for the best flavor and freshness. Wash all the fruits thoroughly, and cut them into manageable pieces.
1. Cutting Techniques: For example, slice strawberries, halve grapes, and cut kiwi into small cubes. The goal is to create a colorful and varied mix that will appeal to kids and adults alike.
Mixing Yogurt
For an added flavor boost, consider mixing your yogurt with honey. This step is optional but highly recommended if you want a sweeter base for your fruit cups.
1. Flavoring Yogurt: In a bowl, combine yogurt with a tablespoon of honey (adjust according to taste) and mix until smooth. This creates a deliciously creamy layer that complements the fresh fruit.
Building the Monsters
Now that your ingredients are prepped, it’s time to start layering your Monster Fruit Cups.
1. Layering Technique: In clear plastic cups, start by adding a scoop of the yogurt mixture at the bottom. Next, layer a mix of fruits, followed by another layer of yogurt. Repeat the process until you reach the top of the cup. This not only makes the cups visually appealing but also ensures that every bite is a blend of flavors.
Creating Monster Faces
Add a playful touch by creating monster faces on top of your fruit cups.
1. Using Candy Eyes: Place candy eyes on the top layer of fruit and yogurt to give your monsters personality. You can use a piece of banana or other fruit to create a mouth, adding to the fun.
Decorative Ideas
Encourage creativity by using various candies and fruits for personalized designs.
1. Encouragement to Personalize: Allow guests (especially kids) to create their own monster faces by providing a selection of toppings. This not only makes the treat interactive but also ensures that everyone gets to enjoy their unique creation.
Serving Suggestions
When it comes to serving the Monster Fruit Cups, presentation can make all the difference.
1. Festive Display: Use Halloween-themed cups or decorate your table with spooky elements like mini pumpkins, cobwebs, or even spooky tablecloths. This enhances the overall atmosphere and makes your dessert table a focal point of the celebration.
Conclusion
In summary, the Spooky Spider Crackers and Monster Fruit Cups are perfect for bringing a festive and fun atmosphere to your Halloween celebrations. These easy and creative recipes not only cater to a variety of tastes but also allow you to engage with family and friends in the kitchen.
As you prepare these themed treats, remember the joys of creating and sharing delicious food that delights guests of all ages. Halloween is a time for fun, creativity, and togetherness, and these spooky snacks are sure to be a hit at your next gathering. So grab your ingredients, unleash your creativity, and enjoy the process of making and sharing these spooky snacks with loved ones!