Introduction
Easter is a time of joy, renewal, and celebration, marked by family gatherings, festive meals, and a plethora of delicious treats. As spring blooms and the days grow warmer, festivities often revolve around colorful decorations, egg hunts, and, of course, delectable desserts that embody the spirit of the season. Among the many treats that grace Easter tables, Mini Easter Cheesecakes stand out as a perfect choice—both for their delightful flavors and for their charming presentation.
Mini Easter Cheesecakes offer a whimsical twist on the traditional cheesecake. Their petite size makes them an ideal dessert for sharing, ensuring that guests can enjoy a sweet bite without overindulging. These mini cheesecakes are not only a feast for the taste buds but also a visual delight, often adorned with vibrant colors and festive toppings that capture the essence of Easter celebrations. Moreover, their ease of preparation makes them a go-to dessert for busy hosts looking to impress family and friends with minimal effort.
The Allure of Mini Cheesecakes
In recent years, mini desserts have surged in popularity, becoming a staple at various gatherings and events. The appeal of mini cheesecakes lies in their versatility and the joy they bring to sharing. Unlike traditional cheesecakes, which can be heavy and cumbersome, mini cheesecakes offer a lighter alternative that allows guests to sample a variety of flavors without feeling overwhelmed. This makes them especially suitable for events like Easter, where guests may already be indulging in a range of dishes.
Additionally, mini cheesecakes can be customized to suit any occasion. From fruity and floral flavors to rich chocolate and caramel variations, the possibilities are endless. Their individual portions also mean that they can be easily served at parties, buffets, and potlucks, making dessert time a hassle-free experience. The colorful presentation of these mini treats adds a festive touch to your Easter table, inviting guests to indulge in a sweet moment of joy.
Ingredients Breakdown
Creating the perfect Mini Easter Cheesecakes requires a well-thought-out selection of ingredients. Each component plays a crucial role in achieving the signature flavor and texture that make these desserts irresistible.
For the Crust
1. Graham Cracker Crumbs: The foundation of any great cheesecake crust is graham cracker crumbs. They provide a delightful crunch and a subtle sweetness that complements the creamy filling. The texture of the crumbs is essential for achieving a sturdy base that holds the cheesecake together while also adding a layer of flavor.
2. Granulated Sugar: A touch of granulated sugar is added to the crust mixture to enhance its sweetness. This sweetness balances the rich cheesecake filling, creating a harmonious flavor profile.
3. Butter: Melted butter binds the graham cracker crumbs and sugar together, ensuring that the crust sets firmly. The richness of butter adds depth to the flavor, making each bite of the cheesecake crust a satisfying experience.
For the Cheesecake Filling
1. Cream Cheese: As the primary ingredient, cream cheese provides the creamy texture and tangy flavor that distinguishes cheesecakes. It is crucial to use high-quality cream cheese, as the flavor of the filling relies heavily on this ingredient.
2. Granulated Sugar: Just like in the crust, sugar plays a pivotal role in the filling. It sweetens the cream cheese and balances the tanginess, resulting in a smooth and luscious texture.
3. Eggs: Eggs act as a binding agent, providing structure to the cheesecake. They help achieve a creamy consistency while also ensuring the cheesecake sets properly during baking.
4. Extracts: Vanilla extract is a common addition that enhances the overall flavor profile. Depending on your flavor preferences, you might also consider using almond extract or lemon zest to add a unique twist.
5. Sour Cream: Sour cream contributes to the creaminess and richness of the filling. It adds a slight tang that enhances the overall flavor, making each bite more complex and enjoyable.
6. Heavy Cream: For an ultra-smooth texture, a splash of heavy cream can be added to the filling. It creates a velvety mouthfeel that elevates the cheesecake experience.
7. Optional Food Coloring: For a festive touch, consider adding food coloring to your cheesecake filling. This can enhance the visual appeal of your mini cheesecakes, allowing you to create vibrant pastel colors that are perfect for Easter.
For the Topping
The finishing touches on your Mini Easter Cheesecakes can be as creative as you desire. Here are a few topping ideas that are sure to impress:
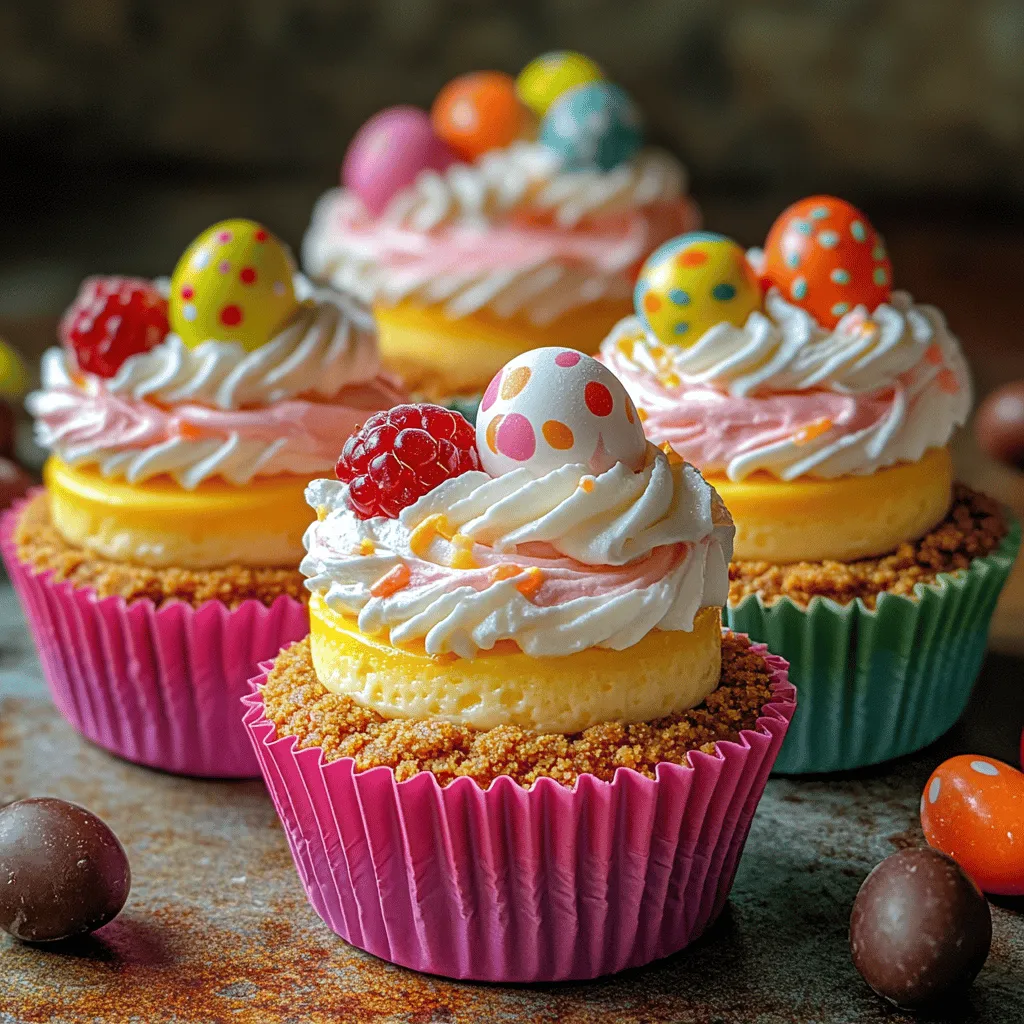
1. Whipped Cream: A dollop of freshly whipped cream adds an airy texture and sweetness, creating a delightful contrast to the dense cheesecake. You can pipe it on for a decorative touch.
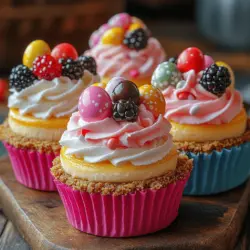
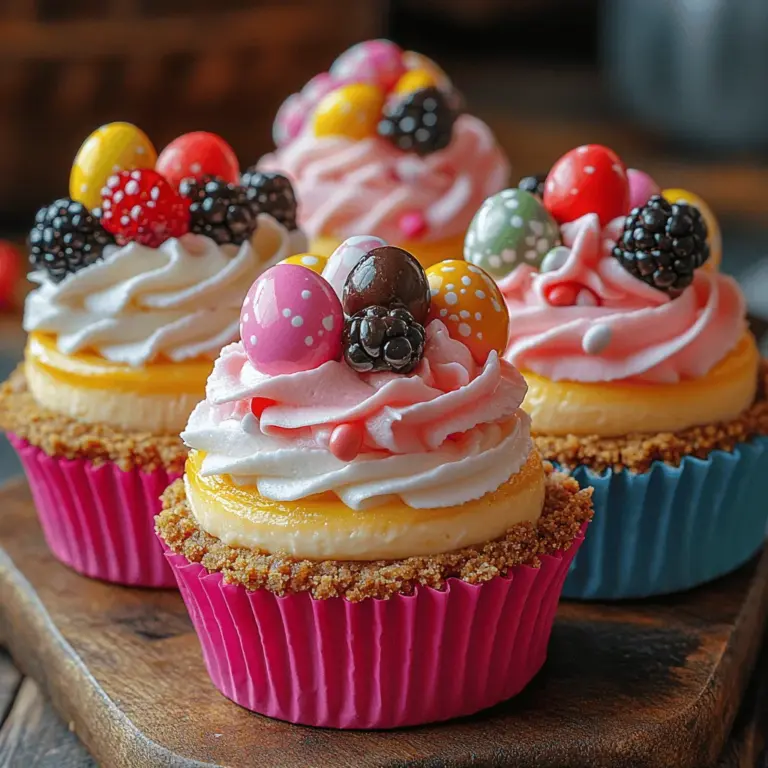
2. Chocolate Eggs: Mini chocolate eggs are a classic Easter treat and make for a whimsical topping. They not only add a burst of color but also provide a sweet crunch that complements the smooth cheesecake.
3. Fresh Berries: Fresh berries, such as strawberries, raspberries, or blueberries, add a burst of flavor and a pop of color. They introduce a refreshing element that balances the richness of the cheesecake.
Step-by-Step Instructions for Making Mini Easter Cheesecakes
Now that you have a clear understanding of the ingredients, let’s move on to the first crucial step in creating your Mini Easter Cheesecakes: preheating the oven.
Preheating the Oven
Before you dive into mixing ingredients, it’s essential to prepare your baking environment. Preheating your oven to 325°F (160°C) ensures that your cheesecakes bake evenly and set properly. This step is crucial, as a properly heated oven helps achieve that perfect creamy texture without overcooking or cracking the surface of your mini cheesecakes.
Once your oven is preheated, you can gather your ingredients and baking tools, setting the stage for a delightful baking experience filled with the sweet aromas of cheesecake.
With these initial steps complete, you’re well on your way to crafting a batch of stunning Mini Easter Cheesecakes that will be the highlight of your Easter celebration. In the following sections, we will delve into the detailed instructions to guide you through the entire cheesecake-making process, ensuring each step is clear and easy to follow. Stay tuned for a delightful journey into the world of baking these festive treats!
Importance of Proper Oven Temperature for Baking Cheesecakes
When it comes to baking cheesecakes, achieving the right texture and consistency heavily relies on maintaining a proper oven temperature. Cheesecakes are delicate desserts that require gentle heat to allow them to set evenly without cracking. For these Mini Easter Cheesecakes, it’s best to preheat your oven to 325°F (160°C). This moderate temperature ensures that the cheesecakes bake evenly while keeping them creamy and smooth.
An oven thermometer can be a handy tool to ensure your oven runs at the correct temperature, as many home ovens can vary. If your cheesecakes are cooked too quickly or at too high a temperature, they can develop cracks and a dry texture, which no one wants in a perfect cheesecake.
Making the Crust
The crust is a key component of any cheesecake, providing a delightful contrast to the creamy filling. For these Mini Easter Cheesecakes, we’ll use a simple yet flavorful graham cracker crust that perfectly complements the rich filling.
Ingredients for the Crust:
– 1 cup graham cracker crumbs
– 2 tablespoons granulated sugar
– 1/4 cup unsalted butter, melted
Instructions for Mixing and Pressing the Crust Mixture
1. Prepare the Crust Mixture: In a medium bowl, combine the graham cracker crumbs and granulated sugar. Mix until well combined. Pour in the melted butter and stir until the mixture resembles wet sand.
2. Press into Muffin Cups: Line a muffin tin with cupcake liners for easy removal. Using a tablespoon, scoop the crust mixture into each muffin cup. Press the mixture down firmly with the back of a measuring cup or your fingers to create an even layer. Make sure it reaches the edges of the liners for a uniform crust.
3. Pre-Bake the Crust: Place the muffin tin in the preheated oven and bake for 5-7 minutes, or until the crust is lightly golden. This step helps to set the crust and adds a nice crunch. Remove from the oven and let it cool while you prepare the cheesecake filling.
Preparing the Cheesecake Filling
A well-prepared cheesecake filling is the heart of any cheesecake. It should be smooth, creamy, and without lumps.
Step-by-Step Guide to Achieving a Smooth and Creamy Filling
1. Gather Ingredients: You will need:
– 16 oz (450g) cream cheese, softened
– 1/2 cup granulated sugar
– 1 teaspoon vanilla extract
– 2 large eggs
– 1/2 cup sour cream
2. Beat the Cream Cheese: In a large mixing bowl, use an electric mixer on medium speed to beat the softened cream cheese until it’s smooth and creamy, about 2-3 minutes. Scrape down the sides of the bowl to ensure all the cream cheese is evenly mixed.
3. Add Sugar and Vanilla: Gradually add the granulated sugar and vanilla extract to the cream cheese, mixing until combined.
4. Incorporate Eggs: Add the eggs, one at a time, mixing on low speed after each addition. Be careful not to overmix, as this can incorporate too much air into the batter.
5. Finish with Sour Cream: Finally, add the sour cream and mix until the filling is smooth and creamy. This will add richness and a slight tang to the cheesecake.
Coloring the Filling
To create a visually appealing dessert, consider dividing and tinting the cheesecake batter with food coloring.
Techniques for Dividing and Tinting the Batter
1. Divide the Batter: Once your filling is smooth, divide it into two or three bowls, depending on how many colors you want to use.
2. Add Food Coloring: Using gel or liquid food coloring, add a few drops to each bowl and mix until you achieve your desired color intensity. Pastel shades work beautifully for Easter-themed desserts.
3. Layering Colors: For a swirled effect, layer spoonfuls of each color in the muffin cups. Use a toothpick or skewer to gently swirl the colors together for a marbled look.
Filling the Cups
With your crust and filling ready, it’s time to fill the muffin cups.
Tips for Layering the Batter
1. Spoon the Batter: Using a small ladle or a spoon, carefully fill each muffin cup with the cheesecake mixture. Aim to fill them about 3/4 of the way full to allow room for rising.
2. Create Swirls: If you chose to tint your batter, layer spoonfuls of different colors in each cup, alternating them to create a visually appealing pattern.
3. Smooth the Top: Gently tap the muffin tin on the counter to settle the batter and remove any air bubbles. You can also smooth the tops with a spatula if needed.
Baking Process
Baking cheesecakes is a delicate process, and monitoring the baking time is essential for achieving the right texture.
1. Bake the Cheesecakes: Place the muffin tin in the preheated oven and bake for 15-20 minutes. The cheesecakes are done when the edges are set and the centers have a slight jiggle.
2. Avoid Overbaking: Overbaking can lead to a dry cheesecake, so keep an eye on them during the last few minutes of baking.
Cooling and Chilling
Cooling and chilling are crucial steps in the cheesecake-making process that cannot be overlooked.
Why Cooling and Chilling are Crucial for Flavor and Consistency
1. Cool Gradually: Once baked, turn off the oven and crack the door open. Allow the cheesecakes to cool in the oven for about 10-15 minutes. This gradual cooling helps to prevent cracking.
2. Refrigerate: Transfer the muffin tin to the refrigerator and chill for at least 4 hours, or overnight if possible. Chilling allows the flavors to meld and gives the cheesecakes a firmer texture.
Creative Presentation Ideas
Presentation plays a significant role in Easter gatherings, and your Mini Easter Cheesecakes can be dressed up beautifully.
Suggestions for Decorating and Presenting Mini Cheesecakes
1. Add Toppings: Consider topping your cheesecakes with whipped cream, colorful sprinkles, or edible flowers for a festive touch. Fresh berries or chocolate shavings can also add a delightful contrast.
2. Themed Displays: Arrange the cheesecakes on a decorative platter or cake stand. You could use pastel-colored tablecloths or Easter-themed decorations like small bunnies or eggs to enhance the festive atmosphere.
3. Individual Servings: Serve the cheesecakes in individual cups or jars for a cute, personal touch. This also makes for easy serving at potlucks or family gatherings.
Nutritional Information and Serving Suggestions
These Mini Easter Cheesecakes offer a delightful treat while still being mindful of nutrition.
Overview of Nutritional Aspects
Each mini cheesecake contains approximately:
– Calories: 180
– Fat: 10g
– Carbohydrates: 20g
– Protein: 3g
These figures can vary based on the specific brands of ingredients used and portion sizes.
Serving Size Recommendations and Pairing Suggestions
A serving size of one mini cheesecake is perfect for a sweet treat during Easter celebrations. Pair these cheesecakes with a refreshing beverage like iced tea, lemonade, or a light sparkling wine to balance the richness of the dessert.
Conclusion
Making Mini Easter Cheesecakes is not only a delightful culinary project but also a wonderful way to create lasting memories during the Easter season. This recipe can easily become a cherished tradition, bringing family and friends together for joyful celebrations.
The creativity involved in tinting the filling and decorating the cheesecakes allows for personalization, making each batch unique. Whether you’re hosting a gathering or simply sharing with loved ones, these mini cheesecakes will surely impress and satisfy. Embrace the fun of holiday baking, and watch as your Mini Easter Cheesecakes become a beloved staple in your Easter festivities.