Introduction
There’s something undeniably special about recipes passed down through generations, especially those from Grandma’s kitchen. These cherished dishes not only nourish our bodies but also fill our hearts with nostalgia, evoking fond memories of family gatherings, holiday celebrations, and home-cooked warmth. One such recipe that has stood the test of time is Grandma’s Decadent Chocolate Pie. This indulgent dessert, with its rich, creamy filling and flaky crust, is the epitome of comfort food, bringing smiles to faces with every bite.
Chocolate pie has a way of making any occasion feel special. Whether it’s a birthday dinner or a simple Sunday meal, this pie has a unique ability to transform the mundane into something extraordinary. Its luxurious chocolate filling, complemented by a perfectly baked crust, creates a harmonious blend of textures and flavors that is hard to resist. The sweetness of the chocolate, combined with the lightness of the whipped cream topping, makes for a dessert that is both satisfying and memorable.
Homemade desserts, like Grandma’s chocolate pie, are an essential part of creating family memories. They are often the highlight of gatherings, bringing family members together, sharing stories, and creating traditions that can last a lifetime. This pie not only serves as a delicious treat but also as a symbol of love and care, crafted with attention and passion. So, let’s embark on this culinary journey to recreate Grandma’s Decadent Chocolate Pie, bringing a taste of nostalgia to our tables once more.
Understanding the Components of Chocolate Pie
To master Grandma’s Decadent Chocolate Pie, it’s essential to understand its key components. This pie is traditionally made up of three primary parts: the classic pie crust, the luscious chocolate filling, and the delightful toppings that elevate its presentation and flavor.
Classic Pie Crust
The foundation of any great pie is its crust. A classic pie crust is made from a simple mix of flour, butter, salt, and ice water. The role of each ingredient is crucial to achieving the perfect texture. Flour provides the structure, while butter adds richness and flakiness. Salt enhances the flavor, balancing the sweetness of the filling, and ice water is used to bring the dough together without melting the butter, which is vital for that desired flaky texture.
Chocolate Filling
The chocolate filling is where the magic truly happens. This part of the pie is crafted from high-quality ingredients that enhance its rich and creamy profile. Key ingredients typically include cocoa powder or melted chocolate, sugar, milk, eggs, and cornstarch. The chocolate delivers a deep flavor, the sugar adds sweetness, and the milk contributes to the creaminess. Eggs serve as a binding agent, giving the filling its silky smooth consistency, while cornstarch helps thicken the mixture, ensuring it sets perfectly.
Toppings
Toppings play a significant role in the overall experience of a chocolate pie. While some may prefer a simple dollop of whipped cream, others might opt for a more elaborate presentation with chocolate shavings, fresh berries, or a drizzle of chocolate sauce. These additions not only enhance the visual appeal of the pie but also complement the rich chocolate flavor, creating a balanced dessert that delights the palate.
Crafting the Perfect Pie Crust
Ingredients for the Pie Crust
To begin our adventure in pie-making, we must first prepare the pie crust. Here’s a list of the essential ingredients needed:
– 1 ¼ cups all-purpose flour: This will form the base of your crust.
– ½ cup unsalted butter: Cold and cubed, this will provide the flakiness and richness.
– 1/4 teaspoon salt: Balances the sweetness of the filling.
– 3-4 tablespoons ice water: Helps bind the ingredients without melting the butter.
Step-by-Step Instructions on Preparing the Pie Crust
Mixing Dry Ingredients
Start by gathering a large mixing bowl and adding the flour and salt. Use a whisk to combine these dry ingredients thoroughly. This step is crucial as it ensures that the salt is evenly distributed throughout the flour, which will enhance the flavor of the crust.
Incorporating Butter for Texture
Next, it’s time to incorporate the cold, cubed butter into the flour mixture. Using a pastry cutter or your fingertips, gently cut the butter into the flour until the mixture resembles coarse crumbs. Be careful not to overwork the dough; you want to maintain visible pieces of butter throughout the mixture. These pieces will create the flaky layers in your crust as it bakes.
The Significance of Ice Water
Once the flour and butter are combined, it’s time to gradually add the ice water. Start with three tablespoons and mix gently with a fork until the dough starts to come together. If it seems too dry and crumbly, add an additional tablespoon of ice water. The goal is to achieve a dough that holds together without being sticky.
Tips for Achieving the Right Consistency and Texture
Achieving the perfect consistency for your pie crust is key to a successful pie. Here are some tips to keep in mind:
– Keep Ingredients Cold: Using cold butter and ice water is crucial for a flaky crust. The cold temperature prevents the butter from melting before baking, allowing it to create steam and lift the layers.
– Don’t Overwork the Dough: Mix the ingredients just until they come together. Overworking it can lead to a tough crust, which is not what you want for a decadent pie.
– Chill the Dough: After forming the dough into a disc, wrap it in plastic wrap and refrigerate for at least 30 minutes. This helps relax the gluten, making it easier to roll out.
Rolling Out the Dough for Success
Importance of Proper Surface Preparation
Once the dough has chilled, it’s time to roll it out. Begin by preparing your work surface. Lightly flour your countertop or a large cutting board to prevent sticking. This step is essential as it ensures that the dough can be easily rolled without tearing.
Techniques for Rolling Out Dough Evenly
Using a rolling pin, gently roll the dough from the center outward, turning it a quarter turn every few rolls to maintain a circular shape. Be sure to apply even pressure, and if the dough starts to stick, sprinkle a little more flour on the surface or the top of the dough. Aim for a thickness of about 1/8 inch, which is ideal for a pie crust.
Guidance on Fitting the Dough into the Pie Pan
Once your dough is rolled out, carefully transfer it to your pie pan. You can do this by rolling the dough around the rolling pin and then unrolling it over the pan. Gently press the dough into the pan without stretching it, which can cause it to shrink during baking. Trim any excess dough hanging over the edges, leaving about an inch to create a decorative edge.
Blind Baking: Ensuring a Flaky Crust
Explanation of the Blind Baking Process
Blind baking is a crucial step in making a perfect pie crust, especially for chocolate pie, which has a creamy filling that requires minimal baking time. This technique involves pre-baking the crust to prevent it from becoming soggy once the filling is added.
Importance of Using Parchment Paper and Weights
To blind bake your crust, first, preheat your oven to 375°F (190°C). Line the crust with parchment paper, ensuring it covers the edges. This paper acts as a barrier that prevents the crust from puffing up during baking. Next, fill the parchment with pie weights or dried beans to weigh it down. This ensures the crust holds its shape and bakes evenly.
Signs of a Perfectly Baked Crust
Bake the crust for about 15-20 minutes, or until the edges are lightly golden. Once the timer goes off, carefully remove the parchment and weights, then return the crust to the oven for an additional 5-10 minutes. The crust should be golden brown and fully cooked. Allow it to cool completely before adding the chocolate filling.
With the pie crust perfectly prepared, we are now ready to embark on the next step of creating the rich chocolate filling that will make Grandma’s Decadent Chocolate Pie a true showstopper.
Stay tuned for the next part, where we’ll dive into crafting the luscious chocolate filling that is the heart of this beloved dessert.
{{image_1}}
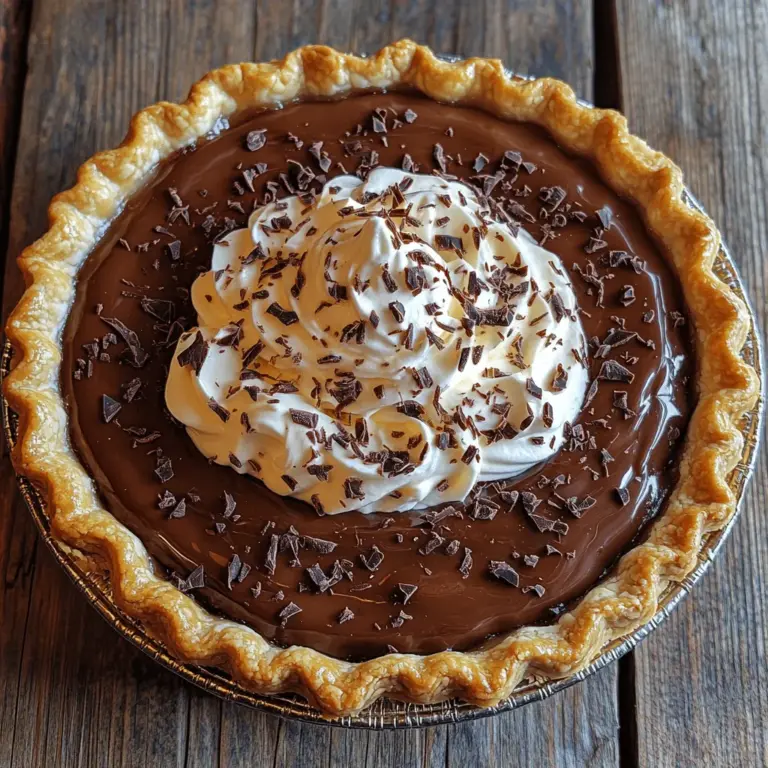
Ingredients Breakdown for the Chocolate Filling
To create the rich and indulgent filling for Grandma’s Decadent Chocolate Pie, you will need the following ingredients:
– Granulated Sugar: This is essential for sweetness and helps balance the richness of the chocolate.
– Unsweetened Cocoa Powder: Use a high-quality cocoa powder for the best flavor.
– All-Purpose Flour: This will help thicken the filling and give it the right consistency.
– Salt: A small amount enhances the overall flavor and brings out the chocolate.
– Milk: Whole milk is preferred for a creamy texture, but you can use a milk substitute if needed.
– Butter: Unsalted butter adds richness and depth to the filling.
– Egg Yolks: These will help thicken the filling and add a velvety texture.
– Vanilla Extract: Pure vanilla extract adds a warm, aromatic note that complements the chocolate beautifully.
Each ingredient plays a crucial role in achieving that decadent, smooth filling that makes this pie irresistible.
Step-by-Step Guide on Preparing the Filling
Combining Dry Ingredients
1. Mix the Dry Ingredients: In a medium-sized mixing bowl, combine 1 cup of granulated sugar, 1/3 cup of unsweetened cocoa powder, 1/4 cup of all-purpose flour, and a pinch of salt. Whisk these ingredients together until they are well-blended and free of lumps. This step ensures that the cocoa powder and flour are evenly distributed throughout the filling.
The Thickening Process Explained
2. Heat the Milk and Butter: In a saucepan over medium heat, combine 2 cups of whole milk and 4 tablespoons of unsalted butter. Stir occasionally until the butter melts and the mixture is hot but not boiling. Monitoring the temperature is crucial; you want to avoid curdling the milk.
3. Incorporate the Dry Mix: Gradually add the dry mixture to the hot milk and butter, whisking continuously. This will help prevent any lumps from forming. Keep stirring until the mixture thickens, which should take about 5 to 7 minutes. You’ll know it’s ready when it coats the back of a spoon.
The Technique of Tempering Egg Yolks
4. Temper the Egg Yolks: In a separate bowl, whisk together 4 large egg yolks until they are smooth. To temper the yolks, slowly add about 1 cup of the hot chocolate mixture to the yolks while whisking constantly. This step gradually raises the temperature of the yolks without cooking them.
5. Combine the Mixtures: Once the egg yolks are tempered, pour them back into the saucepan with the remaining chocolate mixture. Return the saucepan to low heat and cook while stirring continuously for about 2 to 3 minutes. This ensures that the filling thickens properly and prevents the eggs from scrambling.
Importance of Continuous Stirring and Temperature Control
6. Final Cooking: Keep the mixture on low heat, stirring continuously until it becomes thick and glossy. This process is crucial for achieving that luxurious texture. Once it reaches the desired consistency, remove it from the heat and stir in 1 teaspoon of pure vanilla extract for added flavor.
Assembling the Decadent Chocolate Pie
Instructions on Pouring and Smoothing the Filling into the Crust
7. Prepare the Pie Crust: Ensure your pre-baked pie crust (homemade or store-bought) is cooled completely. Pour the thickened chocolate filling into the crust, using a spatula to smooth the top. This step is key to achieving an even surface, which will enhance the pie’s presentation.
Importance of Cooling and Setting Time
8. Cooling: Allow the pie to cool at room temperature for about 30 minutes. This will help it set slightly before refrigerating. Once it has cooled, cover it with plastic wrap and place it in the refrigerator.
Suggestions on How to Ensure the Pie Sets Properly
9. Setting Time: For the best results, let the pie chill in the refrigerator for at least 4 hours, or overnight if possible. This allows the filling to firm up and create the ideal sliceable texture. If you’re in a hurry, placing it in the freezer for an hour can help expedite the setting process, but be cautious not to freeze it completely.
Finishing Touches: Toppings that Elevate the Pie
Options for Homemade vs. Store-Bought Whipped Cream
10. Choose Your Topping: While store-bought whipped cream is convenient, making homemade whipped cream is simple and adds a touch of elegance. To prepare, beat 1 cup of heavy cream with 2 tablespoons of powdered sugar and 1 teaspoon of vanilla extract until soft peaks form. This fresh cream complements the rich chocolate filling perfectly.
Discussion on the Addition of Chocolate Shavings for Presentation
11. Garnish with Chocolate Shavings: For an added touch of sophistication, consider decorating the top of your pie with chocolate shavings. Use a vegetable peeler on a bar of chocolate to create delicate curls, and sprinkle them generously over the whipped cream for a beautiful finish.
Creative Ideas for Variations in Toppings
12. Explore Topping Variations: If you’re feeling adventurous, add a sprinkle of sea salt for contrast or a drizzle of caramel sauce for a decadent flair. Fresh berries such as raspberries or strawberries can also add a pop of color and a refreshing taste that balances the richness of the chocolate.
Serving Suggestions and Pairings
Ideal Occasions for Serving Grandma’s Chocolate Pie
13. Perfect for Any Occasion: Grandma’s Decadent Chocolate Pie is ideal for family gatherings, holiday celebrations, or simply as a comforting treat after dinner. Its rich flavor makes it a standout dessert that can be the centerpiece of any meal.
Suggested Drink Pairings that Complement the Dessert
14. Beverage Pairings: Pair this luscious pie with a glass of milk, a rich coffee, or even a dessert wine such as Port or a sweet Merlot. The beverage you choose can enhance the pie’s chocolate notes and create a well-rounded dessert experience.
Serving Size Considerations and Presentation Tips
15. Serving Size: This pie is rich, so consider serving smaller slices—about 1/8 of the pie per serving is usually sufficient. To present, serve each slice on a dessert plate and garnish with a dollop of whipped cream and a few chocolate shavings for an impressive look.
The Nostalgic Experience of Enjoying Chocolate Pie
Reflection on the Emotional Connection to Family Recipes
16. Connecting Through Food: There’s something magical about recipes passed down through generations. Grandma’s Decadent Chocolate Pie isn’t just a dessert; it’s a vessel for memories. Each bite can transport you back to her kitchen, filled with laughter, warmth, and the sweet aroma of chocolate.
How This Pie Brings Back Memories of Grandma’s Kitchen
17. Creating New Memories: As you prepare and share this pie, you’ll find yourself reminiscing about the times spent with loved ones, whether it was during holidays, birthdays, or quiet afternoons. The experience of making this pie can evoke the essence of family, love, and tradition.
Encouragement to Share the Pie with Loved Ones for New Memories
18. Share the Joy: Don’t keep this delightful dessert to yourself! Encourage family and friends to gather around the table and share in the experience. Each slice can spark conversations, laughter, and the creation of new memories that will last a lifetime.
Conclusion
In summary, making Grandma’s Decadent Chocolate Pie is not just about the ingredients or the steps; it’s about the joy and satisfaction that come from creating something special. This pie embodies the essence of family traditions, bringing people together around the table to appreciate the love and labor that goes into every slice.
Keeping culinary traditions alive is important, as they connect us to our past while allowing us to create new memories. Whether you are celebrating a special occasion or enjoying a quiet evening at home, try this recipe, and share it with your loved ones. In doing so, you will not only savor the deliciousness of the pie but also foster connections that can last for generations.
