
Understanding the Joy of Crispy Cheesy Arancini Rice Balls
Crispy cheesy arancini rice balls are a delightful culinary creation that celebrates the art of transforming leftover risotto into a golden, crunchy snack. Originating from Italy, these savory bites are not only a delicious treat but also embody a rich tradition of resourcefulness in cooking. In this article, we will delve into the history of arancini, explore the essential ingredients that make them so mouthwatering, and guide you through the step-by-step process of preparing these irresistible rice balls. Whether you are an experienced chef or a home cook eager to impress your loved ones, our comprehensive guide will equip you with the knowledge and confidence needed to create the ultimate crispy cheesy arancini rice balls.
The History of Arancini
Culinary Origins of Arancini
The story of arancini dates back to the 10th century when the Arabs invaded Sicily, introducing a variety of culinary techniques and ingredients that would greatly influence Sicilian cuisine. Initially, arancini were a dish called “arancine,” named after the Italian word for orange, “arancia,” because of their round shape and golden color resembling oranges. Traditionally, these rice balls were filled with ragù, peas, and mozzarella, encased in a coating of breadcrumbs, and deep-fried to perfection.
Over the years, arancini evolved into a beloved street food, showcasing the creativity of local cooks who began experimenting with various fillings and flavors. The dish has regional variations across Italy, with some areas favoring a saffron-infused risotto, while others embrace different ingredients such as mushrooms, spinach, or even seafood.
Cultural Significance and Modern-Day Popularity
Arancini have transcended their humble origins to become a symbol of Italian culinary tradition. They are often served at family gatherings, celebrations, and festivals, reflecting the communal nature of Italian dining. In recent years, arancini have gained popularity beyond the borders of Italy, finding their way onto menus in restaurants and cafes worldwide. Food enthusiasts and home cooks alike have embraced the challenge of making these crispy delights, turning them into an iconic dish beloved by many.
With their savory filling and crunchy exterior, arancini have solidified their status as the ultimate comfort food. Whether enjoyed as an appetizer, a snack, or a main course, these rice balls have become a staple in Italian cuisine and are a must-try for anyone looking to indulge in a delicious culinary experience.
Understanding the Ingredients
Key Ingredients for Crispy Cheesy Arancini
Creating the perfect crispy cheesy arancini rice balls requires attention to detail, particularly when it comes to selecting the right ingredients. Each component plays a crucial role in achieving the desired flavor, texture, and overall success of the dish.
– Cooked Risotto: The Foundation of Flavor
The star of the arancini is undeniably the risotto. Using leftover risotto is not only a practical way to minimize food waste, but it also provides the ideal texture needed for forming the rice balls. The creamy consistency of well-prepared risotto, infused with flavors from broth, herbs, and cheese, serves as a flavorful base for the arancini. If you don’t have leftover risotto on hand, you can easily make a fresh batch using arborio rice, which is essential for getting that creamy, al dente texture that is characteristic of risotto.
When preparing your risotto, it’s important to allow it to cool completely before shaping it into balls. This cooling period allows the rice to firm up, making it easier to handle and shape without falling apart during frying.
– Mozzarella and Parmesan: The Cheesy Heart
No arancini is complete without a generous helping of cheese, and the combination of mozzarella and Parmesan is what makes them truly irresistible. Mozzarella adds a gooey, melty texture that stretches beautifully when you take a bite, while Parmesan contributes a nutty, salty flavor that enhances the overall taste profile.
Choosing the right type of mozzarella is crucial; fresh mozzarella balls or low-moisture mozzarella work well for this recipe. The cheese should be cut into small cubes, allowing for a delightful surprise of melted goodness with each bite.
– Coating and Frying Essentials
To achieve that coveted crispy exterior, you’ll need a few essential ingredients for the coating: all-purpose flour, eggs, and breadcrumbs. The flour acts as a base layer that helps the egg adhere to the rice balls, while the egg provides moisture and helps bind everything together.
Breadcrumbs are the final touch that creates that satisfying crunch. For the best results, consider using panko breadcrumbs, which are lighter and flakier than traditional breadcrumbs, resulting in an extra-crispy finish.
Frying is the method of choice for cooking arancini, as it allows for even browning and a satisfying crunch. The oil temperature is critical; too low, and the arancini will absorb excess oil, leading to a greasy outcome, while too high can burn the outside before the inside is heated through.
Step-by-Step Instructions
Preparing the Risotto
Before we dive into the process of shaping and frying our arancini, let’s start with the risotto. If you have leftover risotto, you’re already on your way to creating these delicious rice balls. However, if you need to make a fresh batch, follow these steps:
1. Ingredients for Risotto:
– 1 cup arborio rice
– 4 cups chicken or vegetable broth
– 1 small onion, finely chopped
– 2 tablespoons olive oil
– 1/2 cup dry white wine (optional)
– Salt and pepper to taste
– 1/2 cup grated Parmesan cheese
– Fresh herbs (such as parsley or basil) for added flavor
2. Cooking the Risotto:
– In a saucepan, heat the broth over low heat and keep it warm throughout the cooking process.
– In a separate large skillet or pot, heat the olive oil over medium heat. Add the chopped onion and sauté until translucent, about 5 minutes.
– Stir in the arborio rice and cook for 2-3 minutes until the rice is lightly toasted and coated in oil.
– If using, pour in the white wine, stirring constantly until it is absorbed by the rice. This step adds depth to the flavor.
– Begin adding the warm broth to the rice, one ladle at a time, stirring frequently. Allow the rice to absorb the liquid before adding more. Continue this process until the rice is creamy and al dente, which should take about 18-20 minutes.
– Once the risotto is cooked, remove it from the heat, stir in the grated Parmesan cheese, and season with salt and pepper to taste.
– Spread the risotto onto a baking sheet or shallow dish to cool. Once it reaches room temperature, cover it and refrigerate for at least 1 hour, or until completely chilled. This cooling period is essential for shaping the rice balls.
By preparing a flavorful risotto as the base for your arancini, you’re setting the stage for a delicious snack that will impress anyone lucky enough to taste them. In the next section, we will cover how to shape and fry your crispy cheesy arancini rice balls, ensuring they achieve that perfect golden crust and delicious cheesy center. Stay tuned for more mouthwatering details!
Forming the Rice Balls
Once your risotto mixture has cooled to a manageable temperature, it’s time to form the rice balls. Start by preparing a clean work surface and keeping a small bowl of water nearby. This will help prevent the risotto from sticking to your hands as you work.
Begin by taking a generous handful of the risotto mixture—about 2-3 tablespoons—into your palm. Gently flatten it out into a disc shape. Next, place a cube of mozzarella cheese in the center of the disc. Enclose the cheese by folding the edges of the rice over it, rolling the mixture into a ball shape. Be sure to compress it firmly, ensuring that the risotto completely encases the cheese to create that gooey center once cooked. Repeat this process until all the risotto is used, placing the formed balls on a plate or tray lined with parchment paper.
Setting Up the Breading Station
A well-organized breading station is essential for achieving that perfectly crispy exterior on your arancini. For this, you will need three shallow bowls. In the first bowl, place about 1 cup of all-purpose flour; in the second, beat 2-3 large eggs with a tablespoon of water to create an egg wash; and in the third, add 1-2 cups of breadcrumbs. You can use traditional Italian-style breadcrumbs for a coarser texture or panko breadcrumbs for extra crunch.
To coat the rice balls, first, roll each ball in the flour, shaking off any excess. This initial layer helps the egg wash adhere better. Next, dip the floured ball into the egg wash, allowing any excess to drip off. Finally, roll the ball in the breadcrumbs until fully coated. Ensure each ball is well-covered, as this will contribute significantly to the final crunchiness of the arancini. Once breaded, place the rice balls back on the parchment-lined tray.
Heating the Oil for Frying
The frying process is crucial for achieving perfectly crispy arancini. The ideal oil temperature for frying is around 350°F (175°C). To ensure your oil reaches the correct temperature, use a deep-frying thermometer. If you don’t have one, you can test the temperature by dropping a small piece of bread into the oil—if it sizzles and turns golden brown in about 60 seconds, the oil is ready.
Choose a heavy-bottomed pot or a deep fryer for frying. Fill it with enough oil to submerge the rice balls completely, ensuring they fry evenly. Avoid overcrowding the pot as this can lower the oil temperature, leading to greasy, soggy arancini. Fry in batches, allowing enough space between each ball for proper cooking.
Frying to Perfection
Carefully lower the breaded rice balls into the hot oil using a slotted spoon or a spider strainer. Fry them for about 3-4 minutes, turning occasionally to ensure even browning. The goal is a beautiful, golden-brown crust that is crisp on the outside while the inside remains soft and gooey with melted mozzarella.
Once the arancini are fried to perfection, use a slotted spoon to remove them from the oil, placing them on a plate lined with paper towels to absorb any excess oil. This step is crucial, as it helps maintain the crispiness of the outer layer without becoming greasy. Allow the arancini to cool slightly before serving.
Serving Suggestions
Presentation Tips for Serving Arancini
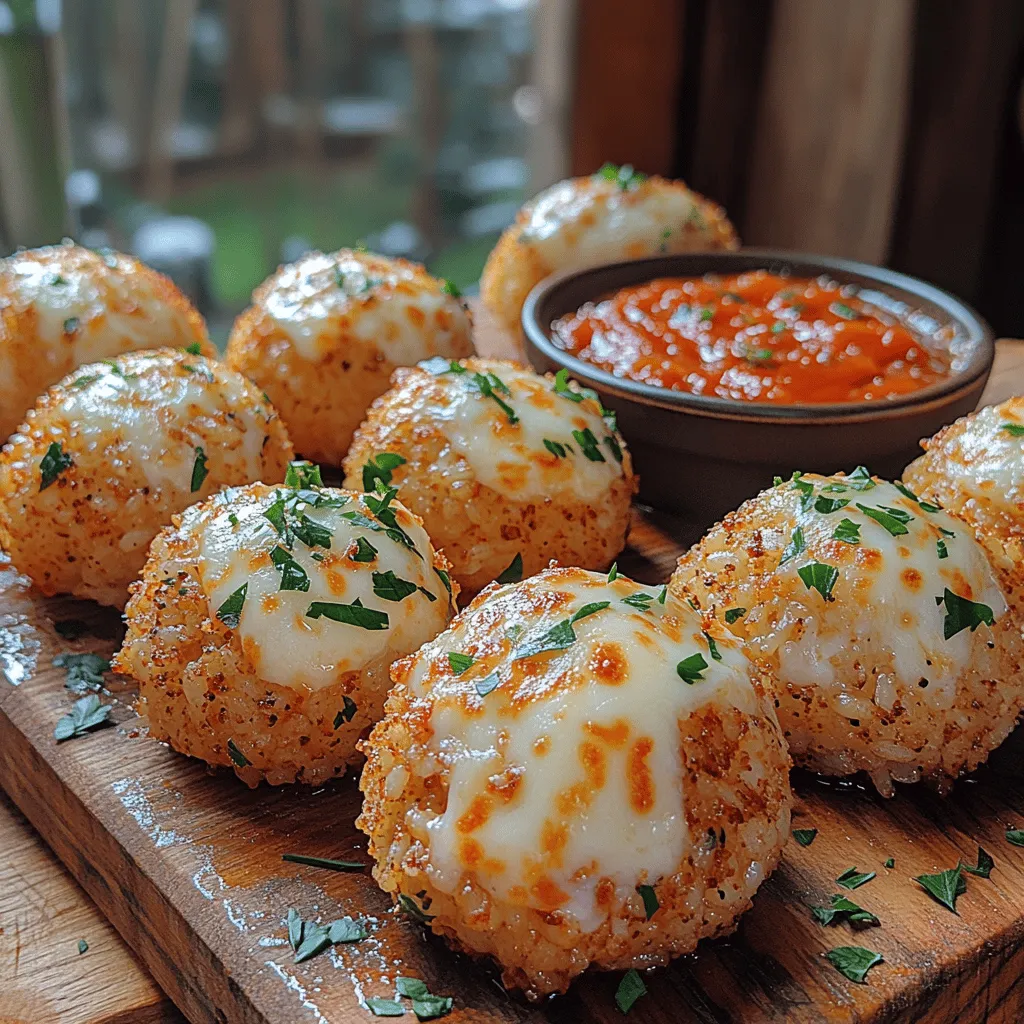
When it comes to presenting your crispy cheesy arancini, a little creativity goes a long way. Arrange the rice balls on a large serving platter or individual plates. For a touch of elegance, garnish with freshly chopped parsley or basil leaves. A sprinkle of grated Parmesan cheese can also elevate the presentation, adding a nice visual appeal.
Consider serving the arancini with a small bowl of marinara sauce in the center of the platter for dipping. This not only adds color to your presentation but also enhances the flavor experience. You can also include lemon wedges on the side, as a squeeze of fresh lemon juice can brighten the flavors of the dish.
Best Accompaniments for Arancini
Arancini pairs wonderfully with a variety of accompaniments. Classic marinara sauce is a must-have dipping option, offering a sweet and tangy contrast to the richness of the cheese. Additionally, consider providing a spicy arrabbiata sauce or a creamy garlic aioli for a different flavor profile.
For a complete meal, serve arancini alongside a fresh arugula salad dressed with lemon vinaigrette. The peppery salad balances the richness of the fried rice balls, creating a well-rounded dining experience. Other delicious sides include roasted vegetables, sautéed greens, or a light pasta dish tossed with olive oil and herbs.
Nutritional Information
Nutritional Breakdown of Arancini
When it comes to enjoying arancini, it’s helpful to know what you’re consuming. On average, one arancini ball contains approximately 120-150 calories, depending on the size and specific ingredients used. The nutritional breakdown per serving (about 3-4 balls) is as follows:
– Calories: 360-450
– Protein: 10-15 grams
– Fat: 20-25 grams
– Carbohydrates: 40-50 grams
– Fiber: 2-3 grams
These values can vary, so it’s always best to calculate based on the specific ingredients and quantities you use.
Healthier Variations and Modifications
For those looking to make healthier variations of arancini, several modifications can be made while still preserving the dish’s essential flavors.
1. Baked Arancini: Instead of frying, you can bake the rice balls. Preheat your oven to 400°F (200°C). Arrange the breaded arancini on a baking sheet lined with parchment paper and lightly spray them with cooking oil. Bake for about 20-25 minutes, or until golden brown and crispy.
2. Gluten-Free Options: To cater to gluten sensitivities, substitute regular breadcrumbs with gluten-free breadcrumbs. Additionally, ensure that the risotto itself is made with gluten-free broth.
3. Healthier Fillings: Instead of mozzarella, consider using low-fat cheese options or even a vegetable filling, like spinach and ricotta, for a lighter take.
4. Whole Grain Rice: Use brown rice or a whole grain risotto for added fiber and nutrients, making the dish a bit more wholesome.
By making these adjustments, you can enjoy the deliciousness of arancini while adhering to dietary preferences or restrictions.
Conclusion
Creating crispy cheesy arancini rice balls is not only a culinary adventure but also a rewarding experience that brings a taste of Italy to your kitchen. The process of transforming simple ingredients such as rice, cheese, and breadcrumbs into a delightful dish is a testament to the joy of home cooking. These arancini are perfect for gatherings, as appetizers, or even as a main dish paired with fresh salad and dipping sauces.
Embrace the cooking process as an opportunity to connect with Italian culinary traditions and make memorable moments around the dining table. Whether served at a festive gathering or a cozy family dinner, these arancini are sure to impress and delight anyone who tries them. So gather your ingredients, follow the steps, and enjoy the satisfaction of crafting this delicious dish from scratch.
